CurtPalme.com Home Theater sales, calibration, service, and discussion forum. Hundreds of free manuals & setup tips.


Sign up and receive the latest newsletters by email!     Join the Forum discussions!    
    Site Map  
Home Products
For Sale
Referral
List
Photo
Gallery
Links Contact
Us
CRT Primer
Troubleshooting Tips
Mounting Methods
Definitive CRT
Projector Setup Guide
Tube/Raster Setup
Tube Condition (Wear)
Advanced Procedures
Projector
Specifications
Projector Rankings
Video Processors
Ampro 1500/2000
Ampro 2300/2600
Ampro 3600/4600
Barco (Older Analog)
Barco 70x/Cine7  
Barco 808/Cine8
Barco 120x/Cine9
Dwin 500/700
Electrohome ECP 
Electrohome Marquee 
Mitsubishi
NEC PG
NEC XG
Panasonic 108x
Runco
Seleco
Sony 10xx
Sony 125x/127x
Sony 1292
Sony D50
Sony G70
Sony G90
Zenith 841/851
Zenith 895/900
Zenith 1200


Barco 500/800/801  

      >> Introduction 
      >> Layout and Setup Tips 
      >> Manuals / Downloads 


Layout and Setup Tips

 (Page 2)

Page: 1 2 3 4 5 6 7 8 9 10 11 12 13
 

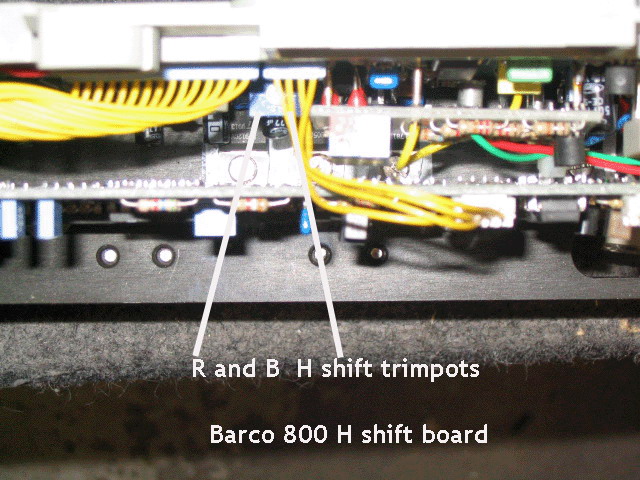
Horizontal Shift Board

As seen below, the H shift board has two sets of adjustments on it. The large yellow coils are the H width/linearity coils. According to the manual, all three coils should be in the full in (CW) position, then you start turning out (CCW) the coils to the colors that are narrowest to match the width of each CRT tube to the widest one. That way, one coil should always be in the full CW position.

You MUST use a non metallic screwdriver to adjust these coils. Due to the current present in these coils when on, a metallic screwdriver will inductively couple to the coil and get red hot as a result. Can’t find a plastic flat head screwdriver at the local TV supply store? File down a chopstick, that works well..:) (Note from webmaster: They're also available in a little $5 plastic screwdriver kit from Radio Shack. Ask for the "TV Tuning Kit"). Normally these coils don’t need adjusting, but there are those of you that must tweak……

The above adjustments are far more important. These two trimpots are multi-turn pots that shift the red and blue rasters left and right on the tube face. While you also use the lens/tube toe-in on the tubes (see the manual for this procedure), if the test pattern and raster isn’t centered on the tube face, you’ll never get the toe-in right.

These two trimpots are multiturn pots, so one turn moves the raster of the red or blue tubes a bit. Again, use a plastic screwdriver here, but if you must use a metal small screwdriver, tape up the shaft so that you don’t short anything out if the screwdriver slips.


... Previous Page

Next Page ...


© Copyright CurtPalme.com. All Rights Reserved.