 |
||||||||||||
| Home |
|
Products For Sale |
FAQs, Tips, Manuals |
Referral List |
|
Photo Gallery |
|
Links |
|
Contact Us |
|
|
||||||||||||||||||
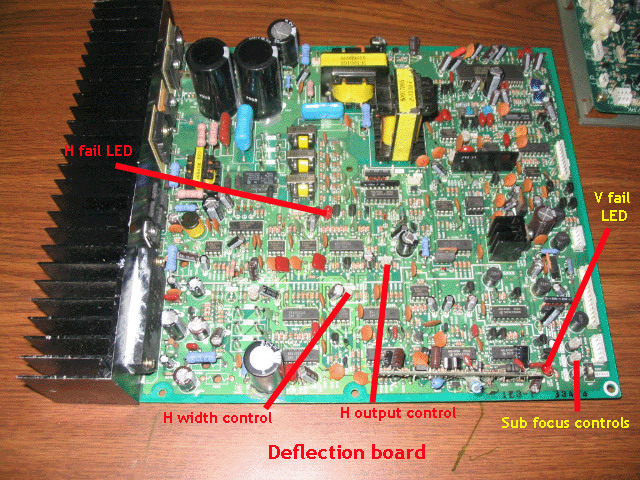
Deflection board OK, here’s a board that has some controls to play with! This is the H and V deflection boards. The set has LED fault indicators if the horizontal or vertical deflection fails. At turn on, these lights may flash momentarily, but both should go off as the set turns on. If one LED stays on, there’s a good chance that this board is defective.
The sub focus controls adjust the focus control range that are found in the onscreen menus. I use these controls to optimize the focus adjustments in the menus. Set all master focus controls in the menus to the 0 position, then use the controls on these boards to set for the best focus in the middle of the image. Now you have full control of over and under-focusing via the remote. (Note of course that the physical position of the focus yokes on each CRT will also affect the electronic focusing settings.) H width control- you can CAREFULLY adjust this control to widen out the raster of the NEC projectors. It’s a good idea to slowly rotate this control while the set is off. If this control is corroded or noisy, it’s possible to blow the deflection board while rotating this control while the set is on. Rotating the control CCW will increase the image width, rotating in a CW direction will shrink the image. Be careful not to overshoot the edges of the tubes as per any CRT installation. The H output control adjusts the drive to the horizontal output section. Do not adjust this control, the proper drive setting is crucial for proper set operation. Not shown in the above image are the red/blue and brown/yellow yoke wires. The yellow/brown wires are the vertical deflection leads, the red/blue are the H deflection wires. If you’re changing from floor to ceiling mount or vice versa, pull out each of these pairs of wires and rotate them 180 degrees. Don’t forget to also swap over the 6 sets of wires on the convergence board. There are two LED’s on the deflection board. If there Is a failure in the V
deflection circuits, the V light will light up continuously after the set is on.
The same goes for the H deflection light. The set will then usually shut off and
indicate an error fault on the back LED display.
|
|
|||||||||||||||||
 NEC PG Series
© Copyright CurtPalme.com. All Rights Reserved. |