|
As this forum is rarely used anymore, we've locked it. Feel free to browse and read. Questions? Please reach out to us directly. Cheers! |
|
|
 |
|
|
| Author |
Message |
ptkctc

Joined: 01 Nov 2013
Posts: 44
|
| Posted: Fri Nov 08, 2013 2:10 am Post subject: Found an older Hitach Ultravision 60UX58B! |
|
|
Hello again, I just went and picked up an older Hitachi 60" rptv as ewaste, which will not come on. All that happens is the red light on the front panel will light up for a second when plugged up, but then fades away and then acts its as if dead until unplugged and repeated again.
After searching around, I found that the common issue is a blown pico fuse and a small blue cap that burns up on this set. I found the cap and its split open and blown apart (one of those flat ones that looks like a small watch battery with a terminal soldered to each side, and coated with a blue epoxy).
Wasn't sure if anybody here had experience with this set, if anybody is and can tell me off the top of their heads what the caps specs are, I would appreciate it (I have a BUNCH of them handy, but I have no reference as to what the blown one was). All the pico fuses are good according to my meter.
Its the very top google search result when googling this model plus "red light goes out", its apparently a very common fault on this set. The pic everybody takes of this cap that goes bad is exactly the one thats bad on my board, thats why this was so simple to figure out initially....
I haven't done anything but bring it in and pull the back panels off it (the mirror box had to come off for it to clear the doorway). I was surprised to see a real glass mirror (the mirror box prob weighs 25 lbs or more with it lol), and multiple auto-convergence sensors or something around the inside of the screen.
Ill get down and do the searching myself if nobody knows, I figured Id ask first just to see if it was common enough that somebody remembers it off the top of their heads. Nobody has ever been into this set, there was staples I had to pull to get the service panel off the back. The previous owner confirmed the same. It just quit working on him, and he went and threw down $4000 for a big flat panel tv and sent the hitachi my way.
|
|
| Back to top |
|
 |
ptkctc
Joined: 01 Nov 2013
Posts: 44
|
| Posted: Fri Nov 08, 2013 9:45 am Post subject: |
|
|

I got it going, the capacitor was a "100k 2kv", and there was also a 2a pico fuse that was open. I used a long-lead buss-type fuse socket to replace and relocate it up higher off the board with a user-changeable 2a fuse.
After turning it on, I looked into the green tube and thought it looked pretty dirty; I pulled and cleaned all the lenses but the green has the hazy, cloudy crap in the fluid and stuck to the glass so I have a little more to do before I am done 
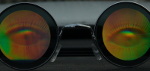
I did notice that this set has colored lenses or fluid, even before I got it working because you could look into the lenses and see color without them being on. I hope its the lenses, because this procedure is intimidating enough for me w/o adding having to color the glycol.
I read somewhere that some people refill with mineral spirits or mineral oil (forgot which one it was) after cleaning up a contaminated tube, but I am planning on doing it right and going back with purpose-specific crt fluid. No leaks so far, and theres still just a tiny, inch long air bubble at the top of each tube with them cool.
I guess I got a nice old school set for free (well after a few hours work), now once I get the fluid goop out of the green tube, I think the hitachi "magic focus" auto-convergence will work better. It adjustments are sub-standard to what I consider to be converged at this point, and I didn't see any manual user-adjustable convergence settings in the menu either. I figure where the convergence uses a bunch of sensors to work and where the green tube is so blurry, its not converging as precisely as it should.
Oh well, on to waiting for the next call to pick up a set, for my sake let it be another Thomson/RCA! My RCA's pic quality currently beats this sets performance, but I'm not done with it yet........lol.
|
|
| Back to top |
|
|
AnalogRocks
Forum Moderator
Joined: 08 Mar 2006
Posts: 26706
Location: Toronto, Ontario, Canada
TV/Projector: Sony 1252Q, AMPRO 4000G
|
| Posted: Fri Nov 08, 2013 10:35 am Post subject: |
|
|
Good going! Nice to see another one saved from the landfill.
_________________
Tech support for nothing
CRT.
HD done right!
|
|
| Back to top |
|
|
ptkctc
Joined: 01 Nov 2013
Posts: 44
|
| Posted: Fri Nov 08, 2013 10:55 am Post subject: |
|
|
Thanks! I am loving it lol, I do this in my spare time, my friends say I have alot more patience than they ever had!
On a side note, I found out how to get into the service mode and Hitachi "DCAM" adjustments, its like the RCA chipper check alignment but w/o requiring any additional hardware. You just short two pins behind the focus block to enter it.
I gotta go get the remote, the original owner contacted me earlier and told me he had it and I can come pick it up anytime.
This doc explains the DCAM adjustments, just in case anyone who comes across this later on looking for details:
http://www.lbaileyht.com/Hitachi_DCAM_Manual.pdf
Ill post back with a few pics once I get the convergence aligned to my preference (it may be a day or so lol!).
PTKCTC signing off for now, I gotta go feed Nipper, lol!
|
|
| Back to top |
|
|
winny

Joined: 09 Oct 2013
Posts: 403
Location: Sweden
TV/Projector: BD808s, BG1209/2
|
| Posted: Fri Nov 08, 2013 11:25 am Post subject: |
|
|
Good job!
Any sexy pictures of the interior, cap replacement or perhaps the glycol change process when you get to that point?
_________________
| Melifluonze wrote: | | Digital is easy. This is torture, but far more interesting... |
|
|
| Back to top |
|
|
ptkctc
Joined: 01 Nov 2013
Posts: 44
|
| Posted: Fri Nov 08, 2013 11:46 am Post subject: |
|
|
Sure, I didn't think to get any during the cap/diode swap, but I can post some before and after pics (I took one for my reference showing the cap as-is before I touched it, and Ill take a few of it now along with some from the fluid swap once I get around to it).
The cap i used is brown, where the original is blue. My fuse rig looks kind of rough right now too, but I am seriously out of 2a pico fuses at the moment. I wasnt sure that it was gonna work after the fix anyways so I wasn't as concerned about how it looked, I was more about whether it would fix it or not (I have gotten some seriously totaled sets since I started collecting ewaste, its hard to believe some of the ways people kill them).
I am gonna have to order some fluid, unless i can manage to use a coffee filter to save the fluid that's in it now.
It may take a little bit, but Ill return to this post once I get around to it (I just got an email to my ewaste addy about a Mitsubishi set thats ready to be picked up, no specifics yet but I'm gonna get back in touch with them and see what the deal is with it.
My next thread may be a Mits thread, and if my luck holds out, it could be a "9-inch guns" Mitsubishi thread lol. (Im not THAT lucky, but you never know doing this kind of stuff!)
|
|
| Back to top |
|
|
Nashou66

Joined: 12 Jan 2007
Posts: 16171
Location: West Seneca NY
|
| Posted: Fri Nov 08, 2013 3:15 pm Post subject: |
|
|
You'll need to clean the glycol out of the Liquid Coupling chamber and clean the Green C element. You can not use colored fluid in Curved LC chambers because of the depth difference caused by the concave lens would have a darker color on edges and lighter in the center.
You can get "Tv-Coolant" at MCM electronics.
Athanasios
_________________
Don't blame your underwear for your crooked ass~ unknown Greek philosopher
"Republicans believe every day is the Fourth of July, but the Democrats believe every day is April 15." --- President Reagan
One Smart Dog!!!
Marquee High Performance Bellows now shipping!!
Marquee Modifications and Performance Enhancement
Marquee C-element and Bellow removal
|
|
| Back to top |
|
|
AnalogRocks
Forum Moderator
Joined: 08 Mar 2006
Posts: 26706
Location: Toronto, Ontario, Canada
TV/Projector: Sony 1252Q, AMPRO 4000G
|
| Posted: Fri Nov 08, 2013 11:45 pm Post subject: |
|
|
Ya know:
| Description: |
|
| Filesize: |
78.38 KB |
| Viewed: |
97 Time(s) |

|
_________________
Tech support for nothing
CRT.
HD done right!
|
|
| Back to top |
|
|
ptkctc
Joined: 01 Nov 2013
Posts: 44
|
| Posted: Sat Nov 09, 2013 7:00 am Post subject: Pics! |
|
|
Cool, I was wondering how the procedure goes. I am glad that I have colored lenses, instead of tinted glycol (from a serviceman's perspective, anyways).
I've been busy, I went and picked up the Mits set, its from 1996 so I unloaded it in the garage for right now, I have three 50"+ rptvs in my den right now, Ill bring it inside and get to work once the Hitachi is done. I feel surrounded by screens, as they are all facing where I sit!
I took some pics a little bit ago when I had the front panel off to do the DCAM adjustment on the Hitachi, and it helped alot. Magic Focus now works perfectly, but I need to make me a geometry jig and go back into DCAM to get the green nailed. It looked pretty good, until I took the pic of the crosshatch and looked at it from that perspective.
I would have turned it around and pulled the back off again to get the pics, but room is tight now, and there are alot of screws holding it on. Friends say to get a power driver, but I honestly despise using them for driving screws into particle board, they are just too rough for it and always strip the holes after a few r&r's. A basic screwdriver gives me a good feel for how tight the screws should be.
In the pics where the eeprom is initializing, you can get a good idea of how dirty the green tube is compared to the blue and red, on a pure white screen you can actually see a few off-color spots. That's aside from the green glow anything white gives off.
Ill snap pics and add them to this thread once I get the fluid, paint and RTV to do the coolant swap. Its been on non-stop since I revived it, and the green cleared up just a tad from what it started as, but its never gonna be as clear as I demand from my sets until its been cleaned out. The biggest improvement is likely from the DCAM alignment, but I swear some of the goop has moved or dispersed since it was first turned on.
I also am including pics of the service mode/DCAM access switch, just for exact reference to this model.
The cap that was bad, despite how it looks here, there was a hole burned through it under that split:

The new cap that I replaced it with. Its the same specs even though it looks wrong lol!

No pics of the pico fuse before, (it looked physically ok but was open), but heres my homebrew solution where I didn't have any laying around (its turned sideways from its normal position for room):

Heres the 3 colors as the eeprom was initiating;
Red:

Blue:

Green:

Crosshatch since DCAM adjustment:

And a couple of the service mode/DCAM access button:


To be continued as soon as I get my supplies for the fluid swap...
|
|
| Back to top |
|
|
ptkctc
Joined: 01 Nov 2013
Posts: 44
|
| Posted: Sun Nov 10, 2013 12:09 pm Post subject: |
|
|
Hmm, I have been studying up on how to do the coolant swap, and I have elected to remove the entire gun to do the procedure. It seems though, my set is unlike most that I see examples of online, unless I am missing something.
My guns are set up so that the only way to get the C element off, is to remove the 4 long screws that have large springs on them at the bottom of the gun.
From what I can tell, its sandwiched between the plate that attaches the gun to the rack, and the tube itself, with the gasket in-between. I can see the gasket edges from the bottom between the gun and mounting plate, and it looks dismaying.
I was hoping to avoid this, as all the guides online show a second plate directly below the focusing lens assembly that will remove from the frame that bolts to the rack, thus releasing the C element without disturbing the 4 bolts with springs on the bottom of the gun. I read of horror stories from people who mess up in one way or another when removing these bolts. If I have to remove them, I am going to use something like a sharpie or paint pen to make a bunch of reference marks at the point where the lower support frame meets the glass, so I can be as close as possible to getting it back in the original position.
I am going to check on some local fluid I may be able to procure for free later, given that i can locate the person to ask them.
After that, I will pull the green gun out and then I will finally know exactly what I have to do. My guns also have what I have seen simply described as a "golf ball" expansion bulb, and I think its a formed part of the C element gasket, and not one that's removable with a wrench like most others (from above the guns, the bulb is half covered by the mounting plate that I am almost sure the C element seals to so it doesn't matter anyways).
I hope to at least find a fill plug, I have bent upside down looking into the front access panel and I can't see it, but granted I cant see all the way around the guns due to the lower plate the spring bolts go through that suspends them.
I used a little mirror and flashlight and can barely make out what looks like a big glob of white sealant towards the top of the tubes that I suspect is covering it up:

Ill post back later with pics if I can get the fluid, it should be very helpful to somebody later on, as I can't find diddly online searching for my particular model in regards to cleaning up contaminated tubes. They are all different in the respects that I have already outlined.
|
|
| Back to top |
|
|
ptkctc
Joined: 01 Nov 2013
Posts: 44
|
| Posted: Wed Nov 13, 2013 4:06 am Post subject: fluid swap w/ pics |
|
|
I finally got the fluid swapped in this Hitachi, I ended up doing all 3 guns, as opposed to just the green which was marginally worse.
The green was horrible, the fluid looked like urine or mud-water, the red was just cloudy fluid, and the blue as well. No build-up on the red and blue lens and crt face, and surprisingly the blue was the best of the 3 (I couldnt even get a good enough pic to show any difference in the blue of it so I omitted insignificant and redundant pics to save time and space).
My camera is super crap, its supposed to be 8mp and 1080 video, but I don't see it lol!
Note in the pic of the close-up of blue CRT face, theres some pretty bad screen burn on it, and its on the blue only. It looks like the splash screen from a DVD player on standby.... Anyone have a good, 6+ condition blue hitachi CRT gun for sale, lol!
Tubes before removal:


Green tube:


Red tube:


Blue tube:

I immediately saw the drain plug once I looked at the tubes again, idk why I missed that the first time...

Draining the green:


Draining the red:

*Red and blue were in similar shape so due to my cameras deficiency, the rest of the procedure primarily follows the green, but the red and blue procedure went the same for each.
Refilling:

Cleaned and fresh fluid:


Old fluid, red on left and green on right; (not pictured:blue was just slightly more clearer than red):

Back together and a comparison of the green to the pic from the previous post above:

Random pics after fluid swap, in comparison to the 61" RCA PTK195 set:


All in all it was well worth it, this set now even gets my 80yo mothers attention, she saw it last night and commented that she wished her new 82" DLP looked this good up close in SD, LOL! I told her that I wish I had an 82" screen, she then replied that she likes the Hitachi so much right now that she would almost TRADE ME the DLP for it!!!
I am actually thinking about moving this set in place of that RCA for now. After doing all this to the Hitachi, I swear it beats it, theres simply more detail and vibrant color to the screen, and it somehow looks like the pic is wider, even though they both are just SD sets. The Hitachi does have the red, blue and green component inputs, which the RCA's I have lack. Its also what I would consider like, "an older cadillac car", its got alot more options than the RCA's, its just an older set by 4 years (Hitachi is a 1999, PTK195's are 2003's).
About the color, I havent paid that much attention to my PTK195's, but I don't remember the guns having colored C elements in them, so that may be why the Hitachi has more life-like, vibrant colors. Its a totally different set lol!
Last edited by ptkctc on Wed Nov 13, 2013 4:14 am; edited 1 time in total
|
|
| Back to top |
|
|
Nashou66
Joined: 12 Jan 2007
Posts: 16171
Location: West Seneca NY
|
|
| Back to top |
|
|
ptkctc
Joined: 01 Nov 2013
Posts: 44
|
| Posted: Wed Nov 13, 2013 4:20 am Post subject: |
|
|
| Nashou66 wrote: | Congratulations!!!!!
You should have really cleaned out the chamber tho before adding the new glycol. A little water and CLR would have really got the old glycol and filth out. Having a perfectly clean C-element and tube face does wonders.
Athanasios |
Oh sorry, I forgot to mention that. I did take cotton balls and alcohol and I rubbed all the gelatinous stuff out of the chambers, followed up with bottled water, several times per tube. It would have bothered me to no end if I hadn't, the green looked like it had jello inside it lol!
I would have taken more pics, but between washing my hands every time I came in contact with fluid, and keeping everything else as clean as possible, I had a lot going on. I have a Mitsubishi in the "holding cell" right now waiting on a R&R, and I haven't got it to come on yet but I will go ahead and bank that it will need the fluid flushed too, Ill take time and do a in-dept write up of it if I can figure out why it was in the trash heap.
Last edited by ptkctc on Wed Nov 13, 2013 6:20 am; edited 1 time in total
|
|
| Back to top |
|
|
AnalogRocks
Forum Moderator
Joined: 08 Mar 2006
Posts: 26706
Location: Toronto, Ontario, Canada
TV/Projector: Sony 1252Q, AMPRO 4000G
|
| Posted: Wed Nov 13, 2013 4:43 am Post subject: |
|
|
Congratulations! What was your grand total?
_________________
Tech support for nothing
CRT.
HD done right!
|
|
| Back to top |
|
|
ptkctc
Joined: 01 Nov 2013
Posts: 44
|
| Posted: Wed Nov 13, 2013 5:08 am Post subject: |
|
|
| AnalogRocks wrote: | | Congratulations! What was your grand total? |
I got 3 bottles of fluid for right over $30 shipped, and I used 2 gallons of distilled water, so $2 for that, and 3 bottles of alcohol for $8. (also 3 rolls of paper towels and a bag of cotton balls, no $ for that but I am still getting fussed at for using them )
$40, not bad considering the pro-rated prices I have seen quoted by some people online.
I really took a long time doing this since it was my first time, but I was making sure I had everything thought out before I did anything. I sat and starred at the way the tubes were mounted for about 2 hours before I took them loose. I was alot more at ease when I saw the way the tubes came apart, but I still wanted to make sure I didn't take a screw loose and dump all the fluid out onto the deflection board.
|
|
| Back to top |
|
|
ptkctc
Joined: 01 Nov 2013
Posts: 44
|
| Posted: Wed Nov 13, 2013 5:18 am Post subject: |
|
|
Something else that gives the Hitachi another point over the PTK195 RCA's, is the quality of the audio processing.
I had an old RCA PTK169 that I inherited from my parents (my first RPTV), and even though it was so old it still had manual trim pots to adjust the convergence, its sound was amazing.
Between the PTK169 and the PTK195, Thomson developed an integrated SRS module, to replace the separate internal module used in previous models. Its stated somewhere that the integrated SRS compromises performance in exchange for ease in manufacturing, and lower cost all around.
I have never been impressed with the sound on PTK195's, although the smaller sets (43-52") have stronger bass than the larger sets, I guess its due to the cabinet size. I have tested this by swapping a 52" main board into a 61" cabinet and the sound stayed the same as with the original 61" board.
This Hitachi obviously has full-fledged SRS. Without any additional speakers, it sounds like you are listening to a 4-5 speaker surround system.
|
|
| Back to top |
|
|
ptkctc
Joined: 01 Nov 2013
Posts: 44
|
| Posted: Sat Nov 23, 2013 3:06 am Post subject: |
|
|
I have a quick question about this set, I have been working on the convergence ever since getting the fluid changed, and I finally figured something out.
The screen has had a layer swiped off it. Somebody, while it was sitting as refuse, took the outermost screen layer off it and now all that is left is the lenticular lens on the outside (you can see where tool marks were left around the inside of the frame). The lens itself has an inward bow to it, and when I do convergence, depending on where you look at the screen (left to right), the top-most parts of the display have a bow to vertical lines. I was watching the price is right earlier and noticed how the square backgrounds look warped as they went towards the top).
I had previously went back into convergence and was adjusting it to where it looked good. It always looked crappy once I moved or looked at it in another light. I have been very diligent about this, and couldn't figure out why I never could get it exactly right.
Is this layer that's MIA the reason for this? The lines will skew left to right if you move positions in front of the set, and i believe its directly related to either the missing protector screen, or where the lenticular lens has sunk inwards. Its really bad at the top corners, you can see the warp where its the corner of the screen. Its almost like the effect you get from a hollogram with the grainy texture, vertical lines directly in front of you will be straight, but you move to the left and the lines you were looking at are then bent towards the right. It got old fighting that effect lol.
Sorry for keeping this thread bumped, but I didn't want to start another thread, simply due to the fact that I have several threads consecutively in this forum section already.
|
|
| Back to top |
|
|
Nashou66
Joined: 12 Jan 2007
Posts: 16171
Location: West Seneca NY
|
|
| Back to top |
|
|
ptkctc
Joined: 01 Nov 2013
Posts: 44
|
| Posted: Sat Nov 23, 2013 5:27 am Post subject: |
|
|
I have tried and tried and I believe its straight from the software point of view, but theres something up with the lenticular screen, maybe the people who took the protector screen pushed in real hard to get it to bulge out of the frame (they were rough getting it out as evidenced by the marks their screwdrivers/knives left). It reminds me of what a thin piece of flexible plastic that big would look like eventually if the set was laid on its back all its life.
I have compared it to the other sets i have, and although they all still have the smooth outer protector screen intact, I can see from the way the light shines off their lenticular layer underneath that they don't have the same inward pitch to them as this Hitachi set.
I may try swapping the screens from one of the other 61" sets I have to see if it will make any difference at all. It was my understanding that this set sat outside for two months on a porch before I got it, and he lived about a mile from the industrial district. I live about 10 miles from it and can still smell the pollution on certain days, and rubber and plastic products rot away around here in record time, even at my house (rubber bands on a clothes hanger hanged on the porch last a little over a month before they turn to goo). Idk if this would harm the screen, but its definately something to consider as the local pollution is really bad.
|
|
| Back to top |
|
|
ptkctc
Joined: 01 Nov 2013
Posts: 44
|
| Posted: Sat Nov 23, 2013 5:41 am Post subject: |
|
|
Heres a pic, its the best pic I can get a good example of what I am talking about with the sunk-in effect:

The shiny spots in the corners is actually where the screen is bowed back into the set, and thats where the most pronounced display distortion is observed when viewing from different angles.
The entire screen is "wavy", as you can see from the lower shine in the center of the screen. Those spots have the focus kind of fuzzy, and convergence is tricky to adjust in those areas as well.
|
|
| Back to top |
|
|
|
|
|
|
|
You cannot post new topics in this forum
You cannot reply to topics in this forum
You cannot edit your posts in this forum
You cannot delete your posts in this forum
You cannot vote in polls in this forum
You cannot attach files in this forum
You can download files in this forum
|
Forum powered by phpBB © phpBB Group
|
|


