|
As this forum is rarely used anymore, we've locked it. Feel free to browse and read. Questions? Please reach out to us directly. Cheers! |

|
 |
|
|
| Author |
Message |
Boilermaker
Joined: 21 May 2006
Posts: 527
|
| Posted: Sun Jun 03, 2012 4:45 pm Post subject: RESTOMOD PROJECT - a 52 y.o. repro amp redo. |
|
|
In the early days of stereo, the "high end" was usually represented by RTR (reel to reel) prerecorded tapes. There are still thousands available on e-bay for very reasonable prices.
In the very early 1970's, I was very fortunate to be able to negotiate a trade for 45 10-1/2". 1/2 track, 15ips master tapes. These tapes were live performances of a major California orchestra and were recorded by a professional recording engineer using a professional Ampex tube type recorder. This represents 5 full concert seasons, and they are easily my most valuable and favorite recordings.
I have followed several threads here about some of you restoring vintage audio gear, and it renewed an interest I had many years ago. As a result, I pulled out my old Otari MX5050 RTR and spent a day or two cleaning it up and found the only thing I needed was a capstan belt as the original fell apart in my hands as I removed it. Thanks to the help of several here, I was able to find one that fit perfectly, so I was back in business! The first thing I listened to was one of my master tapes - the audio quality was easily better than the best SACD I have.
Since my Otari has early generation solid state record and reproduce amps, I felt that improvement could be made by using a good Ampex repro amp, so I checked ebay and found that while still scarce, they were very pricey. Fortunately I ran across en even rarer Knight tape amp that was highly admired in its day and was reasonably priced.
All I need to do is restore it with modern components, and modify my Otari so that I can pull the signal right off the playback heads on it to bypass the Otari's playback amp.
Since I will never wish to record with it, it should simplify the restoration as I can just discard the record and erase circuitry. Obviously, after much searching, I was able to find a schematic for the unit.
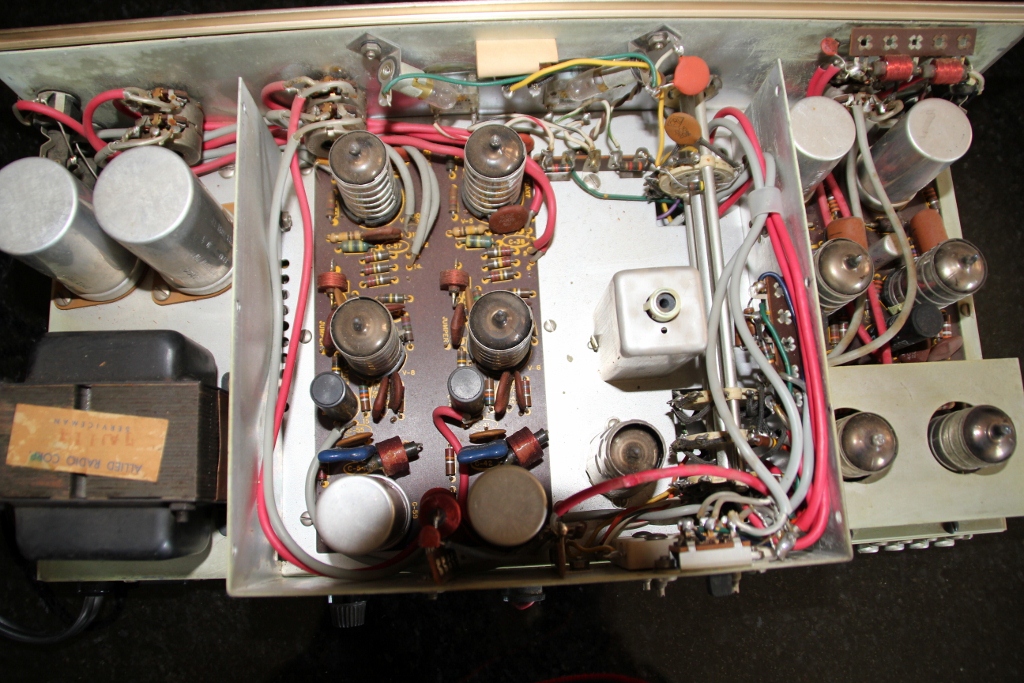
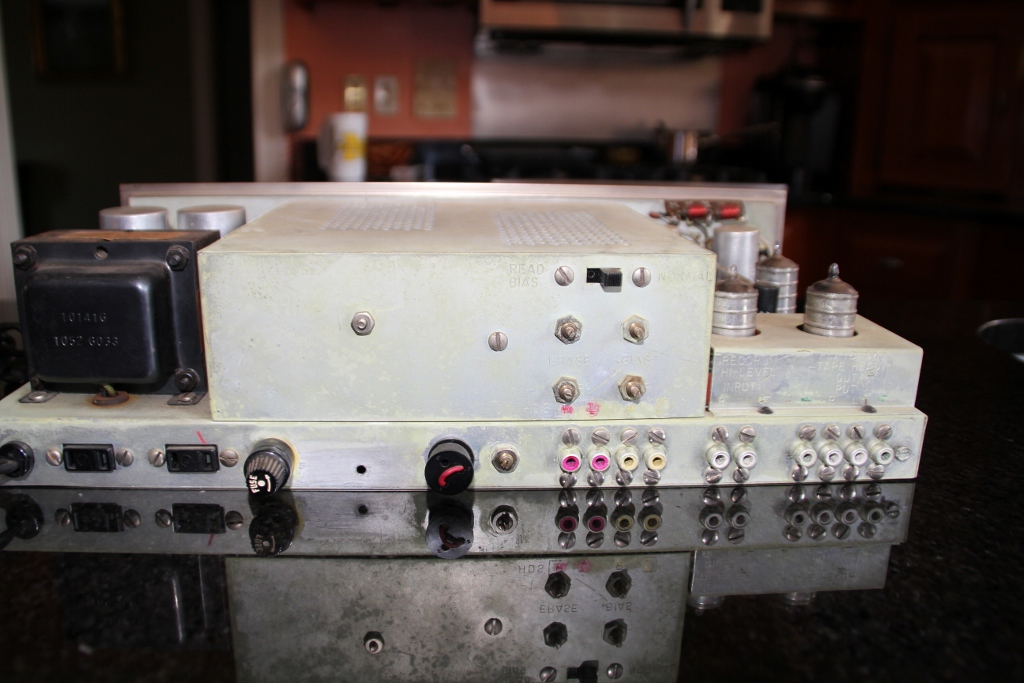
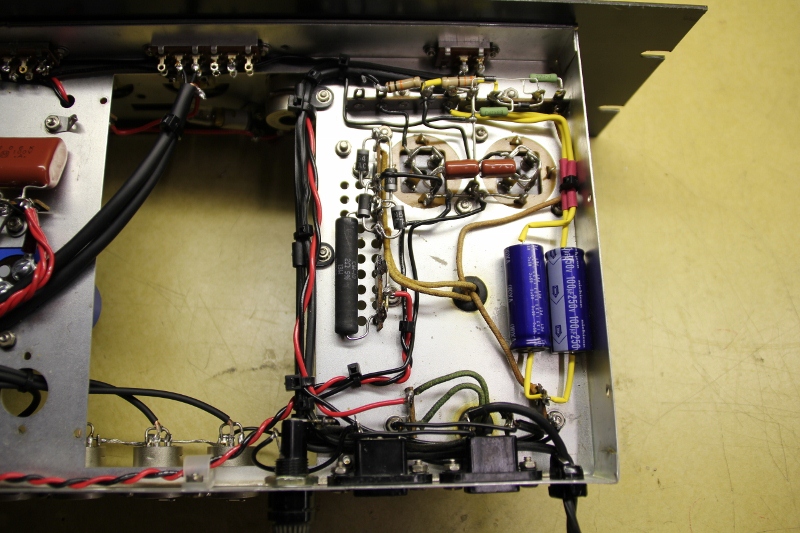
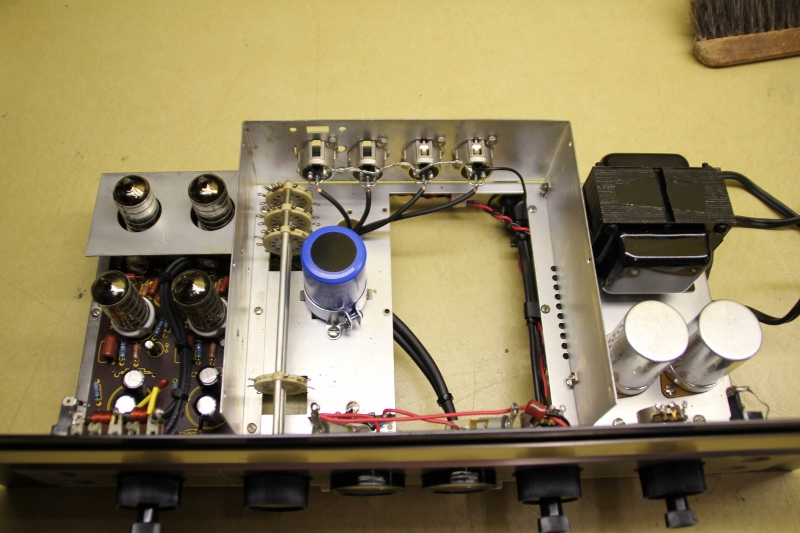
Now, hopefully these pictures will show you what a 1960 model tape amp looks like before the restoration. BTW, Knight products were also available in kit form (similar to Heath) and this amp is clearly the kit model.
Hopefully, if I can figure out this camera thingy, I can post progress pictures, etc.
Bob
| Description: |
|
| Filesize: |
449.08 KB |
| Viewed: |
6946 Time(s) |
|
| Description: |
|
| Filesize: |
326.81 KB |
| Viewed: |
6946 Time(s) |

|
| Description: |
|
| Filesize: |
325.33 KB |
| Viewed: |
6946 Time(s) |
|
|
|
| Back to top |
|
 |
Boilermaker
Joined: 21 May 2006
Posts: 527
|
| Posted: Sun Jun 03, 2012 4:55 pm Post subject: |
|
|
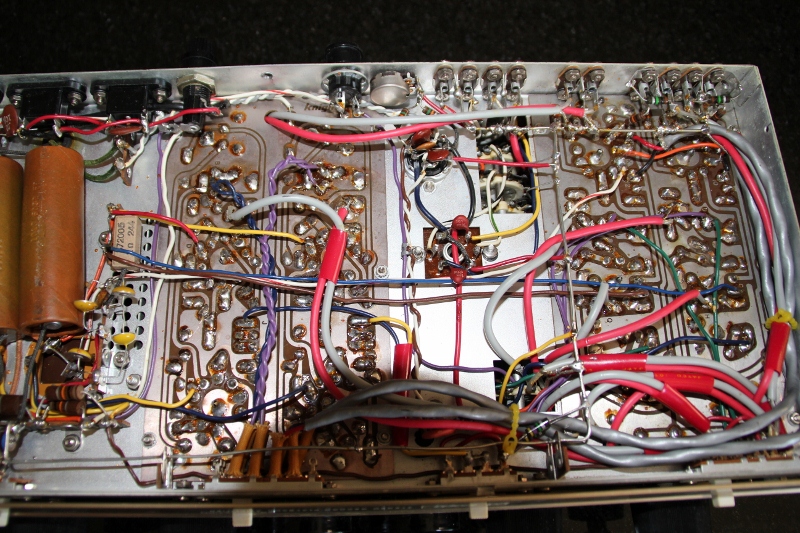
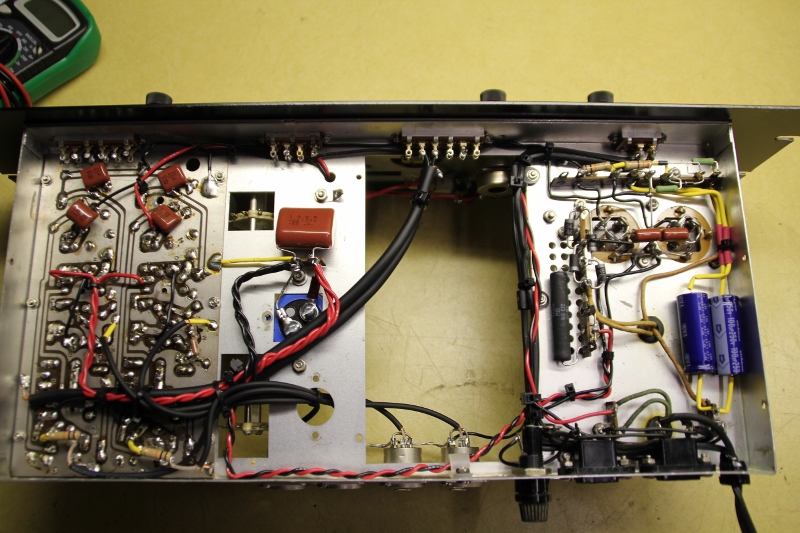
Sorry - Forgot the underside!
| Description: |
|
| Filesize: |
375.47 KB |
| Viewed: |
6943 Time(s) |
|
|
|
| Back to top |
|
|
Nashou66

Joined: 12 Jan 2007
Posts: 16171
Location: West Seneca NY
|
|
| Back to top |
|
|
Boilermaker
Joined: 21 May 2006
Posts: 527
|
| Posted: Sun Jun 03, 2012 8:00 pm Post subject: |
|
|
They are already history. They used ceramic disc caps for the critical NAB/IEC shaping circuits! Can't remember when film type caps were developed, but I'll bet it was after 1960. Best they had then was probably mica. The only components that will be reused are the tubes and the PS transformer.
Bob
|
|
| Back to top |
|
|
Boilermaker
Joined: 21 May 2006
Posts: 527
|
| Posted: Wed Jun 13, 2012 1:37 pm Post subject: |
|
|
Time for a project update:
I was going to attach some pictures, but my camera is causing me problems (probably a user error).
Fortunately I was able to obtain an original schematic, so I completely stripped the chassis and the circuit board and cleaned them. My original intention was to chrome plate the chassis so it would look cool, but the best price on that was $400, so I didn't do it.
I'm about 80% done with the project and just waiting on delivery of a few components to finish. The original had four sections; power supply, record amp, playback amp and erase head oscillator. Since I will never do any serious recording, I eliminated the erase and record electronics which made it less crowded and gave me space to greatly increase the power supply filtering. I have made the following changes:
1 - Changed out all disc caps to polypropolene and polystyrene.
2 - Changed out all electrolytic caps to much, much larger low esr types.
3 - Added ps bypass caps at all tubes.
4 - Changed the input impedance to match the output impedance of the playback heads on my Otari tape machine.
5 - Changed the NAB and IEC equalization components to exact value (required paralleling three polystyrene caps).
6 - Changed inputs and outputs to balanced configuration.
7 - Upsized the output cap so it could handle low impedance loads without losing bass.
8 - Changed all resistors to precision metal films.
9 - Installed a much more aggressive star chassis grounding scheme.
10- Eliminated all the needless signal switching, i.e., A+B, B, A, Reversed, etc.
I have powered up the PS before I hooked it up to the circuit board, and all is well, so it shouldn't take much longer.
As soon as I confirm that it it working correctly, I will rewire the playback heads on my Otari to bypass its playback amp and send the signal directly to the balanced output of the Otari.
Hopefully I can figure out the snafu with my camera and post some pics before I start listening.
BTW, I'll be using NOS Mullard tubes I have had laying around for decades!
Bob
|
|
| Back to top |
|
|
CIR Engineering

Joined: 25 Aug 2008
Posts: 4269
Location: Chicago USA & Berlin Germany
|
| Posted: Thu Jun 14, 2012 12:23 am Post subject: |
|
|
You have got to post photos when it's done and has the NOS tubes installed.
craigr
_________________
JETI 1501-HiRes 2nm Spectroradiometer
JETI 1211 Spectroradiometer
Photo Research PR-650 Spectroradiometer
Klein K10-A Colorimeter
Murideo Fresco SIX-G HDMI 2.x Multimedia Generator
Murideo Fresco SIX-A HDMI 2.x Analyzer
Light Illusion ColourSpace XPT Color Calibration Software
Light Illusion LightSpace XPT Pro Version 10.x Color Calibration Software
OMARDRIS JVC Software Patch to use K10-A and Jeti with JVC OEM AutoCal Software!
Sencore CR7000 CRT Tube Analyzer / Rejuvenater
Authorized Dealer for Lumagen & just about everything worth buying 
www.CIR-Engineering.com - craigr@cir-engineering.com
Phone: 865-405-6892
|
|
| Back to top |
|
|
Boilermaker
Joined: 21 May 2006
Posts: 527
|
| Posted: Sun Jun 24, 2012 3:19 pm Post subject: |
|
|
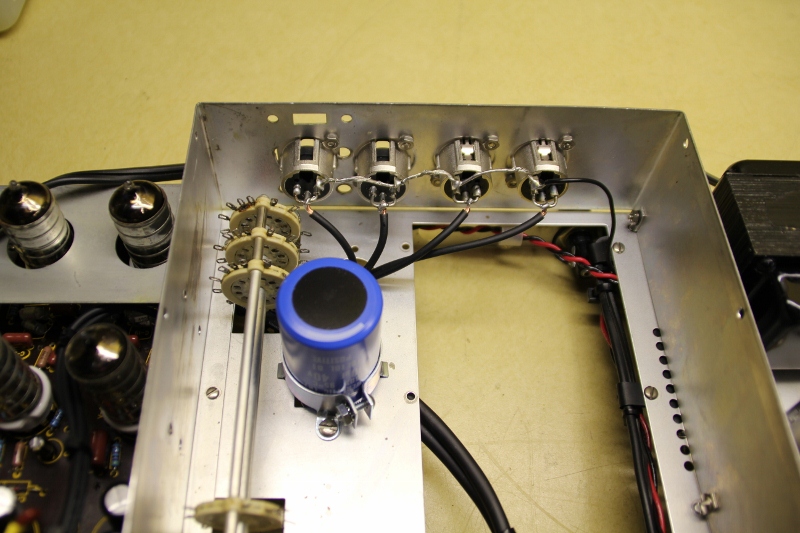
Finally got the pic's.
Project is finished, and as usual there is a problem. I can never seem to do a project like this without at least one snafu!
Audio quality and gain seem perfect, but there is a pretty loud hum that I need to chase down.
I modified my Otari by removing the wires that were attached to the small head selector switch right on top of the head block and then soldering a pair of Canare coax cables that go directly to the Knight input. Since I wanted to keep the cables as short as possible, I didn't use a connector on the back of the Otari, but just snaked them out the back directly to the repro.
I have found that the hum is gone when I disconnect the input to the Knight but reappears even if I just connect an open length of cable?
Oh well, it is going to make me earn the pleasure of listening.
Bob
| Description: |
|
| Filesize: |
235.46 KB |
| Viewed: |
6779 Time(s) |
|
| Description: |
|
| Filesize: |
274.09 KB |
| Viewed: |
6779 Time(s) |
|
| Description: |
|
| Filesize: |
245.68 KB |
| Viewed: |
6779 Time(s) |
|
| Description: |
|
| Filesize: |
296.31 KB |
| Viewed: |
6779 Time(s) |
|
| Description: |
|
| Filesize: |
266.23 KB |
| Viewed: |
6779 Time(s) |

|
|
|
| Back to top |
|
|
Boilermaker
Joined: 21 May 2006
Posts: 527
|
| Posted: Sun Jun 24, 2012 4:00 pm Post subject: |
|
|
|
Just thought - In 1960 when this was made, every single part was made in the US. The only parts now are the chassis, switches and transformer. Things have changed!
|
|
| Back to top |
|
|
Boilermaker
Joined: 21 May 2006
Posts: 527
|
| Posted: Thu Jul 05, 2012 1:19 pm Post subject: |
|
|
I finally fixed the hum problem. There was nothing wrong with the repro, as the problem turned out to be with my installation of shielded cable directly to the tape head selection switch on the Otari. The shield was touching the metal head cover , so I wrapped some tape around it before reinstalling the head cover.
How does it sound? - An obvious improvement over the existing playback amp in the Otari. Much improved! I have never been impressed with the early generations of solid state audio, and there is no way it can match a modern amp, either tube or solid state.
SO - What is next???
While doing this little project I thought of two additions I wanted to do.
1 - While I really beefed up the two power supplies (heater and B+), it still cannot match a good regulator. Since there is a lot of room left on the chassis caused by the removal of the record amp, I did a little search and found http://glass-ware.stores.yahoo.net/ps1kit.html . It will easily fit in the space and is unbelievably cheap. Need to add this to truly become "modern" design.
2 - Because of its age, this little preamp has only NAB equalization. While all the tapes I have are NAB, I have my eye on some IEC tapes that I would like to get. There is a four section rotary wafer switch on my preamp that is not being used, so I can easily add a 2-pole RC passive network to convert NAB to IEC with the flick of a switch.
I am convinced that the finest quality sound source available to the consumer is R2R. While VERY expensive, those of you who play with RTR, need to look at these - www.tapeproject.com . I am going to ask Santa for one of these!
Bob
|
|
| Back to top |
|
|
|
|
|
|
|
You cannot post new topics in this forum
You cannot reply to topics in this forum
You cannot edit your posts in this forum
You cannot delete your posts in this forum
You cannot vote in polls in this forum
You cannot attach files in this forum
You can download files in this forum
|
Forum powered by phpBB © phpBB Group
|
|


