| Author |
Message |
bachiano
Joined: 13 Mar 2006
Posts: 163
|
| Posted: Fri Feb 24, 2012 7:37 pm Post subject: G70 - Horizontal mechanically convergence of Blue and Red ? |
|
|
Is there a way to mechanically converge the Blue and the Red with the horizontal Green?
Or
Just use cent to converge?
Thanks
| Description: |
|
| Filesize: |
210.7 KB |
| Viewed: |
8463 Time(s) |

|
|
|
| Back to top |
|
 |
Motobias

Joined: 08 Jul 2008
Posts: 163
Location: Osnabrueck, Germany
|
| Posted: Fri Feb 24, 2012 7:47 pm Post subject: |
|
|
no... rest is gonna be either pots or digital convergence !
looks pretty good to me already...
|
|
| Back to top |
|
|
bachiano
Joined: 13 Mar 2006
Posts: 163
|
| Posted: Fri Feb 24, 2012 9:16 pm Post subject: |
|
|
Are there pots on the g70 for this ?
Where are they?
|
|
| Back to top |
|
|
Motobias
Joined: 08 Jul 2008
Posts: 163
Location: Osnabrueck, Germany
|
| Posted: Sat Feb 25, 2012 12:15 am Post subject: |
|
|
check the manuals or service documentation !
_________________
Most peope talk about HD without knowing the meaning and how to do it RIGHT !
FIGHTING STUPIDITY SINCE 1983
|
|
| Back to top |
|
|
AFryia

Joined: 09 Mar 2006
Posts: 965
Location: S.E. Michigan VPH-G70Q
|
| Posted: Sat Feb 25, 2012 1:00 am Post subject: |
|
|
| bachiano wrote: | Are there pots on the g70 for this ?
Where are they? |
I don't recommend messing with any pots.
Your mechanical aim and horizon look very good as is.
|
|
| Back to top |
|
|
bachiano
Joined: 13 Mar 2006
Posts: 163
|
| Posted: Sat Feb 25, 2012 2:12 am Post subject: |
|
|
Ok - I'll just use cent then.
Thanks
|
|
| Back to top |
|
|
AnalogRocks
Forum Moderator
Joined: 08 Mar 2006
Posts: 26706
Location: Toronto, Ontario, Canada
TV/Projector: Sony 1252Q, AMPRO 4000G
|
| Posted: Sat Feb 25, 2012 2:53 am Post subject: |
|
|
Use CENT to align the cross hairs on top of each other.
Then do the rest of the alignment/centring/bow/skew etc and end up back on the ZONE page to adjust everything but the center. If you have it well set up you should either need no ZONE or only a few clicks to finish up.
EDIT: I RTFMed, sorry was thinking of the 12xx series Moon manual.
_________________
Tech support for nothing
CRT.
HD done right!
Last edited by AnalogRocks on Sun Feb 26, 2012 6:05 am; edited 1 time in total
|
|
| Back to top |
|
|
CasetheCorvetteman

Joined: 09 Nov 2008
Posts: 6326
Location: Australia
|
| Posted: Sat Feb 25, 2012 6:06 am Post subject: |
|
|
|
Are the yokes firm up against the bells?
|
|
| Back to top |
|
|
bachiano
Joined: 13 Mar 2006
Posts: 163
|
| Posted: Sat Feb 25, 2012 3:30 pm Post subject: |
|
|
| CasetheCorvetteman wrote: | | Are the yokes firm up against the bells? |
Why?
In the mean time I'll go check.
|
|
| Back to top |
|
|
AFryia
Joined: 09 Mar 2006
Posts: 965
Location: S.E. Michigan VPH-G70Q
|
| Posted: Sat Feb 25, 2012 5:10 pm Post subject: |
|
|
| AnalogRocks wrote: | Use ZONE Centring to align the cross hairs on top of each other. Don't touch any other Zone settings.
Then do the rest of the alignment/centring/bow/skew etc and end up back on the ZONE page to adjust everything but the center. If you have it well set up you should either need no ZONE or only a few clicks to finish up. |
AR Zone and Cent are different controls on the G70.
Cent H&V is used to align the cross hairs.
Zone is for final tweaks to select spots on the screen. 21 I believe in a G70, never counted em, and 40 or 50 on a NEC XG
Its best to not use Zone but you almost always end up using some.
|
|
| Back to top |
|
|
AnalogRocks
Forum Moderator
Joined: 08 Mar 2006
Posts: 26706
Location: Toronto, Ontario, Canada
TV/Projector: Sony 1252Q, AMPRO 4000G
|
| Posted: Sat Feb 25, 2012 8:20 pm Post subject: |
|
|
Is the G70 different than the D50's setup?
EDIT: never mind, I read that in a 12xx manual.
_________________
Tech support for nothing
CRT.
HD done right!
Last edited by AnalogRocks on Sun Feb 26, 2012 6:03 am; edited 1 time in total
|
|
| Back to top |
|
|
bachiano
Joined: 13 Mar 2006
Posts: 163
|
| Posted: Sat Feb 25, 2012 10:55 pm Post subject: |
|
|
| CasetheCorvetteman wrote: | | Are the yokes firm up against the bells? |
Yes.
|
|
| Back to top |
|
|
CIR Engineering

Joined: 25 Aug 2008
Posts: 4269
Location: Chicago USA & Berlin Germany
|
| Posted: Mon Feb 27, 2012 2:51 pm Post subject: |
|
|
Don't even think of using any pots on a G70. You are good to go, just start using the convergence controls.
craigr
_________________
JETI 1501-HiRes 2nm Spectroradiometer
JETI 1211 Spectroradiometer
Photo Research PR-650 Spectroradiometer
Klein K10-A Colorimeter
Murideo Fresco SIX-G HDMI 2.x Multimedia Generator
Murideo Fresco SIX-A HDMI 2.x Analyzer
Light Illusion ColourSpace XPT Color Calibration Software
Light Illusion LightSpace XPT Pro Version 10.x Color Calibration Software
OMARDRIS JVC Software Patch to use K10-A and Jeti with JVC OEM AutoCal Software!
Sencore CR7000 CRT Tube Analyzer / Rejuvenater
Authorized Dealer for Lumagen & just about everything worth buying 
www.CIR-Engineering.com - craigr@cir-engineering.com
Phone: 865-405-6892
|
|
| Back to top |
|
|
bachiano
Joined: 13 Mar 2006
Posts: 163
|
| Posted: Mon Feb 27, 2012 6:02 pm Post subject: |
|
|
| CIR Engineering wrote: | Don't even think of using any pots on a G70. You are good to go, just start using the convergence controls.
craigr |
Ok!
Thanks craigr
|
|
| Back to top |
|
|
CIR Engineering
Joined: 25 Aug 2008
Posts: 4269
Location: Chicago USA & Berlin Germany
|
| Posted: Mon Feb 27, 2012 6:08 pm Post subject: |
|
|
This is counter intuitive, but I will suggest that you do your mechanical alignment to the sides of the image rather than the center. Look into the tubes and create your 16x9 raster so that it is equidistant from either edge of the sides of the tube face. Then use the cross pattern to align the cross hatch hatches that are closest to the edges, not the center.
When you perform physical alignment this way you will wind up using more of the usable phosphor and the image will be more evenly distributed across the tube face. This means brighter image and sharper image.
craigr
_________________
JETI 1501-HiRes 2nm Spectroradiometer
JETI 1211 Spectroradiometer
Photo Research PR-650 Spectroradiometer
Klein K10-A Colorimeter
Murideo Fresco SIX-G HDMI 2.x Multimedia Generator
Murideo Fresco SIX-A HDMI 2.x Analyzer
Light Illusion ColourSpace XPT Color Calibration Software
Light Illusion LightSpace XPT Pro Version 10.x Color Calibration Software
OMARDRIS JVC Software Patch to use K10-A and Jeti with JVC OEM AutoCal Software!
Sencore CR7000 CRT Tube Analyzer / Rejuvenater
Authorized Dealer for Lumagen & just about everything worth buying
www.CIR-Engineering.com - craigr@cir-engineering.com
Phone: 865-405-6892
|
|
| Back to top |
|
|
bachiano
Joined: 13 Mar 2006
Posts: 163
|
| Posted: Mon Feb 27, 2012 9:06 pm Post subject: |
|
|
Hi Craig
Can you elaborate a little more.
I read a previous post of your on this but I did not understand it either :-/
I'm ceiling mount btw.
|
|
| Back to top |
|
|
CIR Engineering
Joined: 25 Aug 2008
Posts: 4269
Location: Chicago USA & Berlin Germany
|
| Posted: Tue Feb 28, 2012 12:34 am Post subject: |
|
|
| bachiano wrote: | Hi Craig
Can you elaborate a little more.
I read a previous post of your on this but I did not understand it either :-/
I'm ceiling mount btw. |
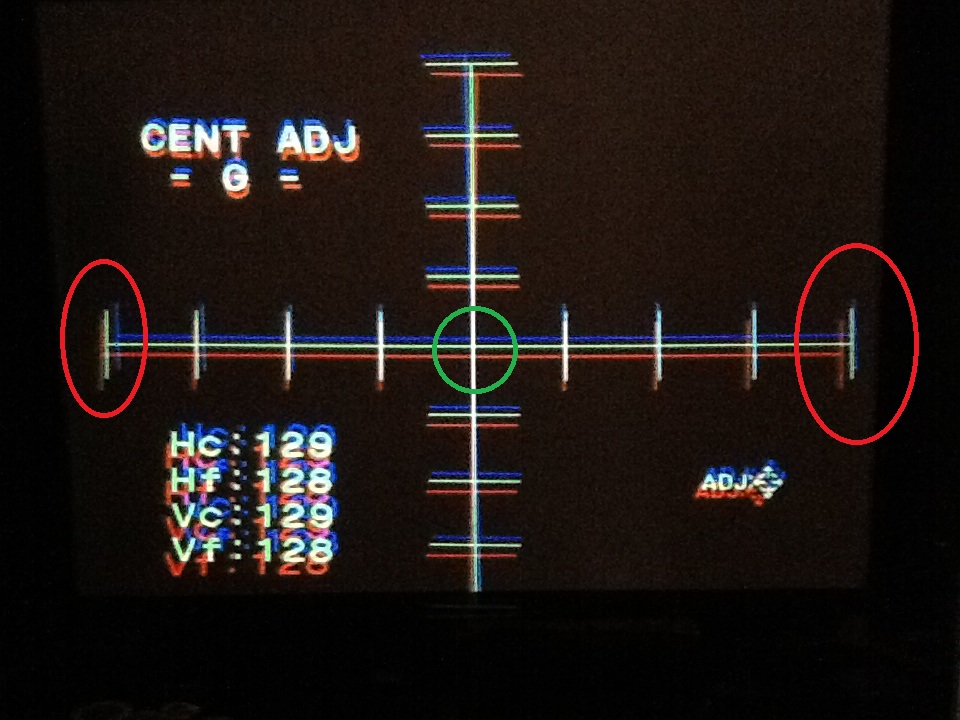
Sure, in the photo below, align the cross so that you get RGB (white) at the sides (circled in red). Don't worry what happens in the middle (circled in green, this can be misaligned). It is basically the opposite of the way you did it.
Before you start alignment, look inside the tubes and adjust the left and right edges of the cross (in each tube) so that they are equidistant from the edges of each tube on both sides. Then physically move (spin) the tubes such that the edges align on the screen.
Get it? It is kinda confusing,
craigr
| Description: |
|
| Filesize: |
190.82 KB |
| Viewed: |
8235 Time(s) |
|
_________________
JETI 1501-HiRes 2nm Spectroradiometer
JETI 1211 Spectroradiometer
Photo Research PR-650 Spectroradiometer
Klein K10-A Colorimeter
Murideo Fresco SIX-G HDMI 2.x Multimedia Generator
Murideo Fresco SIX-A HDMI 2.x Analyzer
Light Illusion ColourSpace XPT Color Calibration Software
Light Illusion LightSpace XPT Pro Version 10.x Color Calibration Software
OMARDRIS JVC Software Patch to use K10-A and Jeti with JVC OEM AutoCal Software!
Sencore CR7000 CRT Tube Analyzer / Rejuvenater
Authorized Dealer for Lumagen & just about everything worth buying
www.CIR-Engineering.com - craigr@cir-engineering.com
Phone: 865-405-6892
Last edited by CIR Engineering on Tue Feb 28, 2012 2:15 am; edited 2 times in total
|
|
| Back to top |
|
|
AFryia
Joined: 09 Mar 2006
Posts: 965
Location: S.E. Michigan VPH-G70Q
|
| Posted: Tue Feb 28, 2012 1:19 am Post subject: |
|
|
| CIR Engineering wrote: | | Before you start alignment, look inside the tubes and adjust the left and right edges of the cross (in each tube) so that they are equidistant from the edges of each tube on both sides. |
It is easier with the lenses removed. you will see the edges of the tube more clearly.
BTW you will need to ground the lens leads for the PJ to operate.
|
|
| Back to top |
|
|
bachiano
Joined: 13 Mar 2006
Posts: 163
|
| Posted: Tue Feb 28, 2012 3:48 am Post subject: |
|
|
Craig
I think I kind of get it.
I'll try it tomorrow.
I'm sure it will make more sense once I've played with it.
Thanks
|
|
| Back to top |
|
|
bachiano
Joined: 13 Mar 2006
Posts: 163
|
| Posted: Tue Feb 28, 2012 3:56 am Post subject: |
|
|
| AFryia wrote: |
It is easier with the lenses removed. you will see the edges of the tube more clearly.
BTW you will need to ground the lens leads for the PJ to operate. |
Once I've taken the lenses off.
What do I use to gauge the distance from the edge of the haircross / crosshatch to the edge of the tube
without touching the C element?
Does this have to be really precise or can I eyeball it?
Thanks
|
|
| Back to top |
|
|
|
|


