| Author |
Message |
skippyar

Joined: 22 May 2009
Posts: 108
Location: Bristol, UK
|
|
| Back to top |
|
 |
Ile
Joined: 09 Mar 2006
Posts: 1491
Location: Jyväskylä, Finland
|
| Posted: Wed Sep 02, 2009 9:06 am Post subject: |
|
|
Can't see youtube here at work, but saw that picture.
From http://www.avforums.com/forums/crt-projectors/757690-barco-faq.html
Q: I have an odd horizontal line visible at times, what is it?
A: At times you may see a horizontal line that fades in the middle of the picture but it quite visible at one end (often the right side), it will be most visible on bright scenes, all white fields or light blues. This is called the horizontal line of coincidence, to some extent it's natural on some models of projector but careful adjustment can remove or at least minimise it. Pause a scene where the line is plainly visible, note which side it shows the most, go to a genlocked pattern and adjust horizontal skew to lower the horizontal centre line on the opposite side to the worst one. Do this by only a small amount, say 4-5 clicks. Now adjust top and bottom keystone to correct the error the skew change introduced. Go back to the picture, is the line less? If it's worse you skewed the wrong way, if it's better carry on tweaking the skew and keystone to minimise or remove the line. You may end up with a horizontal skew error that's plainly visible on the test pattern, it should not be obvious on actual video. Excessive use of horizontal bow may also make the line worse, again it should be possible to reduce the effect by adjusting horizontal bow and correcting the resulting top / bottom bow errors. Removing the line completely may not be possible but you should be able to reduce it to an acceptable level. The line is caused by the projector set-up making several scan line converge as they cross the tube face, result: one large visible scan line.
If deflection coil angles are set wrong or the projector is not mounted flat it will not be possible to remove the line. To check deflection coil angles check the projector is flat with a spirit level, check the screen is flat with a spirit level, sent horizontal skew to 49, delete convergence settings for that block (see this answer). Go to convergence and exactly centre red and blue on green using only the middle zone (actually raster shift). Now check the green horizontal line is parallel with the ground and that both red and blue exactly match green. If anything is wrong you have deflection coil angle problems. Correcting this will require all blocks to be deleted and the projector set to mid point in the service menu. At this point also check raster widths at approximately the scan frequency you intend to use (do this on an internal test pattern), this may save you a lot of convergence problems, including instability.
If you bought your projector from us deflection coil angles are definitely right, we do all projectors on an engineers table. If you seem to have a problem make sure the projector is mounted level. If deflection coil angle was set for a ceiling install and the projector is floor mounted there will be some error, and vice versa.
|
|
| Back to top |
|
|
skippyar
Joined: 22 May 2009
Posts: 108
Location: Bristol, UK
|
| Posted: Wed Sep 02, 2009 10:38 am Post subject: |
|
|
Hei!
"The horizontal line of coincidence" interesting phrase.
I do not have a particular option for "horizontal skew", however after reading all the advice I went back over the Barco settings to try and apply this knowledge.
I noticed the line appeared more apparent (dvd source) on the convergence for Green and Blue*, so tightened it up as much as possible.
In the initial setup stages my cross hatches are >not< 100% aligned, this is because the blue* gun itself is physically misaligned thanks to the courier service lifting it by that lens, thus taking all 80kgs of stress. I tried my hardest to put it back best possible, but the convergence stage rectifies the minor difference.
Perhaps this misalignment coupled with the stress of convergence is creating the problem. :-/
"The line is caused by the projector set-up making several scan line converge as they cross the tube face, result: one large visible scan line. " - Right, understood.
I noticed offsetting the v linearity setting (-1 / 1+) helped to subdue the lines appearance.
All educational stuff 
_________________
Barco 500 Data Owner.
|
|
| Back to top |
|
|
skippyar
Joined: 22 May 2009
Posts: 108
Location: Bristol, UK
|
| Posted: Wed Sep 02, 2009 10:55 am Post subject: |
|
|
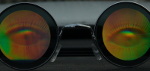
Here is a marco shot from my point n' shoot, ugh.
Using a paint package I've changed the mid-tones and enhanced the colours, so you can see the individual red and blue lines are seperate at the left edge the begin to converge about a foot in (denoted by the black lines).
http://www.flickr.com/photos/skippyxp/3880380177/sizes/o/
_________________
Barco 500 Data Owner.
|
|
| Back to top |
|
|
Ile
Joined: 09 Mar 2006
Posts: 1491
Location: Jyväskylä, Finland
|
| Posted: Wed Sep 02, 2009 1:34 pm Post subject: |
|
|
| skippyar wrote: | | I do not have a particular option for "horizontal skew" |
There should be H centerline skew adjustment under random access - geometry - top and bottom. I have found that also top/bottom bow and keystone could affect to that problem. And yes also V linearity could affect this.
But first check deflection coils angles, RGB horizontal center lines should be in level in screen without electric adjustments.
"If deflection coil angles are set wrong or the projector is not mounted flat it will not be possible to remove the line. To check deflection coil angles check the projector is flat with a spirit level, check the screen is flat with a spirit level, sent horizontal skew to 49, delete convergence settings for that block (see this answer). Go to convergence and exactly centre red and blue on green using only the middle zone (actually raster shift). Now check the green horizontal line is parallel with the ground and that both red and blue exactly match green. If anything is wrong you have deflection coil angle problems. Correcting this will require all blocks to be deleted and the projector set to mid point in the service menu. At this point also check raster widths at approximately the scan frequency you intend to use (do this on an internal test pattern), this may save you a lot of convergence problems, including instability."
Adjusting coils angle
http://www.curtpalme.com/Yoke.shtm
|
|
| Back to top |
|
|
AnalogRocks
Forum Moderator
Joined: 08 Mar 2006
Posts: 26706
Location: Toronto, Ontario, Canada
TV/Projector: Sony 1252Q, AMPRO 4000G
|
| Posted: Wed Sep 02, 2009 1:41 pm Post subject: |
|
|
Redo your setup so everything is 100% square to the screen and use a little gentle persuasion on the lens that won't move. You need to nail the physical setup first then the 'coils lastly the electronic controls.
_________________
Tech support for nothing
CRT.
HD done right!
|
|
| Back to top |
|
|
kal
Forum Administrator
Joined: 06 Mar 2006
Posts: 18114
Location: Ottawa, Canada
TV/Projector: JVC DLA-NZ7
|
|
| Back to top |
|
|
skippyar
Joined: 22 May 2009
Posts: 108
Location: Bristol, UK
|
| Posted: Wed Sep 02, 2009 3:37 pm Post subject: |
|
|
Ok, thanks very much for the responses gents.
So as feared the CRT will need to come down out of its housing. 
Still, would give me an opportunity to have another bash at the RGBs, see if I can ease that green out of the black-end of the greyscale.
Cheers.
_________________
Barco 500 Data Owner.
|
|
| Back to top |
|
|
skippyar
Joined: 22 May 2009
Posts: 108
Location: Bristol, UK
|
| Posted: Fri Sep 04, 2009 10:58 am Post subject: |
|
|
| AnalogRocks wrote: | | Redo your setup so everything is 100% square to the screen and use a little gentle persuasion on the lens that won't move. You need to nail the physical setup first then the 'coils lastly the electronic controls. |
Special thanks to Ile, Kal and AnalogRocks!
I used a little gentle persuasion to physically align the Blue Gun. Immediately I could see all three guns with factiry defaults were positioned correctly with very little need for *any* convergence whatsoever, so I knew then that things were looking up.
----------
I also adjusted the RGB cut offs and now have a much better balanced colour display.
----------
I tweaked the onboard Blue Focus under the Blue Screen to rectify a problem I've always had whereby I could never fully focus my blue lens. (it had been previously mentioned that blue is not intended to be completely sharp because of the human eye's limitations..) I was not convinced and thought this had to be a fault as I recall the chap who sold me it had been "fiddling out" with the blue. At first I thought it was the static convergence rings he'd moved.
Now I have a crisp sharp Blue Gun with no more blue halo effect especially round white text. Even my Sharpness Control feature actually works now as I can see past the projected image at the attributes of a composite video signal. \(O_O)/ 'wow!
-----------
Cheers.
_________________
Barco 500 Data Owner.
|
|
| Back to top |
|
|
AnalogRocks
Forum Moderator
Joined: 08 Mar 2006
Posts: 26706
Location: Toronto, Ontario, Canada
TV/Projector: Sony 1252Q, AMPRO 4000G
|
| Posted: Fri Sep 04, 2009 3:10 pm Post subject: |
|
|
| skippyar wrote: |
Now I have a crisp sharp Blue Gun with no more blue halo effect especially round white text. Even my Sharpness Control feature actually works now as I can see past the projected image at the attributes of a composite video signal. \(O_O)/ 'wow!
-----------
Cheers. |
Actually you aren't supposed to have a crisp blue image.
You need to defocus it just a little.
The blue will look brighter and the overall picture will look better.
_________________
Tech support for nothing
CRT.
HD done right!
|
|
| Back to top |
|
|
RobertMfromLI

Joined: 29 Jun 2009
Posts: 114
Location: West Islip, NY
|
| Posted: Sun Sep 06, 2009 4:36 pm Post subject: |
|
|
You may not have to take the PJ down or take the tube out to re-align it. I've had a stuck tube before, and loosening all 6 of the retaining screws on the tube, then (gently) bumping it loose got it moving so I could properly adjust it.
_________________
Kirk's 5 Year Mission continues at Star Trek New Voyages: Phase 2
|
|
| Back to top |
|
|
|
|


