| Author |
Message |
dturco

Joined: 06 Feb 2009
Posts: 3778
Location: Eastern Shore Maryland
TV/Projector: Runco DLP VX-3000i Marquee 9500 parts doner
|
| Posted: Sun Aug 09, 2009 4:54 pm Post subject: Complete cold start of a P/J 9500 Marquee |
|
|
Let's say you want to install new tubes and magnetics like as in Install Sony Frankenyokes in your Marquee 9500. 
If you were to do this how would you start reset the machine? You would have Zero point of reference. So what would be the very first thing you would have to do?
Obviously the machine is at the correct distance to the screen and square to the screen and all things have been installed properly. So skip that part.
This is how I think it should go, I am asking here not explaining, so If I am wrong that's to be expected, I am just trying to grab the theory here.
I have read Bill Blues guide and Guy Kuo's too. Something isn't clicking,or sinking in so...
1 Turn machine on.
2 Look for magic smoke, there is none.
3 Pull up help menu center rasters on the tube faces.
4 Put up full white screen and do all geometry to the green tube Color 2 and size, keystone,top&bottom,pin. ETC
5 The magnetics CPC, Now I am lost, as soon as I touch the magnetics I think I am moving the raster again so what is the reference point?
The guides say to neutralize the magnetics, but if the coils aren't in a place of center to begin with as you have had them off where and how is that done.?
I think I have a reasonable grasp after this point so I'll let the thread take us on that journey. 
Dave
_________________
Firefly rules. Can't stop the signal.
http://www.hulu.com/firefly
|
|
| Back to top |
|
 |
tse
Joined: 03 May 2006
Posts: 1014
Location: Sweatbucket, Fl.
|
| Posted: Sun Aug 09, 2009 5:11 pm Post subject: |
|
|
After any major change it might be helpful to unplug the CRT heaters at P14. Then if there is magic smoke there is less danger to the tubes. If things look good then plug in P14. The heaters will slowly come up to temp giving you a chance to pull P14 if something is wrong before the tubes begin full conduction.
I like to set up the magnets by first using the convergence position to center the pictures on the phosphor. Mark picture position on screen with sticky notes or masking tape. (Picture should be where you want it or projector physical position and/or mechanical set-up is off.) Press "0" on remote control to center position settings. Make magnet settings keeping picture on screen marks. When finished magnets are correct and position is correct without using convergence shift.
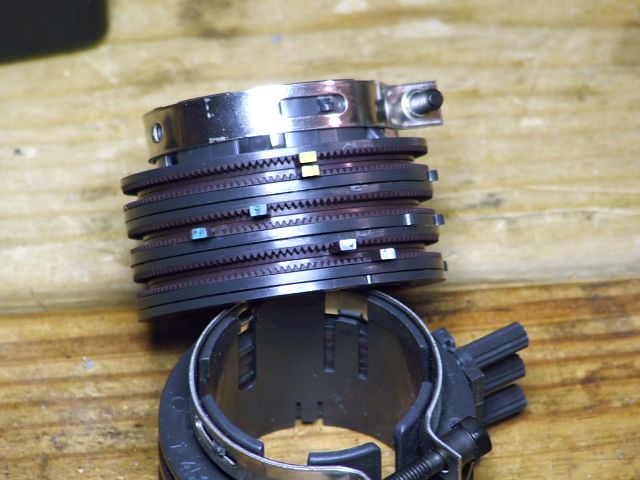
Null the magnets by overlapping the little tabs like the yellow ones in the pic. Remove all the sealing crap before you start.
Scott
| Description: |
|
| Filesize: |
58.92 KB |
| Viewed: |
2973 Time(s) |
|
_________________
"Were we directed from Washington when to sow and when to reap, we would soon want bread."
Thomas Jefferson
|
|
| Back to top |
|
|
Nashou66

Joined: 12 Jan 2007
Posts: 16171
Location: West Seneca NY
|
| Posted: Sun Aug 09, 2009 5:23 pm Post subject: |
|
|
| tse wrote: | After any major change it might be helpful to unplug the CRT heaters at P14. Then if there is magic smoke there is less danger to the tubes. If things look good then plug in P14. The heaters will slowly come up to temp giving you a chance to pull P14 if something is wrong before the tubes begin full conduction.
I like to set up the magnets by first using the convergence position to center the pictures on the phosphor. Mark picture position on screen with sticky notes or masking tape. (Picture should be where you want it or projector physical position and/or mechanical set-up is off.) Press "0" on remote control to center position settings. Make magnet settings keeping picture on screen marks. When finished magnets are correct and position is correct without using convergence shift.
Null the magnets by overlapping the little tabs like the yellow ones in the pic. Remove all the sealing crap before you start.
Scott |
Interesting idea, so let me see if I understand your method.
Center image on the tube face using the convergence controls,
then mark the position of the grids on the screen for each color? would that entail the edges and the center or just center?
then Press 0 while in convergence or when in all geometry functions?
now use the magnets to recenter all the grids to the screen tape markings?
then touch up with electronic controls?
Athanasios
_________________
Don't blame your underwear for your crooked ass~ unknown Greek philosopher
"Republicans believe every day is the Fourth of July, but the Democrats believe every day is April 15." --- President Reagan
One Smart Dog!!!
Marquee High Performance Bellows now shipping!!
Marquee Modifications and Performance Enhancement
Marquee C-element and Bellow removal
|
|
| Back to top |
|
|
Tim in Phoenix

Joined: 21 Oct 2006
Posts: 4409
Location: Phoenix
|
| Posted: Sun Aug 09, 2009 6:32 pm Post subject: |
|
|
Hello
Before pulling old tubes out, I advise setting G2s to 55, and Brite/Contrast to 40 so the new tubes come up softly. Make sure your G2 jumpers have a snug fit on the tube pins, and make sure you are connected on the right pins.
.
|
|
| Back to top |
|
|
dturco
Joined: 06 Feb 2009
Posts: 3778
Location: Eastern Shore Maryland
TV/Projector: Runco DLP VX-3000i Marquee 9500 parts doner
|
| Posted: Sun Aug 09, 2009 6:54 pm Post subject: |
|
|
Thank you Scott and Tim. 
_________________
Firefly rules. Can't stop the signal.
http://www.hulu.com/firefly
|
|
| Back to top |
|
|
tse
Joined: 03 May 2006
Posts: 1014
Location: Sweatbucket, Fl.
|
| Posted: Sun Aug 09, 2009 7:57 pm Post subject: |
|
|
| Nashou66 wrote: | | tse wrote: | After any major change it might be helpful to unplug the CRT heaters at P14. Then if there is magic smoke there is less danger to the tubes. If things look good then plug in P14. The heaters will slowly come up to temp giving you a chance to pull P14 if something is wrong before the tubes begin full conduction.
I like to set up the magnets by first using the convergence position to center the pictures on the phosphor. Mark picture position on screen with sticky notes or masking tape. (Picture should be where you want it or projector physical position and/or mechanical set-up is off.) Press "0" on remote control to center position settings. Make magnet settings keeping picture on screen marks. When finished magnets are correct and position is correct without using convergence shift.
Null the magnets by overlapping the little tabs like the yellow ones in the pic. Remove all the sealing crap before you start.
Scott |
Interesting idea, so let me see if I understand your method.
Center image on the tube face using the convergence controls,
then mark the position of the grids on the screen for each color? would that entail the edges and the center or just center?
then Press 0 while in convergence or when in all geometry functions?
now use the magnets to recenter all the grids to the screen tape markings?
then touch up with electronic controls?
Athanasios |
Mark the edges of the picture on the screen. After they are marked press "0" while in convergence mode. One menu for green and one menu for red/blue. Loosen the three wingnuts on the focus magnets and move the focus magnet to place picture in marked place. Adjust neck magnets, move focus magnet to reposition picture. Repeat until flair is correct and picture is in correct place.
Scott
_________________
"Were we directed from Washington when to sow and when to reap, we would soon want bread."
Thomas Jefferson
|
|
| Back to top |
|
|
Nashou66
Joined: 12 Jan 2007
Posts: 16171
Location: West Seneca NY
|
| Posted: Sun Aug 09, 2009 8:08 pm Post subject: |
|
|
| tse wrote: | | Nashou66 wrote: | | tse wrote: | After any major change it might be helpful to unplug the CRT heaters at P14. Then if there is magic smoke there is less danger to the tubes. If things look good then plug in P14. The heaters will slowly come up to temp giving you a chance to pull P14 if something is wrong before the tubes begin full conduction.
I like to set up the magnets by first using the convergence position to center the pictures on the phosphor. Mark picture position on screen with sticky notes or masking tape. (Picture should be where you want it or projector physical position and/or mechanical set-up is off.) Press "0" on remote control to center position settings. Make magnet settings keeping picture on screen marks. When finished magnets are correct and position is correct without using convergence shift.
Null the magnets by overlapping the little tabs like the yellow ones in the pic. Remove all the sealing crap before you start.
Scott |
Interesting idea, so let me see if I understand your method.
Center image on the tube face using the convergence controls,
then mark the position of the grids on the screen for each color? would that entail the edges and the center or just center?
then Press 0 while in convergence or when in all geometry functions?
now use the magnets to recenter all the grids to the screen tape markings?
then touch up with electronic controls?
Athanasios |
Mark the edges of the picture on the screen. After they are marked press "0" while in convergence mode. One menu for green and one menu for red/blue. Loosen the three wingnuts on the focus magnets and move the focus magnet to place picture in marked place. Adjust neck magnets, move focus magnet to reposition picture. Repeat until flair is correct and picture is in correct place.
Scott |
I never noticed you can zero out the blue and Red convergence? Now on the green i know if you hit Zero while in the green convergence service menu it clears it out, can this be done for all convergence while showing that color during regular convergence? So if in regular convergence and I am in the red color I can hit zero and it will clear the convergence for that color?
Athanasios
_________________
Don't blame your underwear for your crooked ass~ unknown Greek philosopher
"Republicans believe every day is the Fourth of July, but the Democrats believe every day is April 15." --- President Reagan
One Smart Dog!!!
Marquee High Performance Bellows now shipping!!
Marquee Modifications and Performance Enhancement
Marquee C-element and Bellow removal
|
|
| Back to top |
|
|
Tim in Phoenix
Joined: 21 Oct 2006
Posts: 4409
Location: Phoenix
|
| Posted: Mon Aug 10, 2009 12:28 am Post subject: |
|
|
Hello
Pushing 1 clears the static correction, 2 clears the zones, 0 does both and for red and blue. Clear green the same way in the service mode.
.
|
|
| Back to top |
|
|
|
|


