Electron Beam Focus
The electron beam focus system in a projector can be a simple one such as in
an electrostatic system or a complex dynamically varied magnetic focus system.
Sharp electron beam focus is easier if optical focus has already been done. Be
sure to perform an adequate first optical focus prior to fine tuning beam focus.
You have also seen the word "astigmation" mentioned in regard to beam focus.
Astigmation further shapes the electron focusing lens beyond regular focus
controls and is important for achieving maximal beam focus. However, it should
be fairly well set at the factory and new comers to CRT setup are best advised
to avoid attempting CPC magnet astigmation adjustments until they are more
familiar with projection CRT setup. For this reason I will cover astigmation
last in this document even though it should actually be performed PRIOR to
electron beam focusing adjustments.
Focusing Lens Cap to Assist with Electron Beam focusing
The phosphor grain optical focusing technique largely eliminates the need for
this trick, but I mention this for completeness. Some projectors come with a
special lens cap having a central hole approx 1 inch in diameter. This is
intended to reduce the aperture of the optical lens and allow examination of
beam focus even when optical focus is not quite correct. Because the phosphor
technique easily achieves good optical focus independent of beam focus, I
recommend setting the optical focus using the phosphor grain technique rather
than resorting to a focusing lens cap.
Electrostatic Beam Focus
Electrostatically focused CRT projectors have their electron beam focus
adjusted using variable resistors aka pots. These adjust the charge on the focus
lens for each gun. Focus controls are often housed together and marked as focus
for each color gun. On that same housing may also be "screen" controls which
adjust G2 voltage. It is easy to inadvertently adjust the screen controls while
attempting to adjust beam focus. I recommend that the novice cover screen
controls with a taped on piece of cardboard to avoid accidental adjustment while
attempting beam focus.
Check Beam Astigmation
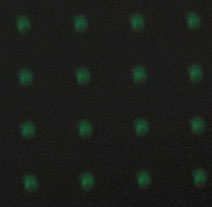
Display a dot pattern on the projector. Work with only one gun on at a time
and set contrast to moderately high level. Binoculars are once more useful in
observing the effects of your adjustments. As you vary the focus pot setting,
notice how the dots change between the overfocused and underfocused directions
of focus adjustment.
 |
 |
| Overfocus |
Underfocus |
The overfocused state changes the dots into a central bright core with a halo
around it. Ideally the bright central core is exactly centered in the halo. Also
the dots should move very little as focus is adjusted between over and
underfocused states.
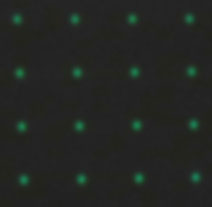
The underfocused state changes the dots into a uniformly lit blob. Ideally
the blob is perfectly circular in shape at screen center. It is normal for some
deformation to be present at screen periphery.
If you find the bright core off center, the blob isn't circular at screen
center, or the dots move as you adjust focus, astigmation for that gun needs to
be corrected. That is done using the CPC astigmation magnets on the neck of each
gun. CPC magnet adjustments should only be handled by a technician or very
advanced user. Great caution is required due to risk of electrical shock, death,
and equipment damage. Novices should enlist the aid of a technician if
astigmation problems are noted on an electrostatically focused machine. On
electromagnetically focused machines, there are often safe user accessible
astigmation controls, suitable for the non-technician.
Once correct astigmation is verified (or you have decided to live temporarily
with poor astigmation), proceed with the actual focusing of the guns. On an
electrostatic machine it is simple:
- Display a fine detail focus pattern or a dot hatch
pattern . Set contrast to a medium level.
- View only one gun at a time and adjust that gun's focus
pot for best overall focus. It is often impossible to achieve perfect beam
focus throughout the entire screen. The screen edges are particularly
problematic. Should that be the case, weigh the screen center as most
important for your compromise setting. That is where most film material will
be sharply focused.
The blue gun electorn beam is usually left slightly underfocused to allow
better grayscale tracking at higher light output levels. If you have light
metering capability, that means underfocusing the blue gun enough to increase
blue light output by about 20% over the fully focused state. Note that this does
not mean the blue gun OPTICAL focus should be left blurred. Just the electron
beam focus! They are not the same.
Electromagnetically Focused Projectors
EM focused projectors populate the pinnacle of projection CRT technology.
These machines use a magnetic coil to focus their electron beams. This is often
combined with a system for dynamically varying focus to achieve good center and
edge focus. (This is also done on some electrostatic machines, but not with
adjustability) The EM focused projector also usually has some form of dynamic
astigmation controls to refine beam spot shape throughout the screen. These
extra dynamic focus and astigmation controls allow very fine focus compared to
electrostatic units, but more controls means greater effort to achieve final
results. EM focus also induces some spiral geometry distortions which need to be
counteracted. The novice can do it successfully, but more work is needed to get
everything in order.
Fore and aft sliding of the focus coil and rotation of the dynamic
astigmation coils are not covered in this document. Those are maneuvers safest
left to experience hands.
EM focused projector typically include a remote operable control control for
overall (aka center) beam focus. This is analogous to the focus pot in an
electrostatic focused machine. An EM focused machine also usually provides
additional controls for fine tuning beam focus at the image edges, corners or
screen zones. These extra controls allow better edge to edge beam focus than
just a fixed single focus control setting.
The EM focused machine also adds a mechanism for dynamically correcting beam
astigmation for each portion of the image. Dynamic astigmation refines overall
beam focus beyond that achievable with just static CPC magnet astigmation. Again
a control is supplied for adjusting overall astigmation (center of screen
usually) and other controls for each edge, corner or zone of the screen.
Check Static Beam Astigmation
The machine will usually have some sort of CPC magnet assembly for rough
static adjustment of beam astigmation. If the CPC magnets are properly set, the
dynamic astigmation system won't have to work as hard to achieve good
astigmation. For this reason, it is a good idea to verify and adjust the CPC
magnets are properly set by neutralizing all the dynamic adjustments and then
checking static beam astigmation. If the underlying static astigmation is
flawed, the CPC magnets should be corrected prior to performing dynamic
astigmation. The complete set of CPC magnets may not be present in a EM focused
machine. Consult your service manual. Once static astigmation is done as well as
possible with the CPC magnets, fine tune with the dynamic astigmation system.
Set all dynamic astigmation controls to neutral to eliminate the effects of
the dynamic astigmation system.
Display a dot pattern on the projector. Work with only one gun on at a time
and set contrast to moderately high level. Binoculars are once more useful in
observing the effects of your adjustments.
As you vary the center EM focus setting, notice how the dots change between
the overfocused and underfocused directions of focus adjustment.
The overfocused state changes the dots into a central bright core with a halo
around it. Ideally the bright central core is exactly centered in the halo. Also
the dots should move very little as focus is adjusted between over and
underfocused states.
The underfocused state changes the dots into a uniformly lit blob. Ideally
the blob is perfectly circular in shape at screen center. It is normal for some
deformation to be present at screen periphery.
If you find the bright core off center, the blob isn't circular at screen
center, or the dots move as you adjust center beam focus, astigmation for that
gun needs to be corrected. That is done using the CPC astigmation magnets on the
neck of each gun. CPC magnet adjustments should only be handled by a technician
or very advanced user. Great caution is required due to risk of electrical
shock, death, and equipment damage. Novices should enlist the aid of a
technician if astigmation problems are noted on an electrostatically focused
machine.
Dynamic Astigmation
Once static astigmation has been adjusted with the CPC magnets, one can
proceed with dynamic astigmation. Some projectors will automatically underfocus
and overfocus the electron beam appropriately when astimation controls are
engaged. If yours does not do so, manually set beam focus to be underfocused or
overfocused as needed. See the later section on CPC Astigmation for details of
over vs underfocused beams with regard to astigmation.
Display a dot pattern and set contrast moderately high.
Start with all astigmation controls neutralized (center, all edges, corners,
or all zones).
Adjust center astigmation skew and height controls to make the center blob
circular. The machine may also have dynamic equivalents of the 2 pole
adjustment. Adjust that to make the central spot centered in its halo. The
actually set of dynamic astigmation controls vary from model to model, but the
sequence is to perfect the center astigmation first. Then do the edges and
finally corners of the screen. Zones interact so go back and fine tune when done
the first time.
EM Beam Focus
Once astigmation is completed, electron beam focus can be done while viewing
a fine crosshatch or focus pattern. Again, start by neutralizing focus controls
for center, edges, corners or all zones. Focus the center of the screen first.
Then do each edge and finally the corners. This particular order allows the
interaction of the edge controls to do some of the corner correction before
using any corner adjustments. Once more, recheck overall beam focus and retouch
as needed.
The goal of adjusting beam focus is not only to minimize electron spot size
but also reduce the flare around the spot as much as possible. Any flaring will
cause edge transitions to appear soft. You will create an overall sharper
looking image by accepting a slightly larger spot size if doing so eliminates
the flare. Overfocus the beam and then slowly back off the control to allow the
flare to diminish. Leave the control at the point at which flaring just
disappears. You may need to perform this adjustment with contrast turned up
enough to show the flaring. This optimizes the projector for best sharpness but
not necessarily best resolution. The dot size may end up slightly larger and
reduce resolution, but the increased sharpness will usually make the overall
image look better defined.
This concludes beam focusing for EM projectors. I have condensed the process.
The reader will best find the particular controls for his machine in the service
and setup manual for the machine.

|
