| Author |
Message |
innof
Joined: 17 Mar 2006
Posts: 193
|
| Posted: Sat Sep 22, 2007 3:06 am Post subject: Marquee Built In Instructions |
|
|
|
Hello Folks. If I follow the HELP instructions bulit into the Marquee for mechanical set-up is there anything "extra" that needs to be done to perfect the image? Thanx for all of your help.
|
|
| Back to top |
|
 |
CZ Eddie
Joined: 23 Mar 2006
Posts: 1601
Location: Austin, TX
|
| Posted: Sat Sep 22, 2007 6:40 am Post subject: |
|
|
Really it's not a 100% deal, not even if your magnetics are properly set up.
But... if the magnetics are nice & tight, then the HELP menu's will get you pretty close to where you need to be!
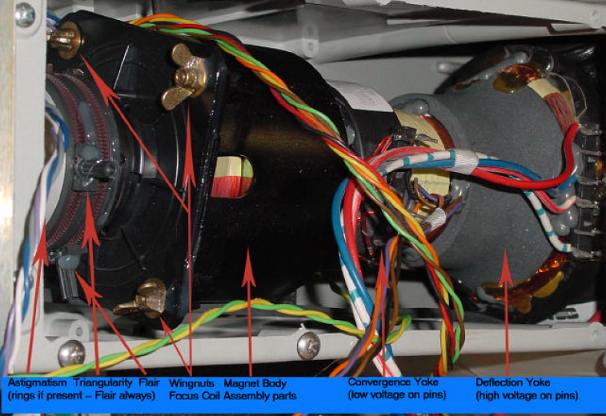
Do you get any flare? Turn up your contrast to 100, set focus to 0 and put up the dots internal pattern. Are the dots round, oval, or do they have any flaring? Flaring would be like a tail or something. If there is no flaring, then you can get a halfway decent pic. But for optimum, you'll want to spend a few hours getting those magnetics setup properly before you even bother with the HELP menu's.
See attachments for magnetics stuff.
| Description: |
|
| Filesize: |
45.75 KB |
| Viewed: |
11028 Time(s) |
|
| Description: |
|

Download |
| Filename: |
Guy Kuo-CRT PROJECTOR FOCUS & MECHANICAL AIM BASICS.doc |
| Filesize: |
61 KB |
| Downloaded: |
592 Time(s) |
| Description: |
|
Download |
| Filename: |
marquee magnetics setup 101.pdf |
| Filesize: |
27.82 KB |
| Downloaded: |
412 Time(s) |
_________________
Back after a digital sabatical.
|
|
| Back to top |
|
|
CZ Eddie
Joined: 23 Mar 2006
Posts: 1601
Location: Austin, TX
|
| Posted: Sat Sep 22, 2007 6:43 am Post subject: |
|
|
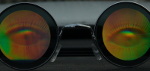
This is what the EDIT: BLOBS!! should look like. If they aren't similar to this, a nice little (but not perfect) donut with an empty center, then your focus will not be optimum.
| Description: |
|
| Filesize: |
26.19 KB |
| Viewed: |
11026 Time(s) |

|
_________________
Back after a digital sabatical.
Last edited by CZ Eddie on Sat Sep 22, 2007 3:18 pm; edited 1 time in total
|
|
| Back to top |
|
|
ADRIANKELLY

Joined: 07 Dec 2006
Posts: 185
Location: Anchorage Alaska
|
| Posted: Sat Sep 22, 2007 7:59 am Post subject: |
|
|
I have a small dot in the center but overall round outside . How close is this to right ?
_________________
If You Choose Not To Decide You Still Have Made A Choice .
|
|
| Back to top |
|
|
Zebu Fellenz
Joined: 21 Dec 2006
Posts: 2567
|
| Posted: Sat Sep 22, 2007 2:41 pm Post subject: |
|
|
Wow Eddie,
Those dots look completely different than what I have on my 8000. I've never messed with the magnets but I have small dots (solid dots) with no hole in the center.
|
|
| Back to top |
|
|
CZ Eddie
Joined: 23 Mar 2006
Posts: 1601
Location: Austin, TX
|
| Posted: Sat Sep 22, 2007 3:17 pm Post subject: |
|
|
Sorry guys, I always get it backwards. 
Ramp focus from one extreme to the other please.  
_________________
Back after a digital sabatical.
|
|
| Back to top |
|
|
tse
Joined: 03 May 2006
Posts: 1014
Location: Sweatbucket, Fl.
|
| Posted: Sat Sep 22, 2007 4:02 pm Post subject: |
|
|
Contrast at 100, focus at 0 should give lines and dots with bright "core" in center of out of focus area. Ramp focus up to 100 and dots should look like the ealier post.
Scott
| Description: |
|
| Filesize: |
4.56 KB |
| Viewed: |
10952 Time(s) |

|
_________________
"Were we directed from Washington when to sow and when to reap, we would soon want bread."
Thomas Jefferson
|
|
| Back to top |
|
|
stefuel

Joined: 07 Mar 2006
Posts: 3353
Location: Green Harbor MA USA
|
| Posted: Sat Sep 22, 2007 4:47 pm Post subject: |
|
|
Why do you guy's always jump to the middle steps of a installation when someone new comes along? 
Here's my little bit of advice. If you don't have the manual, get it. If you do have the manual, read it. Pay close attention to the mounting instructions. If it ain't mounted correctly, all the astig adjustments in the world won't help it. There was a new forum member from the a-site (whom will remain un-named) who sent out just about every board in his projector because it would not converge. I asked him to post a picture of the installation. He was trying to electronically correct for about a 30 degree projection angle. That thread was nearing the end of the second page before we figured that one out.
Baby steps my friends. You can't get into to much trouble with baby steps.
_________________
Chip
A Barco is only a AmPro with training wheels
Card carrying member of the AVS chain gang.
|
|
| Back to top |
|
|
innof
Joined: 17 Mar 2006
Posts: 193
|
| Posted: Sat Sep 22, 2007 7:18 pm Post subject: Test |
|
|
|
Hello again to all. CZEDDIE - That was a great post on your behalf so Thanx very much for having responded. I proceeded in performing the exercise which you outlined and I seem to have a roundish looking sphere with a dot in the center; Is this okay? This projector was originally set up at 109 inches away from the screen and now I have it at approx. 120; How much of a radical change is this in terms of distance? In other words, is it enough to require a readjustment of the magnetics? Thanx folks
|
|
| Back to top |
|
|
JustGreg

Joined: 07 Mar 2006
Posts: 3098
Location: Kenosha, WI
|
| Posted: Sat Sep 22, 2007 7:30 pm Post subject: |
|
|
That's OK Eddie...I'll take those blobs any day. mine are still a "bit" funky. I can't ever seem to get them as good as yours because the pj is ceiling mounted and it kicks the hell out of my back. Regardless of how you worded the procedure....I'd be more than happy with Cheerios like that.
There is everything to say about stefuels advice tho. Location, location, location. I was off 18 degrees my first attempt and it wasn't until I started from scratch and did it all over that I realized I'd been cheating myself out of a better image.
I have a general question about mounting and flapping I'd like to ask. Is there a way to determine if flapping is to blame for poor corner focus as opposed to inferior mounting? Having asked that, flapping can be artificially (we'll call it) used to overcome bad mounting but what else would that affect? Magnetics? Electronic astig adjustments? Electronic focus?
The answer I'll prolly get is...just make sure it's physically aligned right in the first place and I understand that, but for the sake of argument I toss that all out there. (Because I still don't know how it all interacts)
Have a great weekend folks!
Greg
EDIT: Perhaps this would be a good time to ask the pros to list the steps of a good setup from crate to popcorn again?
_________________
Greg
"Is it ignorance or apathy? Hey, I don't know and I don't care!" --Jimmy Buffett
|
|
| Back to top |
|
|
innof
Joined: 17 Mar 2006
Posts: 193
|
| Posted: Sat Sep 22, 2007 7:38 pm Post subject: Update |
|
|
I posted my last response before hitting the refresh button so I did not have an opportunity to actually read all of the other messages posted  Ultimately, the projector is nearly "perfectly" mounted; It sits off the floot approximately 8 inches on a fully customized stand built for me by a metallurgical engineer who owed me a big favor. The ground section was verfied for level and the stand allows for numerous pan and tilt adjsutments. I was told by this individual that the accuracy is measured to 1 mm in terms of squareness with my screen (he apparently utilized all of the components from his work which cost alot of money 8) ) The stand is actually quite beautiful and even heavy being fabricated with CNC machinery out of H13 hardended tool steel. I can't lift the Marquee by myself so he came over and helped me to bolt it into the stand. That's when his engineering persona reared it's head and he volunteered to adjust it as well. He spent two hours measuring with a laser and other contrations that I'm not familiar with! Needless to say, he assures me that it can't get better than this in terms of positioning. From corner to corner of the screen relative to the Marquee it's only off by 1/16th of an inch. Thanx again for all of the replies, you are all very generous with both your time and insights. For this, I duly extend my most genuine gratitude If it wasn't for all of the feedback accrued to date I would not have been able to get this far on this project. Ultimately, the projector is nearly "perfectly" mounted; It sits off the floot approximately 8 inches on a fully customized stand built for me by a metallurgical engineer who owed me a big favor. The ground section was verfied for level and the stand allows for numerous pan and tilt adjsutments. I was told by this individual that the accuracy is measured to 1 mm in terms of squareness with my screen (he apparently utilized all of the components from his work which cost alot of money 8) ) The stand is actually quite beautiful and even heavy being fabricated with CNC machinery out of H13 hardended tool steel. I can't lift the Marquee by myself so he came over and helped me to bolt it into the stand. That's when his engineering persona reared it's head and he volunteered to adjust it as well. He spent two hours measuring with a laser and other contrations that I'm not familiar with! Needless to say, he assures me that it can't get better than this in terms of positioning. From corner to corner of the screen relative to the Marquee it's only off by 1/16th of an inch. Thanx again for all of the replies, you are all very generous with both your time and insights. For this, I duly extend my most genuine gratitude If it wasn't for all of the feedback accrued to date I would not have been able to get this far on this project.
|
|
| Back to top |
|
|
JustGreg
Joined: 07 Mar 2006
Posts: 3098
Location: Kenosha, WI
|
| Posted: Sat Sep 22, 2007 7:50 pm Post subject: Re: Update |
|
|
| innof wrote: | | I posted my last response before hitting the refresh button so I did not have an opportunity to actually read all of the other messages posted Ultimately, the projector is nearly "perfectly" mounted; It sits off the floot approximately 8 inches on a fully customized stand built for me by a metallurgical engineer who owed me a big favor. The ground section was verfied for level and the stand allows for numerous pan and tilt adjsutments. I was told by this individual that the accuracy is measured to 1 mm in terms of squareness with my screen (he apparently utilized all of the components from his work which cost alot of money 8) ) The stand is actually quite beautiful and even heavy being fabricated with CNC machinery out of H13 hardended tool steel. I can't lift the Marquee by myself so he came over and helped me to bolt it into the stand. That's when his engineering persona reared it's head and he volunteered to adjust it as well. He spent two hours measuring with a laser and other contrations that I'm not familiar with! Needless to say, he assures me that it can't get better than this in terms of positioning. From corner to corner of the screen relative to the Marquee it's only off by 1/16th of an inch. Thanx again for all of the replies, you are all very generous with both your time and insights. For this, I duly extend my most genuine gratitude If it wasn't for all of the feedback accrued to date I would not have been able to get this far on this project. |
I didn't have a rocket scientist build my floor mount like you (I'm kidding...I mean no offense to your friend and the gift of his time and talents).
What I did initially was my son had a futon in his bedroom when he moved out so I tossed out the mattress, went at the wood frame with a plethora of tools, and ended up with a throne. I too added a way to adjust the different planes (X.Y.Z). Due to the size and configuration of the room however it had the proverbial "best seat in the house".
The one thing I noticed after ceiling mounting the beast is I no longer need to use as much keystone. When it was floor mounted I had a helluva battle with banding and even a tad when I ceiling mounted it.
An ISF pro would probably vomit or die laughing the way I have mine set up but I still enjoy the hell out of it every time I turn it on; and to me that's all that matters.
Good luck with your obsession, erm, I mean, hobby.
Greg
_________________
Greg
"Is it ignorance or apathy? Hey, I don't know and I don't care!" --Jimmy Buffett
|
|
| Back to top |
|
|
innof
Joined: 17 Mar 2006
Posts: 193
|
| Posted: Sat Sep 22, 2007 9:17 pm Post subject: Update |
|
|
Alright - so I did the test and with FOCUS at 100 and CONTRAST also at 100 I can see three "egg" shape forms - one distinctly green, one distinctly blue, and one distincly red; each overlapping one another. So let me guess.... I need to perform magnetics adjustment  And, I really don't even like the idea of poking around under the hood of this baby, my hair is curly enough And, I really don't even like the idea of poking around under the hood of this baby, my hair is curly enough  Yet, the show must go on, so any ideas please? I don't know where to begin with the magnetic adjustment Yet, the show must go on, so any ideas please? I don't know where to begin with the magnetic adjustment  Thanx. Thanx.
|
|
| Back to top |
|
|
garyfritz

Joined: 08 Apr 2006
Posts: 12088
Location: Fort Collins, CO
|
| Posted: Sat Sep 22, 2007 9:20 pm Post subject: |
|
|
The adjustments people are talking about here (adjusting the CPC magnets to get the flare &etc right) are done with one color at a time. Done right, it gives you the sharpest focus. (Along with magnetic focus, optical focus, flapping, etc.) Once you have the magnets adjusted, then you can worry about things like converging all 3 colors together.
The CPC magnet tabs are on the rear neck of the tubes. There's not too much to worry about back there. It's up by the bell of the tubes that you have to be veerrryy careful.
|
|
| Back to top |
|
|
stefuel
Joined: 07 Mar 2006
Posts: 3353
Location: Green Harbor MA USA
|
| Posted: Sat Sep 22, 2007 10:32 pm Post subject: Re: Update |
|
|
| innof wrote: | | I posted my last response before hitting the refresh button so I did not have an opportunity to actually read all of the other messages posted Ultimately, the projector is nearly "perfectly" mounted; It sits off the floot approximately 8 inches on a fully customized stand built for me by a metallurgical engineer who owed me a big favor. The ground section was verfied for level and the stand allows for numerous pan and tilt adjsutments. I was told by this individual that the accuracy is measured to 1 mm in terms of squareness with my screen (he apparently utilized all of the components from his work which cost alot of money 8) ) The stand is actually quite beautiful and even heavy being fabricated with CNC machinery out of H13 hardended tool steel. I can't lift the Marquee by myself so he came over and helped me to bolt it into the stand. That's when his engineering persona reared it's head and he volunteered to adjust it as well. He spent two hours measuring with a laser and other contrations that I'm not familiar with! Needless to say, he assures me that it can't get better than this in terms of positioning. From corner to corner of the screen relative to the Marquee it's only off by 1/16th of an inch. Thanx again for all of the replies, you are all very generous with both your time and insights. For this, I duly extend my most genuine gratitude If it wasn't for all of the feedback accrued to date I would not have been able to get this far on this project. |
Well now you've gone and done it. You've peaked my interest
Please post a picture of the installation, especially from the side. Please take the picture from the same height as the base of the projector and so that the screen is also in the picture.
_________________
Chip
A Barco is only a AmPro with training wheels
Card carrying member of the AVS chain gang.
|
|
| Back to top |
|
|
innof
Joined: 17 Mar 2006
Posts: 193
|
| Posted: Sat Sep 22, 2007 11:26 pm Post subject: Help |
|
|
|
Okay then - Here's the question of the day..... When performing any of these adjustments, do I need to have the source activated (i.e. Sony PS3 playing while doing the deed)?
|
|
| Back to top |
|
|
AnalogRocks
Forum Moderator
Joined: 08 Mar 2006
Posts: 26706
Location: Toronto, Ontario, Canada
TV/Projector: Sony 1252Q, AMPRO 4000G
|
| Posted: Sun Sep 23, 2007 1:03 am Post subject: Re: Help |
|
|
| innof wrote: | | Okay then - Here's the question of the day..... When performing any of these adjustments, do I need to have the source activated (i.e. Sony PS3 playing while doing the deed)? |
I had my PS One playing while doing the deed once. Man did my girlfriend complain.
Can you post a picture of your stand? It sounds wonderfull.
_________________
Tech support for nothing
CRT.
HD done right!
|
|
| Back to top |
|
|
innof
Joined: 17 Mar 2006
Posts: 193
|
| Posted: Sun Sep 23, 2007 1:32 am Post subject: |
|
|
|
Good One. Good One. I need to borrow my brother's camera and then post some pics. I just threw the Fifth Element into the PS3 and despite the lack of locked in magnetics the picture looked pretty good; I'm wondering if anyone nearby can give me a hand with the set-up or I can get some leads as to how to do the procedure myself?
|
|
| Back to top |
|
|
AnalogRocks
Forum Moderator
Joined: 08 Mar 2006
Posts: 26706
Location: Toronto, Ontario, Canada
TV/Projector: Sony 1252Q, AMPRO 4000G
|
| Posted: Sun Sep 23, 2007 2:02 am Post subject: |
|
|
Next thing we need you too do is fill in your location in your profile. Then maybe some one near you can step up.
_________________
Tech support for nothing
CRT.
HD done right!
|
|
| Back to top |
|
|
innof
Joined: 17 Mar 2006
Posts: 193
|
| Posted: Sun Sep 23, 2007 2:09 am Post subject: La belle province |
|
|
|
I'm in Montreal and actually travel to Toronto at least once a quarter.
|
|
| Back to top |
|
|
|
|


