| Author |
Message |
kal
Forum Administrator

Joined: 06 Mar 2006
Posts: 18114
Location: Ottawa, Canada
TV/Projector: JVC DLA-NZ7
|
|
| Back to top |
|
 |
dvh99

Joined: 25 Dec 2009
Posts: 2158
Location: nederland
|
| Posted: Sat Nov 10, 2012 3:02 am Post subject: |
|
|
dunno about that, just ask the guy if it goes above 100 degrees celcius or thereabouts.
it aint that big, you could mount it.
_________________
1 answer always poses multiple questions.
marquee 9500ultra HD10L moome hdmi1.3 v3+ some mods.
|
|
| Back to top |
|
|
Ile
Joined: 09 Mar 2006
Posts: 1491
Location: Jyväskylä, Finland
|
| Posted: Wed Nov 14, 2012 9:10 am Post subject: |
|
|
Cheaply build bi-metals aren't that accurate, I have twisted mine to show about right at 80 C using Fluke as a reference.
Liquid thermometer would be much more accurate.
Usually digital in/out thermometers don't measure that high, but some wireless weather stations have also sauna sensor and humidity measurement.
Wireless food thermometers have adjustable alarm for certain temperature, that would be handy to know when sauna is ready and measuring range is high enough also for heater stones.  Don't know if there is weather stations with similar alarm. Don't know if there is weather stations with similar alarm.
|
|
| Back to top |
|
|
kal
Forum Administrator
Joined: 06 Mar 2006
Posts: 18114
Location: Ottawa, Canada
TV/Projector: JVC DLA-NZ7
|
| Posted: Wed Nov 14, 2012 2:27 pm Post subject: |
|
|
Good point. I've been thinking of using something liquid filled. I use liquid filled NIST certified lab grade thermometers to calibrate my digital brewery thermometers. The spirit or liquid used in these thermometers doesn't "drift" or change over time like other things can so they make good reference thermometers.
I'll look into something like in your link.
A sauna thermometer of course doesn't have to 100% accurate but something that works reasonably close (within a few degrees would certainly be more useful than the one I have now that is off by 40 degrees and stuck within a 20 degree range no matter what the temperature is. 
Thanks!
_________________

Support our site by using our affiliate links. We thank you!
My basement/HT/bar/brewery build 2.0
|
|
| Back to top |
|
|
AnalogRocks
Forum Moderator

Joined: 08 Mar 2006
Posts: 26706
Location: Toronto, Ontario, Canada
TV/Projector: Sony 1252Q, AMPRO 4000G
|
| Posted: Wed Nov 14, 2012 5:15 pm Post subject: |
|
|
| kal wrote: |
Good point. I've been thinking of using something liquid filled. I use liquid filled NIST certified lab grade thermometers to calibrate my digital brewery thermometers. The spirit or liquid used in these thermometers doesn't "drift" or change over time like other things can so they make good reference thermometers.
I'll look into something like in your link.
A sauna thermometer of course doesn't have to 100% accurate but something that works reasonably close (within a few degrees would certainly be more useful than the one I have now that is off by 40 degrees and stuck within a 20 degree range no matter what the temperature is.
Thanks! |
I thought a sauna was just supposed to be hot until you can't stand it any more 
_________________
Tech support for nothing
CRT.
HD done right!
|
|
| Back to top |
|
|
Jeremy112
Joined: 28 Sep 2006
Posts: 2649
Location: Fond du Lac, WI
|
| Posted: Mon Nov 19, 2012 2:33 pm Post subject: |
|
|
why do I get the feeling that the basement of your new home is much more awesome than the rest of it? 
Kal, I LOVE LOVE LOVE the large tiles you chose to go with, they make the rooms you used them in look modern and clean in design.
I also love all the lights and new shiny brewery stuff you have  Truly a great basement Kal! Something I would love to have! Truly a great basement Kal! Something I would love to have!
_________________
When I'm asking for a Model number, that doesn't mean I'm asking for a nude photo with your number on it
|
|
| Back to top |
|
|
Jeremy112
Joined: 28 Sep 2006
Posts: 2649
Location: Fond du Lac, WI
|
| Posted: Mon Nov 19, 2012 5:07 pm Post subject: |
|
|
Oh and Kal, I am wondering what your center channel is that you have? I am upgrading my speakers and the center channel is the only thing I dont have picked since Boston Acoustics did not make a matching center channel for my Lynnfield 400Ls & 500Ls (they are almost 20 years old so no surprise, since the speakers were designed pre-5.1) but they have the home theater look and sound.
Your center channel is one that caught my eye so any info on it would be awesome
_________________
When I'm asking for a Model number, that doesn't mean I'm asking for a nude photo with your number on it
|
|
| Back to top |
|
|
kal
Forum Administrator
Joined: 06 Mar 2006
Posts: 18114
Location: Ottawa, Canada
TV/Projector: JVC DLA-NZ7
|
| Posted: Mon Nov 19, 2012 5:21 pm Post subject: |
|
|
The center channel is a Paradigm Signature C5.
Ideal for any HT setup is to have a center channel that is identical to the side left and right speakers and placed the same way too. This usually requires an accoustically transparent (AT) screen. The result is a sound that's very firmly anchored the picture since it's "in" the picture. While I'm happy with the center speaker I have, I know it would sound better to have a third Paradigm Signature S8 to match my left/right speakers.
If I ever go with an AT screen that will be one of the mean reasons to do it.
Kal
_________________
Support our site by using our affiliate links. We thank you!
My basement/HT/bar/brewery build 2.0
|
|
| Back to top |
|
|
kal
Forum Administrator
Joined: 06 Mar 2006
Posts: 18114
Location: Ottawa, Canada
TV/Projector: JVC DLA-NZ7
|
| Posted: Tue Dec 04, 2012 7:04 pm Post subject: |
|
|
I've been spending a lot of time lately on getting the bar taps all set up properly. There's still a ways to go but I figured an update was in order. I'll be eventually documenting this in more detail with extra pictures and parts lists but this won't be done until all my testing is complete. What is below is only an update of what's going on.
First thing that was needed was a chalkboard so that we can write down what's on tap:
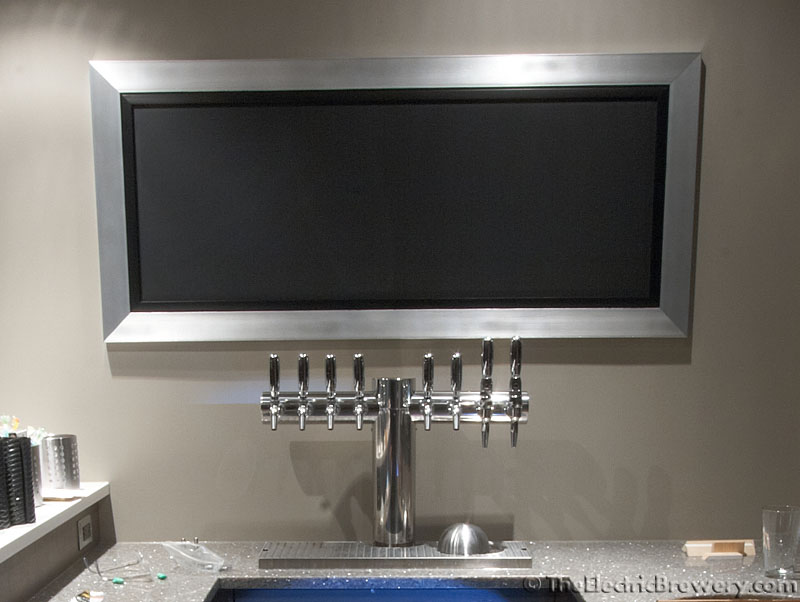
Everyone that sees it thinks it's a flat panel TV. Once I add some writing it should be more obvious what it is.
This is actually a mirror bought from a local discount home improvement store. Finding one the right size/ratio and that suited our style took some time but the result was considerably less expensive than having something custom made ($50 vs $400).
The glass was sanded lightly and then Rust-Oleum chalkboard spray paint was applied after carefully covering the frame and edges with tape.
Rust-Oleum chalkboard paint is also available that can be applied with a roller or brush. I've used it before for other projects and a roller is definitely preferred to avoid brush marks but you need to then be able to roll past the working area. Since the glass mirror could not be easily removed from the frame (it's glued in) I opted to go with spray paint here instead to make sure that the finish was nice and smooth.
I hooked up the Draft Beer Trunk Line (1/4" 8 Product Lines w/ 2 Glycol Lines) to the 8-tap tower and added the six Perlick faucets and two stout faucets using a faucet wrench. This special wrench is absolutely required. You'll completely wreck the nice finish on the shank nuts if you try to use a regular wrench. The good news is that a faucet wrench is only about $5.
It's amazing how many tools it takes to do what's actually a pretty straight forward job (mostly because I had to go through 2 layers of drywall and the bar cabinet back wall - all very cramped):
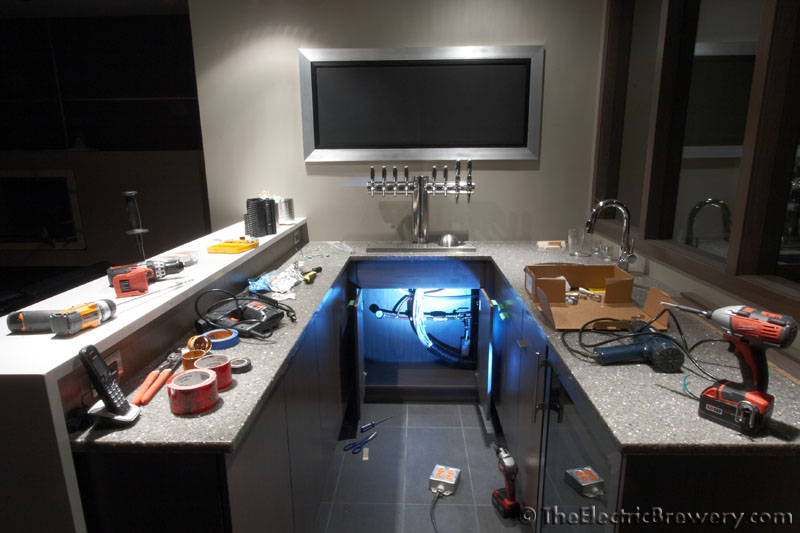

The hose ends were heated slightly with a heat gun to make them easier to slide on to the barbed ends of the tower supply lines. Small all stainless worm clamps are used to hold them in place.
Once all tests are done the exposed hoses will be wrapped in plastic wrap (moisture barrier), then wrapped in metal foil for (cold transfer from glycol lines to product lines), and then insulated. Same as the original trunk line.
I don't believe I evef included a photo of the plumbing to supply and drain the drip tray so here's an explanation of the parts shown:
1 - Pressure gauge for glass rinser. (Around 15-20 PSI is all you need).
2 - Pressure reducing valve (PRV) used to take the ~60 PSI house water pressure down to ~15 PSI for the glass rinser. (The PRV is mostly hidden by the beer trunk line).
3 - One way check valve to stop any backflow. (Prevents the rinser from leaking if house water pressure drops).
4 - Shut off valve for glass rinser.
5 - Shut-off valve for brewery floor drain washout. (You need to run water through basement floor drains once or twice a year to avoid standing water. This valve makes it easy. I simply open it for 10 seconds a couple of times/year since technically the brewery floor drain will never be used - it's there "just in case". Most houses will only have 1 floor drain that is automatically washed/cleaned from the air conditioner, dehumidifyer, and/or HRV/ERV system so no need for manual intervention.)
6 - Drain from drip tray. (A regular dishwasher drain hose that connects to above the P-trap under the bar sink).
7 - Cold water supply line to the drip tray sprayer. (Always use cold water for a glass rinser).
One the brewery side the large trunk line will connect to the keg freezer (keezer) on the right:
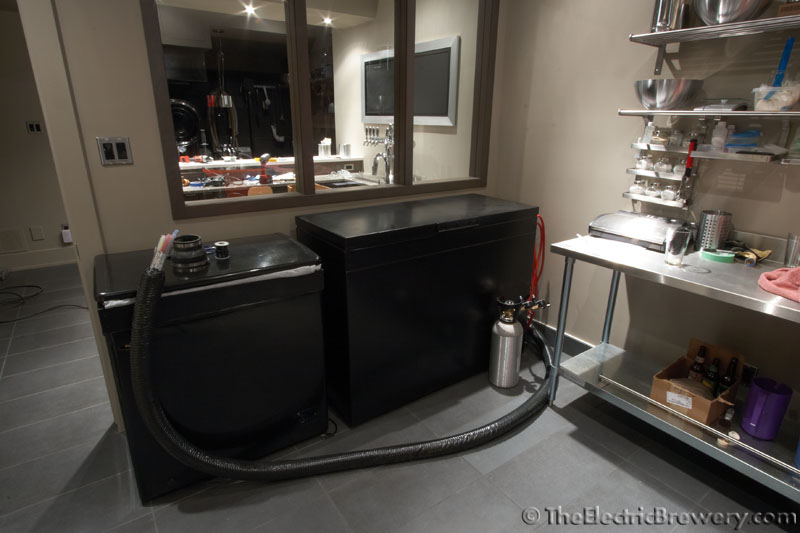
The freezer on the left is actually run as a freezer and is used to store hops and yeast, and to chill the glycol lines in the trunk line. I've been doing various cooling scenario tests at the moment to see what works best and will be documenting more shortly.
Extra shelves were installed in the brewery, (still more to come for the right wall):
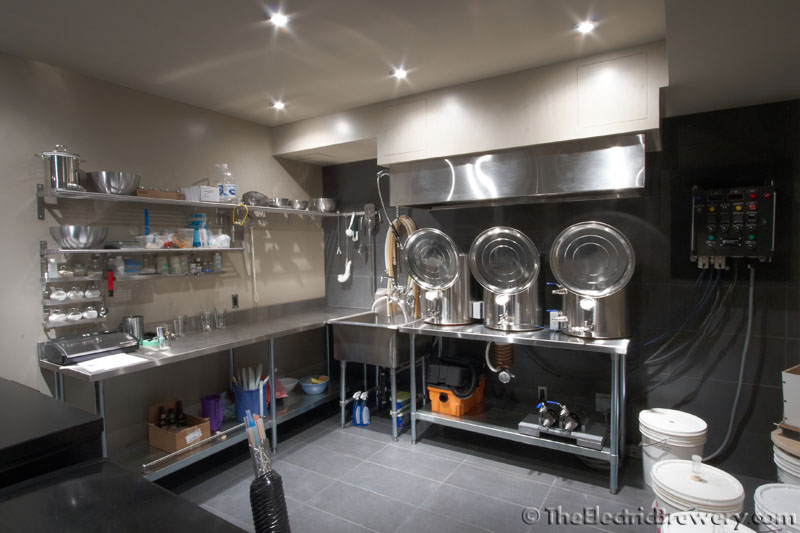
I've brewed twice now in the new room and it's a welcome change from running around in the garage. Everything is at your fingertips.
On the Home Theatre front, our existing Zenith 1200 CRT projector has been temporarily put back into service by floor mounting to tide us over until a new projector is ordered. (We're waiting for a new line of JVC models that won't be out until likely end of December, and I do not want to be first in line either). Having the old projector running will also make it easier to sell as prospective buyers will want to see it in action.

Bonus points to anyone who recognizes the miniseries currently up on screen.
I discovered a new genre of movie posters that I like called "retro minimalist" (Google "retro minimalist movie posters"). These ones feature the movie that probably had the biggest impact on me and made me want to get into this hobby:

As far as I'm concerned, Han shot first and Jar Jar doesn't exist.
Kal
_________________
Support our site by using our affiliate links. We thank you!
My basement/HT/bar/brewery build 2.0
|
|
| Back to top |
|
|
kal
Forum Administrator
Joined: 06 Mar 2006
Posts: 18114
Location: Ottawa, Canada
TV/Projector: JVC DLA-NZ7
|
| Posted: Tue Dec 04, 2012 9:34 pm Post subject: |
|
|
I'm a big fan of using the right tool for the right job and using good tools. I find they make all the difference when to comes to doing good work. Good tools also make the job easier and will (hopefully) last longer.
With that in mind I noticed that I had pictures of some of my tools in the previous pictures. For Xmas 2011 my big gift was the following tools that I've been using all year now:

From top to bottom:
Milwaukee 2697-22 M18 18-Volt 1/2-Inch 2-Tool Combo Kit (Compact hammer drill & impact driver)
Milwaukee 2735-20 M18 LED Worklight
Ridgid R82007 12-Volt Lithium-Ion Pocket Drill Driver
(Using these links helps support this site at no additional cost to you - Thank you!)
In the past I've never been a big fan of cordless tools but that's probably because I've always used cheap ones that just don't have any power and have batteries that never last. These Milwaukee M18 tools are different. They do not lose power as the batteries deplete and it takes forever to drain the batteries in the first place. I've been using them extensively over the last 12 months and it again drives home the point that the right tool can really simplify a job and save you time.
Still using a screwdriver? Try an impact driver instead. It'll save your wrists, is about 50x faster, more torque, and less chance of stripping heads when used correctly.
The compact hammer drill switches easily between hammer and non-hammer and has 2 speed settings. The slower one is actually perfect for milling grain.I've been this drill now for ~1 years instead of my previously recommended corded drill as I only have to pull the trigger in all the way and never worry about milling too fast.
The compact hammer drill in action making holes for the beer trunk line:

The LED worklight is actually the one I use the most. It presents phenomenally bright and well focused light, has good weight to it (balances perfectly on the battery), an adjustable head, and the battery seems to last forever. There were times when I'd be working on all day with it on. You can go all day without charging it. Like their other tools it doesn't feel cheap or fragile. I don't like having to be careful with tools and the LED worklight is no exception: It's all scratched up but works perfectly.
Sometimes you need something smaller to get into tight spots (like between joists) and that's where the Ridgid R82007 12-Volt Lithium-Ion Pocket Drill Driver comes in. Perfect for tight spaces. Came in very handy when I installed a central-vac conduit through joists *above* a whole bunch of HVAC tin:
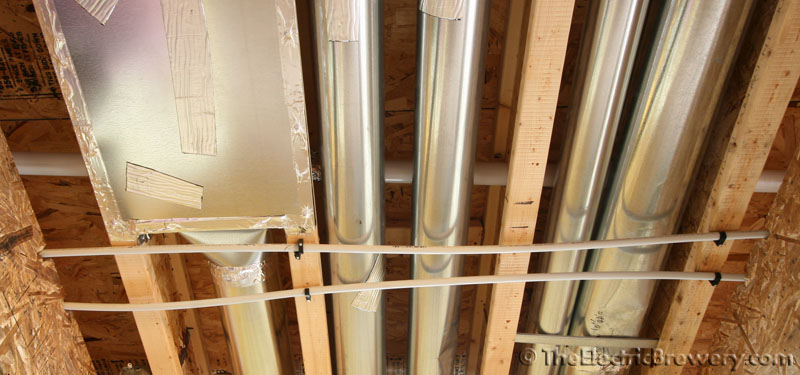
The white conduit can be seen running left to right in the picture above. It's part of the HDMI cable conduit that goes between the A/V room behind the screen and the projector mount in the back of the home theater. I had to punch through about 15 joists and get my drill & hole saw up there amongst HVAC ducts to do it. There's no way this would have been possible with a regular sized drill.
Note: There seems to be many people who had battery issues with this compact Ridgid model so if you do buy one make sure to get one from a store with a good return/exchange policy, though I believe that Ridgid will do the swap for you too. (Mine seem fine).
Kal
_________________
Support our site by using our affiliate links. We thank you!
My basement/HT/bar/brewery build 2.0
|
|
| Back to top |
|
|
Motobias

Joined: 08 Jul 2008
Posts: 163
Location: Osnabrueck, Germany
|
| Posted: Mon Dec 10, 2012 11:38 am Post subject: |
|
|
you are one hell of a smart nutter
_________________
Most peope talk about HD without knowing the meaning and how to do it RIGHT !
FIGHTING STUPIDITY SINCE 1983
|
|
| Back to top |
|
|
kal
Forum Administrator
Joined: 06 Mar 2006
Posts: 18114
Location: Ottawa, Canada
TV/Projector: JVC DLA-NZ7
|
|
| Back to top |
|
|
VideoGrabber
Joined: 09 Apr 2006
Posts: 933
Location: Michigan
|
| Posted: Fri Jan 04, 2013 8:19 pm Post subject: |
|
|
| kal wrote: | | Shamless plug: |
A plug without a sham. Interesting.
_________________
- Tim
|
|
| Back to top |
|
|
kal
Forum Administrator
Joined: 06 Mar 2006
Posts: 18114
Location: Ottawa, Canada
TV/Projector: JVC DLA-NZ7
|
|
| Back to top |
|
|
kal
Forum Administrator
Joined: 06 Mar 2006
Posts: 18114
Location: Ottawa, Canada
TV/Projector: JVC DLA-NZ7
|
| Posted: Mon Jan 07, 2013 10:58 pm Post subject: |
|
|
Nothing is ever simple...
A couple of months ago I thought I'd get ahead of things a bit and do some of the HDMI wiring before the new projector arrived:

The HDMI splitting/switching is as follows:

It's deceptively simple. We only have 2 sources:
- Bell ExpressVu HD-PVR: For watching TV (both recorded and live)
- PS3: For Blu-ray/DVD/games
The biggest issue is that we want to be able to share recorded TV content between our family room TV and the Home Theatre projector. Bell (who uses Dish Network equipment) is just coming out with "whole house PVR" solutions now but I didn't want to replace perfectly good equipment. Instead, we simply split the output so that both the projector and TV always get the same signal. This works for us because we never sit in separate rooms watching different TV shows (I rarely watch TV to begin with). A Monoprice 8204 HDMI splitter is used to do this.
The family room TV is a good 40 or so feet away and above. I did not want to put HDMI cables in the ceiling and through the floor for many reasons: HDMI cables are fragile and do not bend well. They do not enjoy being pulled through joists and other tight spaces. The connectors on HDMI cables are especially fragile. They are also large meaning a fairly large hole has to be drilled through the floor to get up into the family room. So Monoprice 8121 HDMI/CAT6 converters were used instead. Allows you to send HDMI over two CAT5e/CAT6 network cables up to 98ft (give or take).
While sharp bends on high speed network cable should also be avoided, it's much easier to work with and I can crimp on the connectors after the fact. Given the fact that the run is fairly short, at only $18 for the Monoprice 8121 HDMI/CAT6 converters I was willing to take a chance over using a more robust solution like the Lumagen HDMI/CAT6 extender (even with my dealer cost it's still not $18).
Both source signals then go to a Monoprice 8462 HDMI switcher. This switcher is "intelligent" in that it always switches to the last source that outputs a signal. This means that I don't need to do any switching at all to switch between PS3 and HD-PVR during normal use. The HD-PVR always on and always outputs a signal so it's always the active signal sent to the projector. If we want to watch a movie or play a game, we turn on the PS3 and the switcher automatically switches over. Once done, the PS3 is turned off and the switcher switches back to the HD-PVR automatically. I like that. Makes it bulletproof for anyone to use.
IR override with the remote is also available if we want to switch to TV while the PS3 is still on, but the automatic switching covers 99% of what we want to do.
So to get back to my original statement: Nothing is ever simple...
The projector was installed a week or so ago, and what I wrote above just didn't work. The HDMI switcher kept freezing (wouldn't switch inputs automatically or with the remote). Once it locked on a signal, it could never be switched to another. I had to manually unplug the power and plug it back in to wake it up after disconnecting HDMI cables. It only seemed to have a problem when the projector HDMI cable was connected so I was starting to suspect a handshaking issue between the projector and switcher (makes sense right?).
Turns out that the problem was elsewhere and I forgot to follow my own advice that I often give to people that have HDMI issues: While long cables can cause issues, make sure none of the cables are too short as well.
Really short HDMI cable (less than 6') can sometimes cause handshaking/reflection issues. If you're having problems with a setup that uses really short cables, try a 9-12' one just to confirm. The cable I'm using between the HDMI splitter and HDMI switcher is only 1' long. So I tried a longer (12') cable and the problem went away. Sheesh.
I bought a few of these these high quality 1' Monoprice HDMI cables and they all caused the same issue. They worked fine in other setups however. The cables are "fine". It all depends on the HDMI hardware on either end. It's somewhat of a crapshoot. In this case I got sidetracked a bit since the problem would go away when I unplugged the projector HDMI cable.
The suggestion of not using really short HDMI cables is also echoed by some manufacturers of HDMI equipment (Lumagen for example).
P.S. I hate HDMI for reasons like this.
Kal
_________________
Support our site by using our affiliate links. We thank you!
My basement/HT/bar/brewery build 2.0
|
|
| Back to top |
|
|
VideoGrabber
Joined: 09 Apr 2006
Posts: 933
Location: Michigan
|
| Posted: Tue Jan 08, 2013 2:37 am Post subject: |
|
|
| kal wrote: | | Nothing is ever simple... |
No kidding. It's amazing the amount of grief this tech stuff can cause.
| Quote: | | ...make sure none of the cables are too short as well. Really short HDMI cable (less than 6') can sometimes cause handshaking/reflection issues. If you're having problems with a setup that uses really short cables, try a 9-12' one just to confirm. The cable I'm using between the HDMI splitter and HDMI switcher is only 1' long. So I tried a longer (12') cable and the problem went away. Sheesh. |
Now that you've identified the source of the problem, you might want to open up the HDMI Splitter box, just to see if there is a Drive Level trim-pot inside. Backing off on that would also solve the problem, without draping miles of cable all over the place.  OK, so I exaggerate. OK, so I exaggerate.
| Quote: | | I bought a few of these these high quality 1' Monoprice HDMI cables and they all caused the same issue. |
Well, there you go. That's what you get for buying high-quality cables. I wonder if you had bought the crappiest AWG32 cables you could find, if they may have had enough HF losses to avoid your overload issues. [I bought a pile of short HDMI cables myself a while back, for future use when I cable lots of gear into a rack when I eventually get into a new house. I probably should have tested them, because I may wind up with the same fate as you. I can't recall, but I think they were mostly 3'-ers though.]
| Quote: | | P.S. I hate HDMI for reasons like this. |
I hate HDMI (more specifically HDCP) because it panders to media industry paranoia, and puts the burden of wasted cost, inconvenience, and flat-out system failure squarely on the back of the consumer. And after all that, does nothing to protect the media conglomerates if someone wants to grab that signal anyway. So billions of dollars spent on all the encode/decode chips in hundreds of millions of devices, enriching a handful of companies, and the only thing gotten from it is a PITA for consumers.
_________________
- Tim
|
|
| Back to top |
|
|
VideoGrabber
Joined: 09 Apr 2006
Posts: 933
Location: Michigan
|
| Posted: Tue Jan 08, 2013 2:43 am Post subject: |
|
|
Kal had written:
> Though I don't know of any plugs that have shams
well, in a sense, HDMI plugs are shams, because they're supposed to reliably carry a secure data-stream, but really don't.
(How's that for a stretch? )
There's no question though that the handshaking there is a b*tch, and the root of numerous problems.
_________________
- Tim
|
|
| Back to top |
|
|
kal
Forum Administrator
Joined: 06 Mar 2006
Posts: 18114
Location: Ottawa, Canada
TV/Projector: JVC DLA-NZ7
|
| Posted: Tue Jan 08, 2013 4:19 am Post subject: |
|
|
| VideoGrabber wrote: | | Now that you've identified the source of the problem, you might want to open up the HDMI Splitter box, just to see if there is a Drive Level trim-pot inside. Backing off on that would also solve the problem, without draping miles of cable all over the place. OK, so I exaggerate. |
Interesting. I'll take a look. Not sure given the size and cost that there would be a pot in there for that (cheaper to used a fixed resistor) but you never know!
Kal
_________________
Support our site by using our affiliate links. We thank you!
My basement/HT/bar/brewery build 2.0
|
|
| Back to top |
|
|
kal
Forum Administrator
Joined: 06 Mar 2006
Posts: 18114
Location: Ottawa, Canada
TV/Projector: JVC DLA-NZ7
|
| Posted: Thu Jan 24, 2013 9:12 pm Post subject: |
|
|
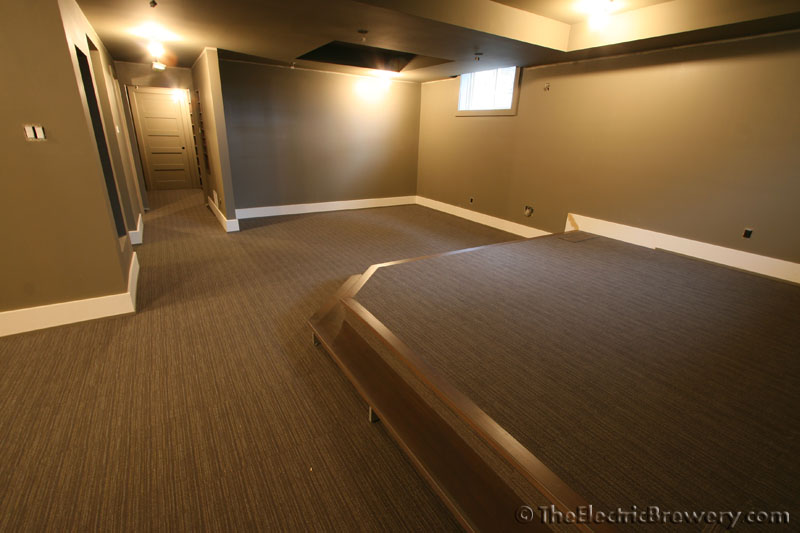
The steps and nosing around our riser are very slippery and I'd like to treat them with something. I don't need something that provides super friction like anti-slip tape (looks like sandpaper). We're not playing basketball on this thing. I just want something that raises the coefficient of friction a bit. For example, the pre-finished hardwood on our main floor is brand new and not overly slippery. I'd be happy with something similar to that level of friction.
There seems to be a quite a variety of anti-slip sprays and roll-on coatings meant for for wood stairs. Anyone use any of these products. Thoughts/Recommendations? Thanks!

Kal
_________________
Support our site by using our affiliate links. We thank you!
My basement/HT/bar/brewery build 2.0
Last edited by kal on Thu Jan 24, 2013 9:49 pm; edited 1 time in total
|
|
| Back to top |
|
|
RayN999

Joined: 25 May 2010
Posts: 207
Location: Minneapolis, MN
TV/Projector: Sony VPL-VW60 and Toshiba 65H84 CRT RPTV
|
| Posted: Thu Jan 24, 2013 9:39 pm Post subject: |
|
|
I've been looking for ideas on this as well, since I want to refinish the (extremely narrow & steep) steps in my 114 year old house. Like you, I'd like it to not look like someone sprinkled sand down or glued sandpaper down.
Watching this thread for some inspiration.
Ray
_________________
Ray Nelson
N9QBV
|
|
| Back to top |
|
|
|
|


