| Author |
Message |
overclkr

Joined: 08 Mar 2006
Posts: 4227
|
| Posted: Wed Aug 29, 2012 9:10 pm Post subject: |
|
|
freaking awesome Kal. I am very jealous 
|
|
| Back to top |
|
 |
kal
Forum Administrator
Joined: 06 Mar 2006
Posts: 18114
Location: Ottawa, Canada
TV/Projector: JVC DLA-NZ7
|
| Posted: Fri Aug 31, 2012 3:07 am Post subject: |
|
|
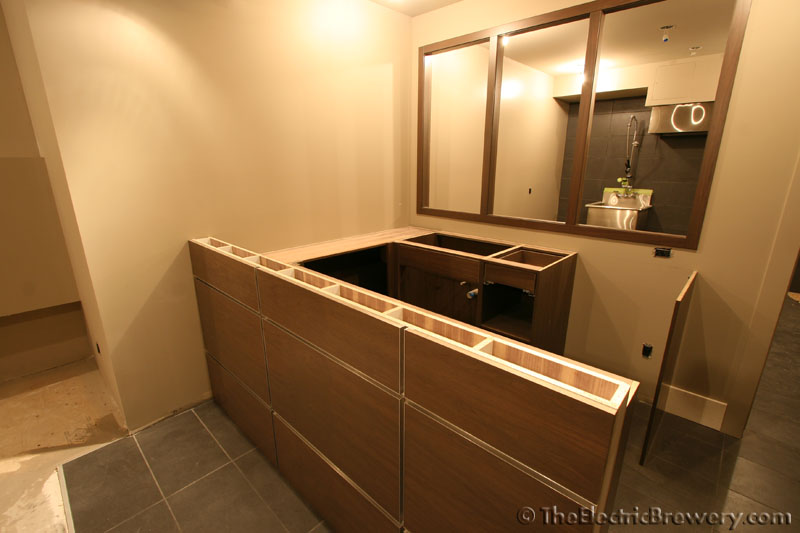
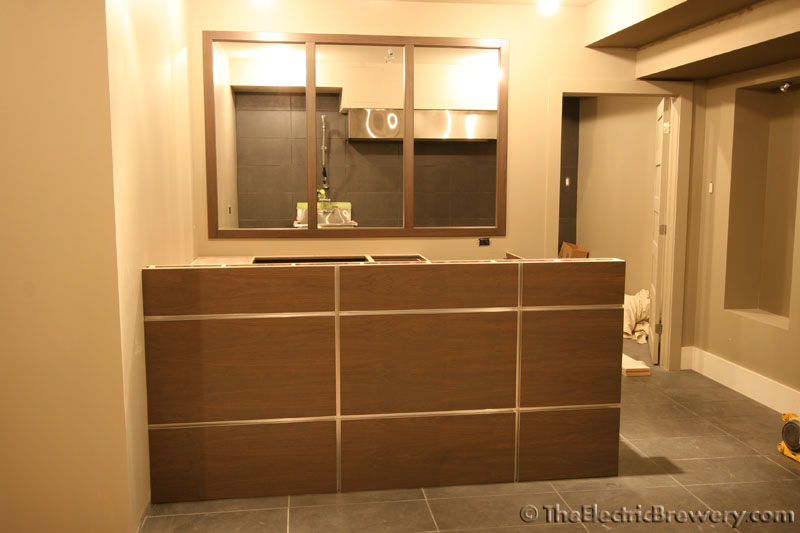
The bar cabinetry was installed today:


We picked walnut for all of the fine woodwork in the basement as it has a more interesting and somewhat consistent grain. It's been stained greyish/brown. Here's a closeup:

Still missing are the doors, countertops, and front of the bar.
On Tuesday the company doing the countertops (Urban Quarry) come to template for the quartz. For the upper (front) bar we're going with Cambria Whitehall 0120 quartz:

Here it is installed somewhere else:

Very white indeed. The upper bar in this white quartz will also 'waterfall' off the edge to the floor.
For the lower bar we're going with Cambria Minera 5360 quartz:

Here it is installed somewhere else:

It's a greyer/silver/speckled quartz.
Lots of other minor things were done as well:
The fireplace box was lined with Roxul mineral wool & Durock cement board (for fireproofing):

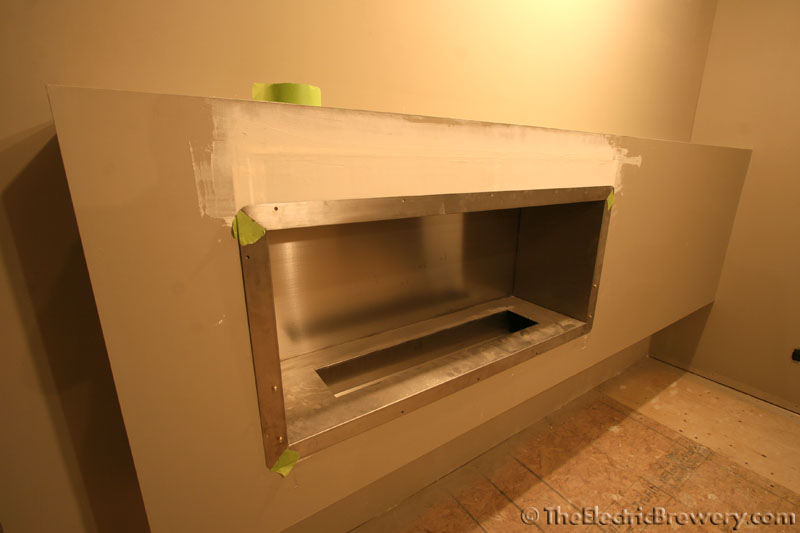
The fireplace stainless box insert was installed and the gap in the drywall above was patched. You need to cut a larger hole to get the fireplace in first because of the bottom bump and then patch:
I suppose you could install it first and drywall around it too.
Some of the baseboard work has started. The baseboards are simple 7" high & flat. Some places require special cutting to make it fit right:

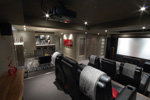
The A/V room behind the screen was insulated right up to (and including) the ceiling:

... and many other small minor things (painting trim, sealing/caulking/cleaning/etc) ...
Kal
_________________

Support our site by using our affiliate links. We thank you!
My basement/HT/bar/brewery build 2.0
|
|
| Back to top |
|
|
kal
Forum Administrator
Joined: 06 Mar 2006
Posts: 18114
Location: Ottawa, Canada
TV/Projector: JVC DLA-NZ7
|
| Posted: Mon Sep 03, 2012 9:50 pm Post subject: |
|
|
Yesterday I hung the sauna heater, hooked up the 8/3 wire using a saddle connector to provide the proper strain relief (it only uses the two HOT lines and the GROUND - the NEUTRAL is unused and was terminated with a twist-on insulated wire connector), cleaned the rocks, and did a test run to burn off some of the oils left behind during the manufacturing process. The thing worked great. Amazing how fast 7000W of power can heat up a small room!
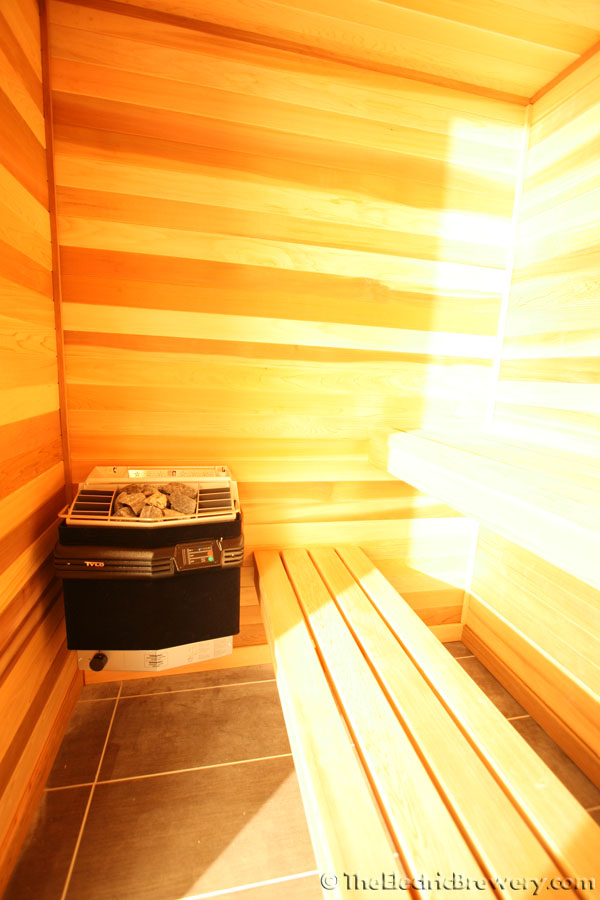

There's a few pieces of 2x2" and 1x3" cedar that they supply that you can install as an optional heater guard but I don't think it'll bother. The sides of the unit actually do not get hot as there's an air gap between the outside and inside wall where air is allowed to flow to keep the outside wall cool. Only the top and the rocks get hot. The unit is also out of a traffic path.
I also find that using the guard doesn't look as nice. It's detrimental to the clean look of the room. Here's an example of the guard in use on the same heater in a different sauna:

Kal
_________________
Support our site by using our affiliate links. We thank you!
My basement/HT/bar/brewery build 2.0
|
|
| Back to top |
|
|
HK-Steve

Joined: 15 Jul 2006
Posts: 849
Location: Switzerland
TV/Projector: Marquee 9500, Epson 8100
|
| Posted: Tue Sep 04, 2012 6:56 am Post subject: |
|
|
Sweet job Kal,
I agree with the guard around the unit, cleaner without it.
Also like that you can not see the electrical cable, last example pic, looks SHI?...........
Keep up the great work and attention to detail.
Cheers
_________________

|
|
| Back to top |
|
|
kal
Forum Administrator
Joined: 06 Mar 2006
Posts: 18114
Location: Ottawa, Canada
TV/Projector: JVC DLA-NZ7
|
| Posted: Tue Sep 04, 2012 12:23 pm Post subject: |
|
|
Thanks Steve.
In that last picture I think the white hose is actually the drainage hose for the steam tank. Either way, I did make sure that the 8/3 electrical wire is well hidden. It comes through the wall underneath the unit and slightly above the bottom where there's an area meant exactly for wiring the electrical cable and other optional wiring. This way it can only be seen if you're passed out on the floor directly under the unit. 
Here's a different install where you can clearly see the drainage hose and the electrical cable:

Kal
_________________
Support our site by using our affiliate links. We thank you!
My basement/HT/bar/brewery build 2.0
|
|
| Back to top |
|
|
kal
Forum Administrator
Joined: 06 Mar 2006
Posts: 18114
Location: Ottawa, Canada
TV/Projector: JVC DLA-NZ7
|
| Posted: Sat Sep 08, 2012 3:01 am Post subject: |
|
|
A bunch of the fine wood working was installed today. I have to say we're really impressed with the work. It's all done by http://cabinetsbydesignottawa.com.
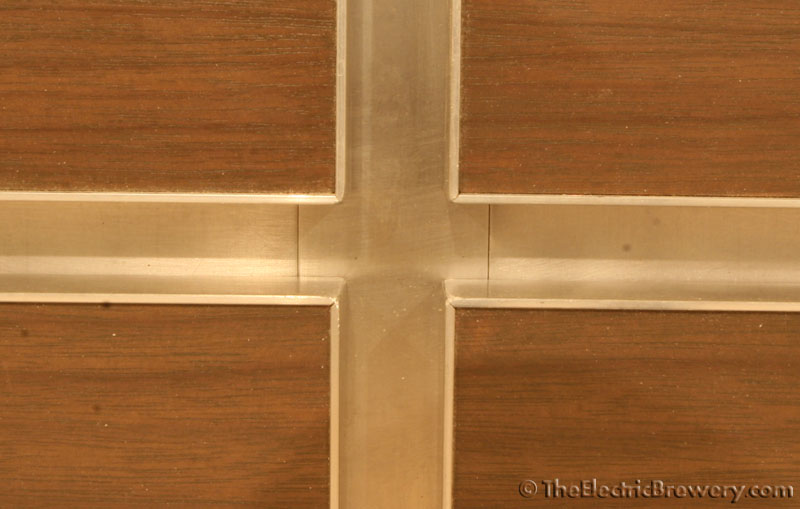
Bar front & window trim between the bar & brewery:
Detail on the bar front that shows how the aluminum channel is done:

Window trim detail:

Once the 3 panes of glass are installed the trim on the back side will be installed as well.
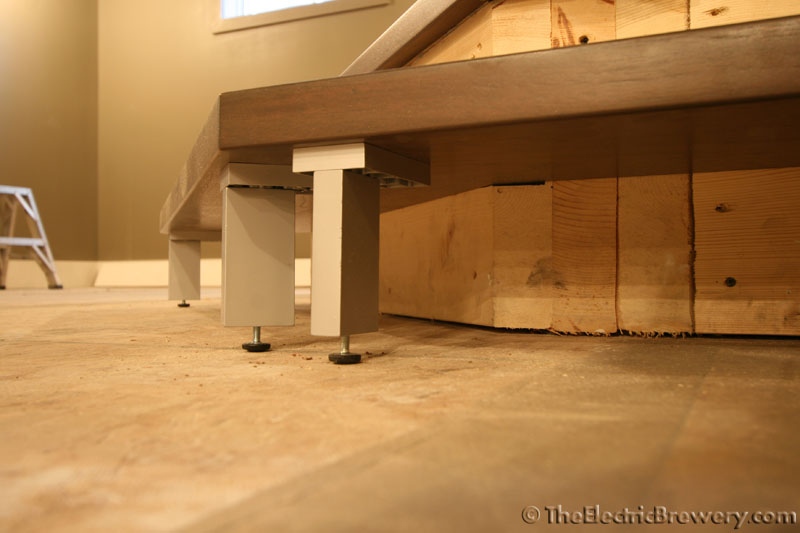
Riser nosing, step and feet:
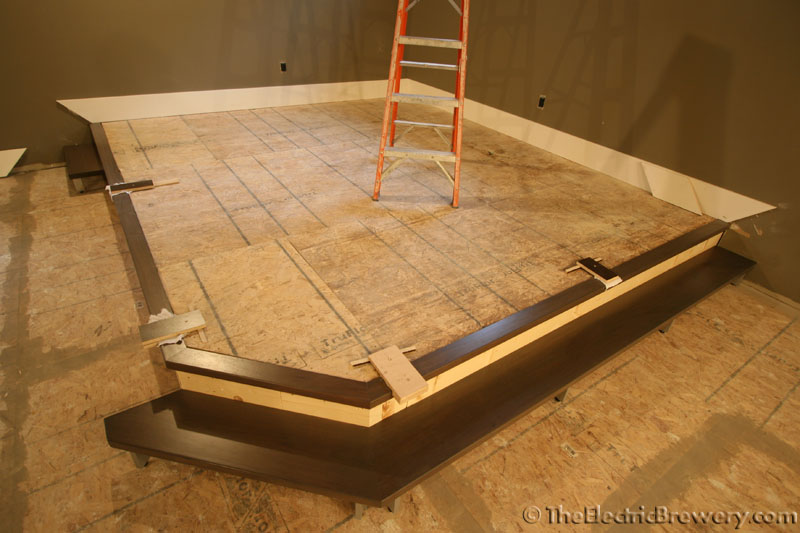

You can also see in the above pictures how floor leveling compound was used between some of the large 4x8' OSB sheets in preperation for the carpet tiles. The carpet tiles are 1/4" thick 20x20" pieces that are glued directly to the floor. There's no underpad. Any ridges in the floor need to be levelled out otherwise you may feel them. Carpet pad under a normal carpet install hides a lot.
Home theater equipment rack:

In the back the shelves are notched to leave room for a wire chase between shelves:

Ventilation holes are purposely not cut at my request as I need to figure out what goes where. I'll work that out myself and then cut some holes and install some low speed fans with grills.
DVD/Blu-ray shelves:


Under the stairs is our "head end" where satellite/internet/phone/security systems reside. We need to provide a way in for the once every few years when access is required. It's also how you access the back side of the bathroom plumbing and urinal clean-out (required in Ontario by law). So A hidden door that looks like a niche is used:


The door is held closed with a couple of small rare earth magnets. You just give it a push to open it. We'll probably put a piece of art or two on the door and nobody will even know it's a door. It'll should also stop someone from accidentally leaning on it and falling in by accident. Most of the time however the sliding door at the bottom of the stairs will completely cover this hidden door so we'll see ...
On Monday carpet gets installed, followed by quartz templating on Tuesday. Slowly but surely we're getting closer to the finish.
Kal
_________________
Support our site by using our affiliate links. We thank you!
My basement/HT/bar/brewery build 2.0
|
|
| Back to top |
|
|
WanMan

Joined: 19 Mar 2006
Posts: 10270
|
| Posted: Sat Sep 08, 2012 1:10 pm Post subject: |
|
|
| kal wrote: | | Kal |
Tell me about these riser step legs.
_________________
Trust no one. Absolutely no one. Advice of the board.
|
|
| Back to top |
|
|
kal
Forum Administrator
Joined: 06 Mar 2006
Posts: 18114
Location: Ottawa, Canada
TV/Projector: JVC DLA-NZ7
|
|
| Back to top |
|
|
kal
Forum Administrator
Joined: 06 Mar 2006
Posts: 18114
Location: Ottawa, Canada
TV/Projector: JVC DLA-NZ7
|
| Posted: Sat Sep 15, 2012 5:30 pm Post subject: |
|
|
The carpet has been installed:


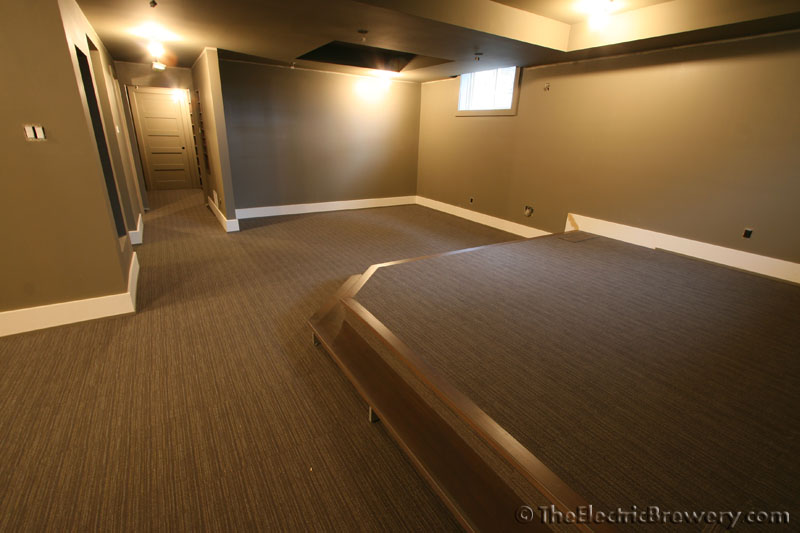
Some more baseboard & quarter round work was done. The baseboards will not stay white. They're being painted the same colour as the walls. Just like the doors and door trim seen at the end of the hall in the last photo.
UrbanQuarry.ca came to template for the bar quartz. A considerable amount of time was spent working out the exact placement of the draft tower & drip tray as it's not the typical stuff they're used to seeing. The 3" hole for the tower is something they'd rather do with their wet CNC machine in the shop instead of on site later so it had to be figured out now. The 4 small holes for the tower mount bolts as well as the two holes for the drip tray will be done on site. Same with the bar sink faucet. The large cutout for the bar sink will of course also be done in their shop. They took the sink with them to be sure of the measurements.
The tower hole placement is tricky as you want to leave enough room behind the tower to be able to clean, and the tower and the drip tray have be pressed up against each other (the drip tray fits "into" the tower). You also need to make sure you have room for the drip tray plumbing underneath (drain & glass rinser) once you factor in quartz overhang, bar doors/cabinetry. You can't have the drip tray up too far as while you can drill through the quartz just about anywhere, you don't want to have the drain plumbing hit the cabinet framing/door. In fact, considerable time was spent up front to determine the exact cabinet depth to allow for all these things before the cabinets themselves were build. It was a very large domino effect. The end result after all this math is a quartz counter that's 15-3/4" deep with 2" behind the tower and 2-3/4" between the drip tray and the front quartz overhang.
They'll also be cutting the exact length for the vertical waterfall counter on site (in the truck) after they install the horizontal pieces. The vertical piece down the side of the bar also needs to be finished (polished) on both sides since it'll be visible on both sides. Normally quartz (or granite) is only polished on the top since the bottom edge is not seen (below eye level or hidden by cabinets).
They only take ~2 weeks from templating to install so the quartz is likely to be installed the week after next. UrbanQuarry.ca is the same company that our builder actually used for our kitchen quartz which is good to hear as they did a great job (clean install, seams not visible).
Next Wednesday they install the fireplace wall wood and the bar cabinet doors. Glass shelves and shower wall are probably close too.
Kal
_________________
Support our site by using our affiliate links. We thank you!
My basement/HT/bar/brewery build 2.0
|
|
| Back to top |
|
|
kal
Forum Administrator
Joined: 06 Mar 2006
Posts: 18114
Location: Ottawa, Canada
TV/Projector: JVC DLA-NZ7
|
| Posted: Mon Sep 17, 2012 6:37 pm Post subject: |
|
|
| kal wrote: | | They only take ~2 weeks from templating to install so the quartz is likely to be installed the week after next. |
Scratch that. Turns out that due to the quartz we picked not being one of the popular ones and general popularity of quartz, there are going to be delays having it installed. We're scheduled for about a month from now instead of a week from now. Oh well.
Kal
_________________
Support our site by using our affiliate links. We thank you!
My basement/HT/bar/brewery build 2.0
|
|
| Back to top |
|
|
kal
Forum Administrator
Joined: 06 Mar 2006
Posts: 18114
Location: Ottawa, Canada
TV/Projector: JVC DLA-NZ7
|
| Posted: Fri Sep 21, 2012 10:25 pm Post subject: |
|
|
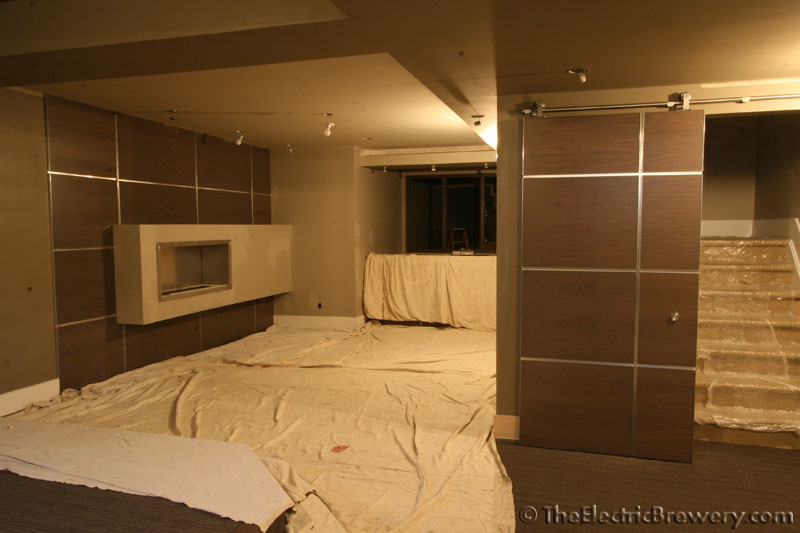
All of the fine woodworking is now in, including the wood panels around the fireplace and the custom sliding door at the bottom of the stairs:
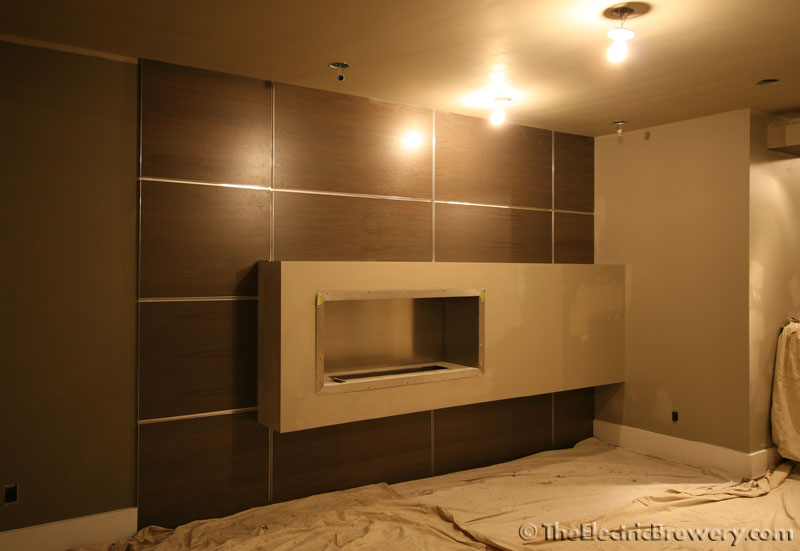

The baseboards around the sliding door had to be replaced as they stick out too much. The floor wasn't perfectly level either so some work had to be done there to make the custom door fit (it was hitting the carpet). About 15 tapcon concrete screws were added to the OSB underneath to flatten out the platon to make things work. Easier than sanding.
The bar cabinetry doors and handles were installed:


In keeping with everthing else they are a simple and clean. Straight lines.
The good news story of the day is that the quartz for the bar won't be delayed very long. It'll be installed some time between Sept 27 - Oct 2 instead the original late October date we were given.
On Monday the glass will be installed for the shower wall and niche shelves as well as the bar niche. Painter was in all day today caulking and sealing up the trim. He comes back for most of the day tomorrow as well.
Kal
_________________
Support our site by using our affiliate links. We thank you!
My basement/HT/bar/brewery build 2.0
|
|
| Back to top |
|
|
kal
Forum Administrator
Joined: 06 Mar 2006
Posts: 18114
Location: Ottawa, Canada
TV/Projector: JVC DLA-NZ7
|
| Posted: Fri Sep 28, 2012 5:52 pm Post subject: |
|
|
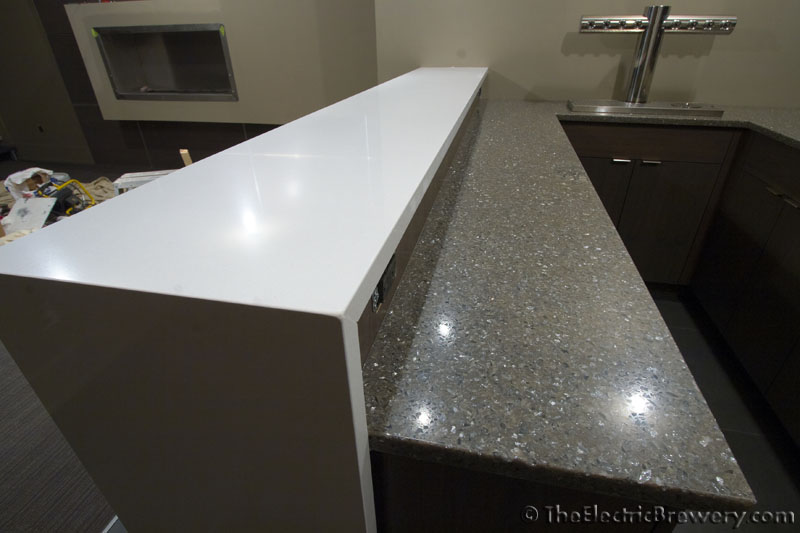
The bar quartz has now been installed. I temporarily dropped in the draft tower, drip tray and faucet for the photos below just to make sure everything fits correctly. They will eventually be installed permanently with the right plumbing, properly siliconed, etc ...


The glass shower wall has been installed as well. Not much to photograph. It's see-through.
On Monday and the painter finishes painting the bar area and the brewery windows/bar niche glass shelves/shower niche glass shelves get installed. Then the plumber hooks up the drip tray and the bar sink and the electrician installs the pot lights and changes the light switches. That's probably about it other than a few minor finishing touches. Then the fun really begins and we start moving in furniture and other equipment.
Kal
_________________
Support our site by using our affiliate links. We thank you!
My basement/HT/bar/brewery build 2.0
|
|
| Back to top |
|
|
kal
Forum Administrator
Joined: 06 Mar 2006
Posts: 18114
Location: Ottawa, Canada
TV/Projector: JVC DLA-NZ7
|
| Posted: Thu Oct 04, 2012 5:42 pm Post subject: |
|
|
We took delivery of the Marvel 6GARM beverage center a couple of days ago. We knew the fan in it wouldn't be dead silent but having it in place now it's just too noisy. We're looking at alternatives and our dealer is being very accommodating/helpful.
One that we're considering from their recommendation is a unit that unfortunately they do not have on their showroom floor: The Liebherr RU 500 beverage center.

Anyone have any experience with Liebherr fridges/appliances?
They do say:
| Quote: | | SuperQuiet : Because refrigerators are such an important part of the hub of our homes - the kitchen - noise levels must be kept to a minimum. Silent compressors and a low noise cooling circuit are two outstanding features of all Liebherr appliances. In our modern production plants, test engineers work steadily in sound rooms and x-ray chambers to reduce the noise level of Liebherr appliances. |
Very subjective and somewhat meaningless, and seems to cover all their fridges so who knows how much applies to this beverage center. None of the manufacturers give any dbA ratings so it's impossible to compare.
Kal
_________________
Support our site by using our affiliate links. We thank you!
My basement/HT/bar/brewery build 2.0
|
|
| Back to top |
|
|
garyfritz

Joined: 08 Apr 2006
Posts: 12088
Location: Fort Collins, CO
|
| Posted: Thu Oct 04, 2012 9:37 pm Post subject: |
|
|
A google search indicates the Marvel noise level is around 46-50 dBA, though it's not at all well documented and may not be official. The websites that have dBA ratings are flaky.
Can't find anything on the Liebherr, though, sorry... Maybe ask them? http://www.liebherr.us/HGH/en-GB/96685.wfw, appliances@liebherr.com, or (905) 319 8835.
|
|
| Back to top |
|
|
kal
Forum Administrator
Joined: 06 Mar 2006
Posts: 18114
Location: Ottawa, Canada
TV/Projector: JVC DLA-NZ7
|
| Posted: Thu Oct 04, 2012 11:33 pm Post subject: |
|
|
| garyfritz wrote: | | A google search indicates the Marvel noise level is around 46-50 dBA, though it's not at all well documented and may not be official. The websites that have dBA ratings are flaky. |
Do you have a link Gary for where you found thesse noise levels? I came up completely blank.
I'll definitely give them a call.
Kal
_________________
Support our site by using our affiliate links. We thank you!
My basement/HT/bar/brewery build 2.0
|
|
| Back to top |
|
|
garyfritz
Joined: 08 Apr 2006
Posts: 12088
Location: Fort Collins, CO
|
| Posted: Fri Oct 05, 2012 6:08 pm Post subject: |
|
|
|
https://www.google.com/search?q=marvel+6garm+dba -- that returns a couple of sites that, in the Google summary, shows 46 and 50 dBA. Unfortunately if you go to the sites, it's not there. You might be able to go spelunking in the Google cache...
|
|
| Back to top |
|
|
kal
Forum Administrator
Joined: 06 Mar 2006
Posts: 18114
Location: Ottawa, Canada
TV/Projector: JVC DLA-NZ7
|
|
| Back to top |
|
|
jask

Joined: 17 Mar 2006
Posts: 10187
Location: kamloops BC
|
| Posted: Fri Oct 12, 2012 5:33 am Post subject: |
|
|
|
More pictures... ?
|
|
| Back to top |
|
|
kal
Forum Administrator
Joined: 06 Mar 2006
Posts: 18114
Location: Ottawa, Canada
TV/Projector: JVC DLA-NZ7
|
|
| Back to top |
|
|
dvh99

Joined: 25 Dec 2009
Posts: 2158
Location: nederland
|
| Posted: Fri Oct 12, 2012 4:16 pm Post subject: |
|
|
| kal wrote: | All of the fine woodworking is now in, including the wood panels around the fireplace and the custom sliding door at the bottom of the stairs:
The baseboards around the sliding door had to be replaced as they stick out too much. The floor wasn't perfectly level either so some work had to be done there to make the custom door fit (it was hitting the carpet). About 15 tapcon concrete screws were added to the OSB underneath to flatten out the platon to make things work. Easier than sanding.
The bar cabinetry doors and handles were installed:
In keeping with everthing else they are a simple and clean. Straight lines.
The good news story of the day is that the quartz for the bar won't be delayed very long. It'll be installed some time between Sept 27 - Oct 2 instead the original late October date we were given.
On Monday the glass will be installed for the shower wall and niche shelves as well as the bar niche. Painter was in all day today caulking and sealing up the trim. He comes back for most of the day tomorrow as well.
Kal |
kal this build is absolutely amazing and i see you just want the best to your likings without worrying about the cost which is a happy luxury.
one thing i would have done different is take a combined fireplace as can be seen in the following link, i really like the sound of wood burning  . .
http://www.kombifire.nl/
_________________
1 answer always poses multiple questions.
marquee 9500ultra HD10L moome hdmi1.3 v3+ some mods.
|
|
| Back to top |
|
|
|
|


