| Author |
Message |
Curt Palme
CRT Tech
Joined: 08 Mar 2006
Posts: 24396
Location: Langley, BC
TV/Projector: All of them!
|
| Posted: Tue Apr 24, 2012 7:59 pm Post subject: Swapping bellows question |
|
|
Hey, figured I'd post here...
I'm changing my first bellows. Tube is mint, but old, and the original bellows tore while trying to remove the C element. Judging by how tough the bellows were secured to the back LC housing, there's no way I would have ever gotten this C element out without damaging the bellows!
Simple question to install the new ones: Do I use a small bead/film of silicone between the bellows and aluminum? Seems it would be a good idea NOT to, as future removal of the bellows would be a lot easier without extra silicone.
Just curious.
Thanks!
|
|
| Back to top |
|
 |
barclay66

Joined: 27 Jun 2011
Posts: 1304
Location: Germany
TV/Projector: Marquee 9500 Ultra
|
| Posted: Tue Apr 24, 2012 9:33 pm Post subject: |
|
|
Hello Curt,
If You're dealing with Nash's Marquee bellows then I should guide You to this post: http://www.curtpalme.com/forum/viewtopic.php?p=211059#211059
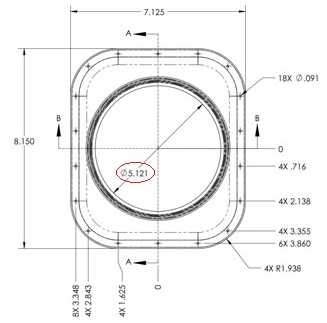
When I mounted his bellows on my tubes I used a very thin layer of RTV anyway. So You might call me anal too. However I noticed that the surface which would seal against the C-element didn't fit perfectly and initially leaked without RTV. This was due to the fact that the aperture in the housing was a little wider than the bellow ring facing the C-element (see picture, I'm talking about that diameter of 5.121). When mounting the C-element the Bellow could slip off the housing due to friction with the C-element. In this case the layer of RTV did not only act as an additional sealant but as a lubricant too. The C-element widened the rubber uniformly and thus fit like a glove.
BUT: I'm talking about a thin (!!!) layer between the bellow and the C-element and not about RTV between the housing and the bellow!
As I wouldn't reuse any bellows I didn't care about them being torn in the future...
Regards,
barclay66
Oops, forgot that picture:
| Description: |
|
| Filesize: |
26.28 KB |
| Viewed: |
4644 Time(s) |
|
|
|
| Back to top |
|
|
Nashou66

Joined: 12 Jan 2007
Posts: 16171
Location: West Seneca NY
|
| Posted: Tue Apr 24, 2012 9:57 pm Post subject: |
|
|
I advise not to use but others have. it depends on future removal and use. The compression ridges are designed to fill in any gaps in the face plate. The new ones Dale at Apple rubber used a design they use on other high pressure gaskets where no RTV is used(food industry). Also if you use the RTV it will adhere to the bellow even if you remove it and the ridges will not be able to compress as originally intended and then you will need RTV again. I should tell people to use it so i can sell more bellows after they realize the rtv ruined the sealing properties of the original bellow 
nashou
_________________
Don't blame your underwear for your crooked ass~ unknown Greek philosopher
"Republicans believe every day is the Fourth of July, but the Democrats believe every day is April 15." --- President Reagan
One Smart Dog!!!
Marquee High Performance Bellows now shipping!!
Marquee Modifications and Performance Enhancement
Marquee C-element and Bellow removal
|
|
| Back to top |
|
|
draganm

Joined: 08 Mar 2006
Posts: 8990
Location: Colorado
|
| Posted: Tue Apr 24, 2012 10:51 pm Post subject: Re: Swapping bellows question |
|
|
| Curt Palme wrote: | | Simple question to install the new ones: Do I use a small bead/film of silicone between the bellows and aluminum?Thanks! |
I use a very thin bead between bellows and Aluminum housing and none between bellows and C-element. Approx. 2 dozen tubes and No leaks.
Helpful hint: Once bellows are installed to AL housing, use the Scheimphlug screws to center bellows in C-element opening before clamping in C-element.
|
|
| Back to top |
|
|
Curt Palme
CRT Tech
Joined: 08 Mar 2006
Posts: 24396
Location: Langley, BC
TV/Projector: All of them!
|
| Posted: Tue Apr 24, 2012 11:49 pm Post subject: |
|
|
| Nashou66 wrote: | I advise not to use but others have. it depends on future removal and use. The compression ridges are designed to fill in any gaps in the face plate.
nashou |
Thanks, and thanks to the other responses. That's what I figured, I did see those ridges.
Super design BTW! I've mailed bellows to other customers before, but this is my first attempt at DIY. Superbly crafted.
I'm going to get some stainless steel screws in the next few days, and will stock up on all other stainless screws for everywhere on the LC hardware. I'll do everything without RTV, and will fill the tube with water prior to final assembly. I do that with all tubes that I install into LC housings as well, I've wasted too much glycol over the years to use it first. 
|
|
| Back to top |
|
|
haireez
Joined: 14 Jun 2007
Posts: 207
Location: singapore
TV/Projector: Vidikron Vision 1 - Ultra
|
| Posted: Wed Apr 25, 2012 11:10 am Post subject: |
|
|
I've installed a new set of bellows that i bought from Nash a year ago and did not even use any kind of silicon. To date, no leak at all. Perfect!
_________________
2 White Vision 1
|
|
| Back to top |
|
|
dturco

Joined: 06 Feb 2009
Posts: 3778
Location: Eastern Shore Maryland
TV/Projector: Runco DLP VX-3000i Marquee 9500 parts doner
|
| Posted: Wed Apr 25, 2012 1:47 pm Post subject: |
|
|
| Curt Palme wrote: | | Nashou66 wrote: | I advise not to use but others have. it depends on future removal and use. The compression ridges are designed to fill in any gaps in the face plate.
nashou |
Thanks, and thanks to the other responses. That's what I figured, I did see those ridges.
Super design BTW! I've mailed bellows to other customers before, but this is my first attempt at DIY. Superbly crafted.
I'm going to get some stainless steel screws in the next few days, and will stock up on all other stainless screws for everywhere on the LC hardware. I'll do everything without RTV, and will fill the tube with water prior to final assembly. I do that with all tubes that I install into LC housings as well, I've wasted too much glycol over the years to use it first. |
Doah!! Water first..[Slaps forehead]. Great idea!! For what its worth, the first time I installed the belowes no leaks for 2 years. I did not use any RTV or anything else. I did have a slight fungus and some crystal formations in the Glycol though. Now 2 years later I am re-usuing the same bellows, with the new PT-22 tubes. I have leaks in two of the three tubes and in less than 2 months I have fungus.
I painted the chambers with VHT epoxy and used Ice Clear, instead of Glycol.
Weird HUH?
The leaks are from the Chamber side not the C-element side. Dragan's method of using the Sceimphlug screws to center is what I did too. I think I didn't let the Bellows rest between installs and this did not allow the ridges to uncompress enough.
I plan on redoing the chambers this weekend where I will take them off boil them, or at least put them in really hot water for awhile, the re-install them. I'm thinking there is some residual organics on the bellows that just washing did not remove, ergo regrowth of the Fungus.
_________________
Firefly rules. Can't stop the signal.
http://www.hulu.com/firefly
|
|
| Back to top |
|
|
Curt Palme
CRT Tech
Joined: 08 Mar 2006
Posts: 24396
Location: Langley, BC
TV/Projector: All of them!
|
| Posted: Wed Apr 25, 2012 1:54 pm Post subject: |
|
|
The only downside with water is that if you have a slow leak, the evidence can evaporate overnight, whereas with glycol, you'll have evidence to eternity.
Fortunately, in the early stages of siliconing tubes into housings, there was usually a pretty significant leak. I don't know how the manufacturers do it, to get that really nice smooth bead of silicone around the tubes in the LC housing (Barco 1209s, Marquees). I use a standard RTV tube, and it always looks like crap. I did find that using a finger wrapped in paper towel would smooth the head out, and push the silicone down further in the cracks, sealing the leaks, so that's been my method for the last year.
|
|
| Back to top |
|
|
CasetheCorvetteman

Joined: 09 Nov 2008
Posts: 6326
Location: Australia
|
| Posted: Wed Apr 25, 2012 2:45 pm Post subject: |
|
|
|
Spray it with a mist of water after you run the bead Curt, then it will go on smooth with your finger when you put the two parts together.
|
|
| Back to top |
|
|
Nashou66
Joined: 12 Jan 2007
Posts: 16171
Location: West Seneca NY
|
| Posted: Wed Apr 25, 2012 11:47 pm Post subject: |
|
|
Dave do not boil them. Use denatured alcohol to clean them and rinse them.
Most likely the crap growing is from crap in the threads of the fill holes. use a pipe cleaner in dipped in some WD 40 then follow with another pipe cleaner in some type of degreaser, then follow again with denatured alcohol. This should clean out those threads of any contaminates that will find their way into the chamber.
Athanasios
_________________
Don't blame your underwear for your crooked ass~ unknown Greek philosopher
"Republicans believe every day is the Fourth of July, but the Democrats believe every day is April 15." --- President Reagan
One Smart Dog!!!
Marquee High Performance Bellows now shipping!!
Marquee Modifications and Performance Enhancement
Marquee C-element and Bellow removal
|
|
| Back to top |
|
|
dturco
Joined: 06 Feb 2009
Posts: 3778
Location: Eastern Shore Maryland
TV/Projector: Runco DLP VX-3000i Marquee 9500 parts doner
|
| Posted: Thu Apr 26, 2012 12:43 am Post subject: |
|
|
| Nashou66 wrote: | Dave do not boil them. Use denatured alcohol to clean them and rinse them.
Most likely the crap growing is from crap in the threads of the fill holes. use a pipe cleaner in dipped in some WD 40 then follow with another pipe cleaner in some type of degreaser, then follow again with denatured alcohol. This should clean out those threads of any contaminates that will find their way into the chamber.
Athanasios |
Ha!
I just took one apart and that crap is growing right out of the fill holes. So even the Orison Ice Clear and the VHT epoxy paint can stop this reaction from happening. Those damn little fill hole are the bane of this design.
I really thought that the Orison would be non reactive it's vegetable based I thought? So it must be some sort of galvanic reaction with the metals. i wonder why it didn't happen to all of them?
Maybe it's the removing the fill screws that is the issues. Perhaps there was a coating there that gets removed when they come out? Just a thought.
I am also going to get stainless steel fill screws from Dragan I hope.
And I will not boil them, even though I think they could survive that easily.
_________________
Firefly rules. Can't stop the signal.
http://www.hulu.com/firefly
|
|
| Back to top |
|
|
cmjohnson

Joined: 03 Apr 2006
Posts: 5180
Location: Buried under G90s
|
| Posted: Mon May 07, 2012 4:11 am Post subject: |
|
|
I would definitely recommend applying black VHT epoxy paint to the aluminum surfaces that are in contact with the glycol, every single time.
The problem is that when you scrape off the remains of the old bellows, you inevitably scrape off some of the aluminum anodizing. And the raw aluminum
that is exposed in that process will then be in contact with glycol and set up the chemical reaction that creates the white slime we hate so much.
The VHT epoxy cures this problem. AND, being better at absorbing light than the original grey anodizing, you also get a SLIGHT increase in contrast ratios.
The way to avoid having the fill holes become the starting point for additional corrosion and formation of white slime is to apply a SMALL amount of silicone
into the fill holes before installing the fill screws. If you apply just the right amount (with a toothpick works best) then the silicone will just barely fill up
the entire fill hole when the screw is in place, thus sealing the exposed aluminum away completely from the glycol.
CJ
|
|
| Back to top |
|
|
draganm
Joined: 08 Mar 2006
Posts: 8990
Location: Colorado
|
| Posted: Mon May 07, 2012 2:59 pm Post subject: |
|
|
| dturco wrote: | | I just took one apart and that crap is growing right out of the fill holes. So even the Orison Ice Clear and the VHT epoxy paint can stop this reaction from happening. Those damn little fill hole are the bane of this design. |
your right. the tapped holes were never anodized, they are bare Aluminum. CJ's idea of pushing a little RTV in there before adding the screws is the only solution I can think of. IF you loo at the Sony G70 chamber they used one very large fill screw and the chambers are very well anodized, includingthe threads.
BTW, it doesn't matter what fluid you put in there, AL reacts with water just as badly as it does with Glycol. The only thing that doesn't bother AL is Acid's, anything Base or even a neutral PH of 7 will cause it to Oxidize.
your screws mailed out last monday
|
|
| Back to top |
|
|
|
|


