| Author |
Message |
ChrisWiggles
Opinionated SOB
Joined: 12 Mar 2006
Posts: 2529
Location: Seattle
|
| Posted: Tue Aug 16, 2011 10:29 pm Post subject: |
|
|
|
I just used unistrut for my Barco, and hung it from the ceiling. I bolted two long pieces of strut length-wise to the Barco chassis, and then hung those off threaded rod that was hung from three strut pieces lagged into the floor/ceiling joists which ran perpendicular to the projector. IMO, simplest/cheapest way to go, and quite flexible placement-wise.
|
|
| Back to top |
|
 |
v1rtu0s1ty
Joined: 29 Oct 2007
Posts: 110
|
| Posted: Wed Aug 17, 2011 12:20 am Post subject: |
|
|
| ChrisWiggles wrote: | | I just used unistrut for my Barco, and hung it from the ceiling. I bolted two long pieces of strut length-wise to the Barco chassis, and then hung those off threaded rod that was hung from three strut pieces lagged into the floor/ceiling joists which ran perpendicular to the projector. IMO, simplest/cheapest way to go, and quite flexible placement-wise. |
I did use unistrut for my Sony. However, it was easy for my Sony because I had the Sony mounting kit. I would like to see how you attached the unistrut to the chassis/body. I would like to know which screw you used.
Thanks! I really appreciate it.
|
|
| Back to top |
|
|
ChrisWiggles
Opinionated SOB
Joined: 12 Mar 2006
Posts: 2529
Location: Seattle
|
| Posted: Wed Aug 17, 2011 3:04 am Post subject: |
|
|
I don't have the time to take a picture right now, but I just used what looks like about 1.5" short bolts with a couple nuts on there to bolt the strut onto the barco's mounting flange things. Looks like maybe 5/16" size maybe? Looks like carraige bolts actually, with a couple washers on either side, big washer on the unistrut side because the unistrut holes are pretty big. And just tightened it up. Certainly nuthin' fancy! I can take pictures if you want, but it really won't be that illustrative, I mean, you're just bolting one piece of metal to another one through the holes in each of them, I think it's kind of straight forward? If it's not obvious, the 'U' of the strut is facing away from the projector, though I suppose you could do it the other way too if you wanted to, but I think that would be a PITA (impossible?) to tighten the bolts inside the strut once you hung it off threaded rod coming down from the ceiling.
My G808 is no longer mounted to the ceiling, but I do still have the strut on the projector, makes it easy to move around. I need to get rid of this projector... lol I'm so lazy!
|
|
| Back to top |
|
|
v1rtu0s1ty
Joined: 29 Oct 2007
Posts: 110
|
| Posted: Wed Aug 17, 2011 4:25 am Post subject: |
|
|
| ChrisWiggles wrote: | I don't have the time to take a picture right now, but I just used what looks like about 1.5" short bolts with a couple nuts on there to bolt the strut onto the barco's mounting flange things. Looks like maybe 5/16" size maybe? Looks like carraige bolts actually, with a couple washers on either side, big washer on the unistrut side because the unistrut holes are pretty big. And just tightened it up. Certainly nuthin' fancy! I can take pictures if you want, but it really won't be that illustrative, I mean, you're just bolting one piece of metal to another one through the holes in each of them, I think it's kind of straight forward? If it's not obvious, the 'U' of the strut is facing away from the projector, though I suppose you could do it the other way too if you wanted to, but I think that would be a PITA (impossible?) to tighten the bolts inside the strut once you hung it off threaded rod coming down from the ceiling.
My G808 is no longer mounted to the ceiling, but I do still have the strut on the projector, makes it easy to move around. I need to get rid of this projector... lol I'm so lazy! |
Sure please, that will help me a lot. Two to 3 pictures are enough. One picture shows the whole base of the projector that also shows the struts. Then one close up shot of the screw that attaches the unitstrut to the metal on the projector.
No rush though, maybe this weekend will be fine. 
Thanks so much!
|
|
| Back to top |
|
|
ChrisWiggles
Opinionated SOB
Joined: 12 Mar 2006
Posts: 2529
Location: Seattle
|
| Posted: Wed Aug 17, 2011 5:19 pm Post subject: |
|
|
|
I'm not getting back into town until next week, but I can shoot your some pictures then.
|
|
| Back to top |
|
|
v1rtu0s1ty
Joined: 29 Oct 2007
Posts: 110
|
| Posted: Wed Aug 17, 2011 5:26 pm Post subject: |
|
|
| ChrisWiggles wrote: | | I'm not getting back into town until next week, but I can shoot your some pictures then. |
Awesome! Thank you so much! 
|
|
| Back to top |
|
|
Tom.W

Joined: 09 Mar 2006
Posts: 6635
|
|
| Back to top |
|
|
ChrisWiggles
Opinionated SOB
Joined: 12 Mar 2006
Posts: 2529
Location: Seattle
|
| Posted: Wed Aug 17, 2011 9:15 pm Post subject: |
|
|
Thanks Tom, I remember that guide from back in the day! 
That's basically exactly what I did with my 808, except that I ran the strut the other way (lengthwise across the two mounting flanges on the 808). That allowed me to place the ceiling strut up into the ceiling bolted onto the sides of the joists, which saved me a couple inches, because I had very low ceilings.
|
|
| Back to top |
|
|
v1rtu0s1ty
Joined: 29 Oct 2007
Posts: 110
|
| Posted: Thu Aug 18, 2011 8:12 am Post subject: |
|
|
Thanks. That's how I mounted my Sony 1272.
However, I don't see a place where I can attach the unistrut to my Barco projector. I'll take a picture of the barco tomorrow.
This is what I did back in 2007. Below is the picture of the unistrut that is attached to the 1272 mounting kit. I'll use those struts again once I decommision the 1272.


or my old thread whcih contains the mounting of the 1272 projector, http://www.avsforum.com/avs-vb/showthread.php?p=12309678
|
|
| Back to top |
|
|
ChrisWiggles
Opinionated SOB
Joined: 12 Mar 2006
Posts: 2529
Location: Seattle
|
| Posted: Thu Aug 18, 2011 5:10 pm Post subject: |
|
|
| v1rtu0s1ty wrote: |
Thanks. That's how I mounted my Sony 1272.
However, I don't see a place where I can attach the unistrut to my Barco projector. I'll take a picture of the barco tomorrow.
|
Aren't there two metal flange things running across the width of the machine on the bottom? They have a couple holes in them, I just bolted the strut spanning the two heavy metal flanges through the holes...? I mean, unless somebody cut/grinded those off for some reason on your 808...?
I guess I don't understand the difficulty. Should be pretty obvious. 
|
|
| Back to top |
|
|
Tom.W
Joined: 09 Mar 2006
Posts: 6635
|
| Posted: Thu Aug 18, 2011 5:36 pm Post subject: |
|
|
|
There are two L shaped mounting brackets both front and rear on the projector with two holes each. Those are all you need.
|
|
| Back to top |
|
|
ChrisWiggles
Opinionated SOB
Joined: 12 Mar 2006
Posts: 2529
Location: Seattle
|
| Posted: Thu Aug 18, 2011 5:59 pm Post subject: |
|
|
| Tom.W wrote: | | There are two L shaped mounting brackets both front and rear on the projector with two holes each. Those are all you need. |
two L shaped mounting brackets
both front and rear
doo doo doo doo doo
All you need is
two mounting brackets
doo doo doooooo
http://www.youtube.com/watch?v=r4p8qxGbpOk

|
|
| Back to top |
|
|
v1rtu0s1ty
Joined: 29 Oct 2007
Posts: 110
|
| Posted: Thu Aug 18, 2011 6:07 pm Post subject: |
|
|
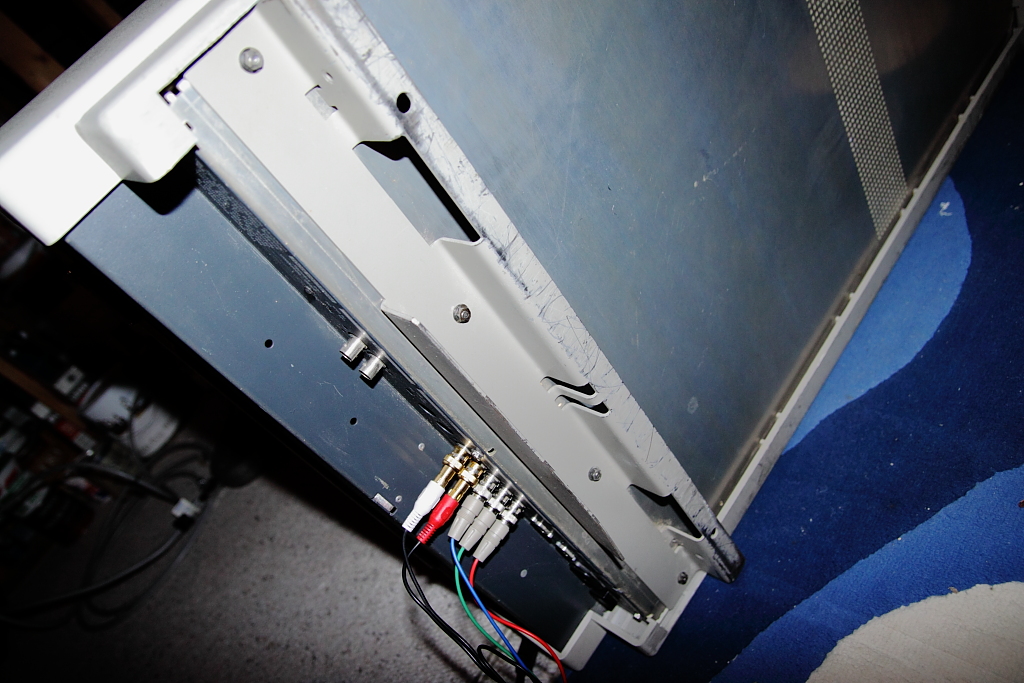
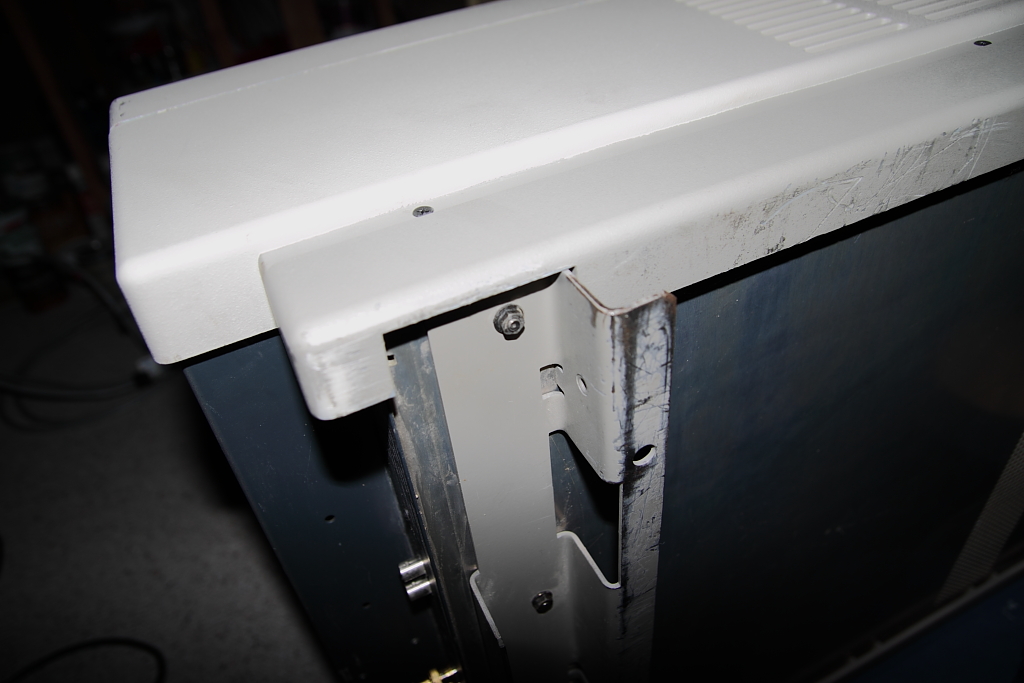
Ok. Looks like this is what you are referring to. I tilted it and took a shot. Are those 4 small screws strong enough to handle the weight of this monster? hehehe
| Description: |
|
| Filesize: |
472.8 KB |
| Viewed: |
12471 Time(s) |
|
| Description: |
|
| Filesize: |
365.4 KB |
| Viewed: |
12471 Time(s) |
|
|
|
| Back to top |
|
|
ChrisWiggles
Opinionated SOB
Joined: 12 Mar 2006
Posts: 2529
Location: Seattle
|
| Posted: Thu Aug 18, 2011 6:14 pm Post subject: |
|
|
|
Yep, exactly. Plenty strong. I just bolted two pieces of strut to the four holes with bolts and a couple nuts. I ran longer pieces of strut the length of the projector (cut to length) spanning the two brackets, but you could do it the other way too if you wanted, just depends on how you wanted to run the strut on the ceiling.
|
|
| Back to top |
|
|
v1rtu0s1ty
Joined: 29 Oct 2007
Posts: 110
|
| Posted: Thu Aug 18, 2011 6:19 pm Post subject: |
|
|
| ChrisWiggles wrote: | | Yep, exactly. Plenty strong. I just bolted two pieces of strut to the four holes with bolts and a couple nuts. I ran longer pieces of strut the length of the projector (cut to length) spanning the two brackets, but you could do it the other way too if you wanted, just depends on how you wanted to run the strut on the ceiling. |
Awesome! I hope my old strut that I used on the sony is long enough.
Thanks for the help to both of you!!!
|
|
| Back to top |
|
|
Elaine Benes
Joined: 25 Apr 2006
Posts: 1416
|
| Posted: Sat Aug 20, 2011 3:02 pm Post subject: |
|
|
This is the method I've used to mount my Barco and before that my Marquee. It uses two pieces of "black pipe" that you can buy at any Home Depot, and two pieces of unistrut. Its cheaper to make than just about any other option, gives you adjustment side to side and front to back, and is STABLE, your projector won't move around a lot when you're trying to get it into place.
Also, its EASY to mount, just hoist it up and slide the pipe in place, done.


Just bolt the eye bolts directly to your mounting flange of your Barco. With the Marquee, its even easier, you just screw them into the feet holes...
|
|
| Back to top |
|
|
v1rtu0s1ty
Joined: 29 Oct 2007
Posts: 110
|
| Posted: Sun Aug 21, 2011 1:51 am Post subject: |
|
|
|
Thanks Elaine. I really like it. I like it because it will be easy for us to move the projector sideways.
|
|
| Back to top |
|
|
jask

Joined: 17 Mar 2006
Posts: 10187
Location: kamloops BC
|
| Posted: Sun Aug 21, 2011 3:52 am Post subject: |
|
|
|
when you get it were you want it shoot a whole bunch of silicone around each pipe and bolt connection-front and back on one side to make sure it never has a chance to wander.
|
|
| Back to top |
|
|
Elaine Benes
Joined: 25 Apr 2006
Posts: 1416
|
| Posted: Sun Aug 21, 2011 4:16 am Post subject: |
|
|
| jask wrote: | | when you get it were you want it shoot a whole bunch of silicone around each pipe and bolt connection-front and back on one side to make sure it never has a chance to wander. |
Trust me, you've got over 150lbs keeping it in place, they don't move. This mount is more secure, in my experience(with a Marquee 8500, 8500LC and Barco 808)than the factory mounts because it doesn't depend on a couple of tiny screws(like NEC factory mounts, for instance) to keep the projector in the position you want it.
You screw out or in the eye bolts to change the tilt, if necessary, and push it side to side for proper positioning side to side. One only needs to be very, very, VERY exacting about making the unistrut perpendicular to your screen(there is only a tiny bit of adjustment room, skew wise), as long as you do that, orienting the projector to the screen properly is really easy.
PS: My projector hangs under the kitchen, so there's tons of foot traffic overhead, if this mount was going to allow the projector to move, it would especially happen under these conditions...
|
|
| Back to top |
|
|
Elaine Benes
Joined: 25 Apr 2006
Posts: 1416
|
| Posted: Sun Aug 21, 2011 3:57 pm Post subject: |
|
|
|
If you've got a Princess Auto close, check in their Surplus section, the one here in Kingston has RGBHV cables 25' long for under $20.(I think, cheap for sure) which would be a slight improvement over your current cables visible in the picture you posted....
|
|
| Back to top |
|
|
|
|


