| Author |
Message |
v1rtu0s1ty
Joined: 29 Oct 2007
Posts: 110
|
| Posted: Sun Aug 14, 2011 4:42 am Post subject: |
|
|
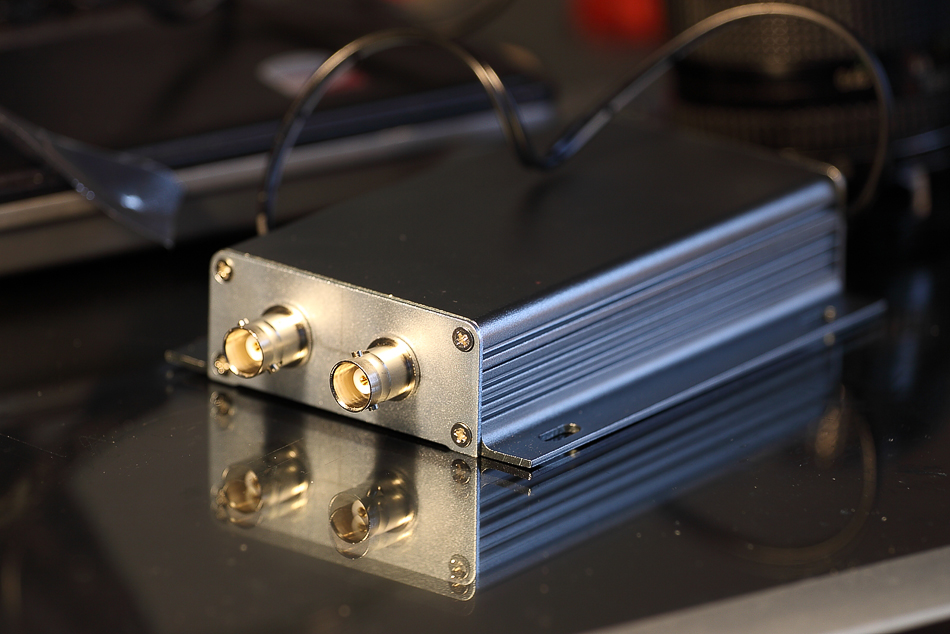
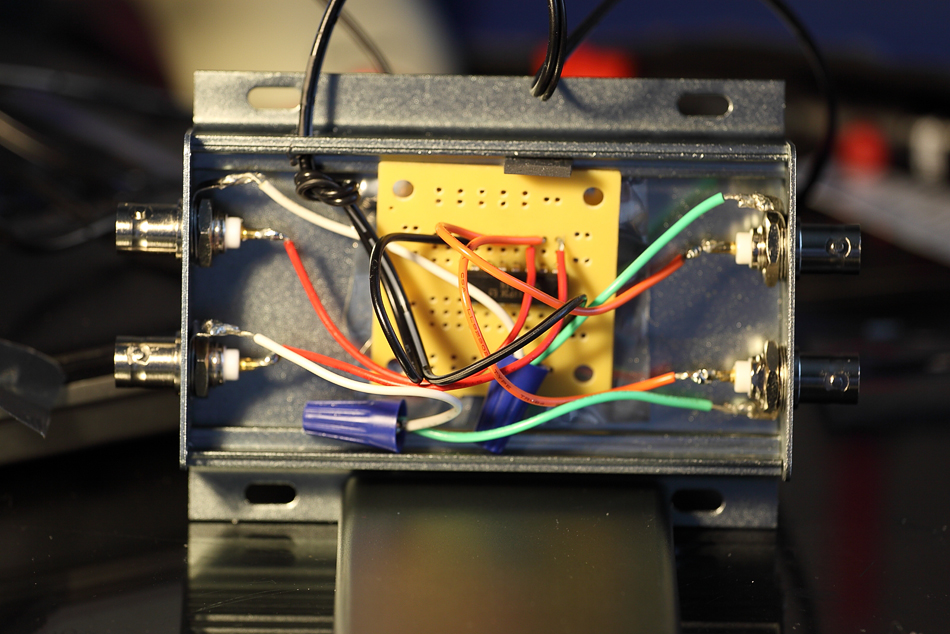
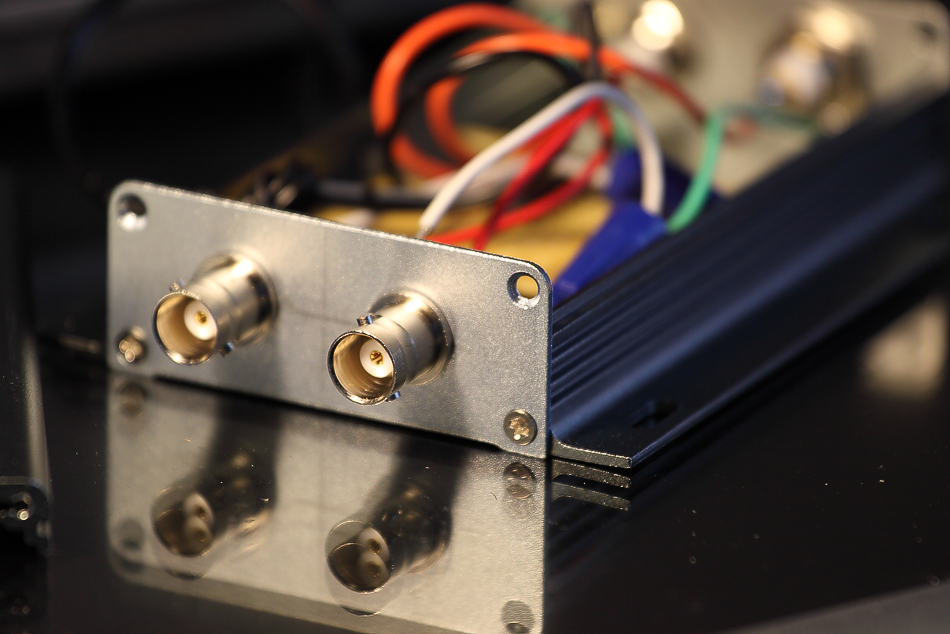
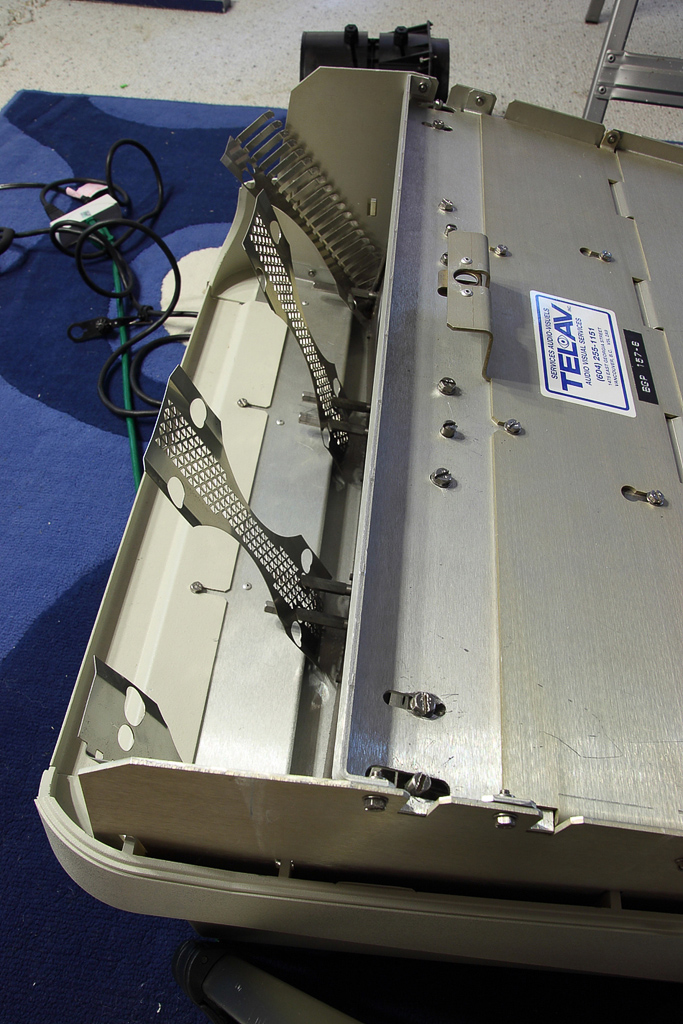
Here is my newest version. I'm so glad the aluminum box arrived today! Took 3 weeks since it came from HK  I've tested it too and it works. I love the new look! I've tested it too and it works. I love the new look!
| Description: |
|
| Filesize: |
399.43 KB |
| Viewed: |
11491 Time(s) |
|
| Description: |
|
| Filesize: |
468.84 KB |
| Viewed: |
11491 Time(s) |
|
| Description: |
|
| Filesize: |
444.47 KB |
| Viewed: |
11491 Time(s) |
|
|
|
| Back to top |
|
 |
Tom.W

Joined: 09 Mar 2006
Posts: 6635
|
|
| Back to top |
|
|
v1rtu0s1ty
Joined: 29 Oct 2007
Posts: 110
|
|
| Back to top |
|
|
v1rtu0s1ty
Joined: 29 Oct 2007
Posts: 110
|
| Posted: Sun Aug 14, 2011 8:09 pm Post subject: |
|
|
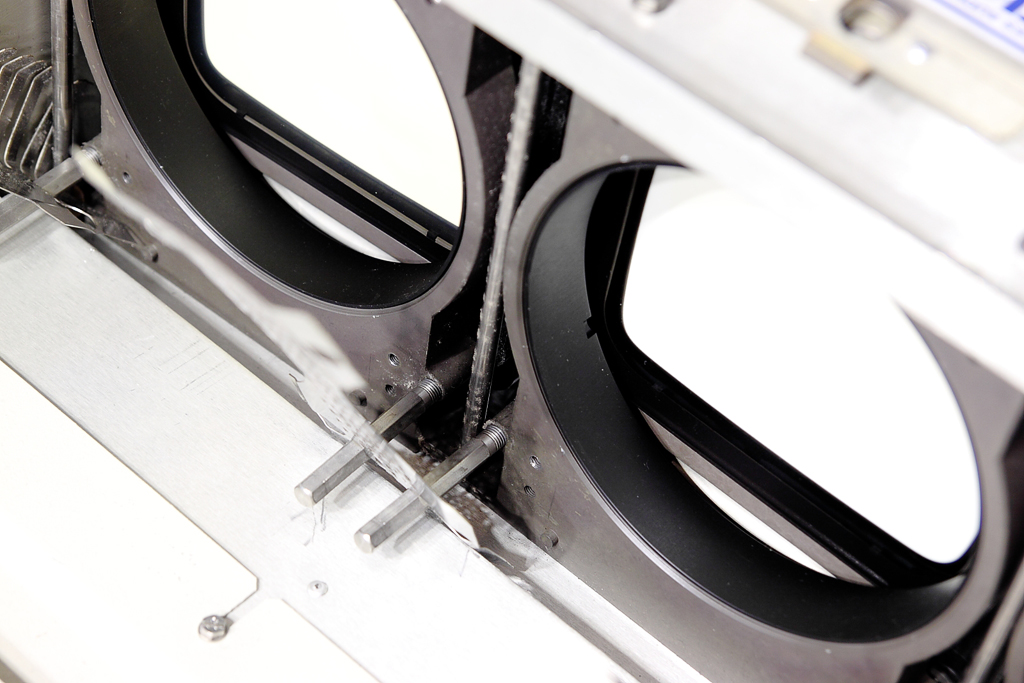
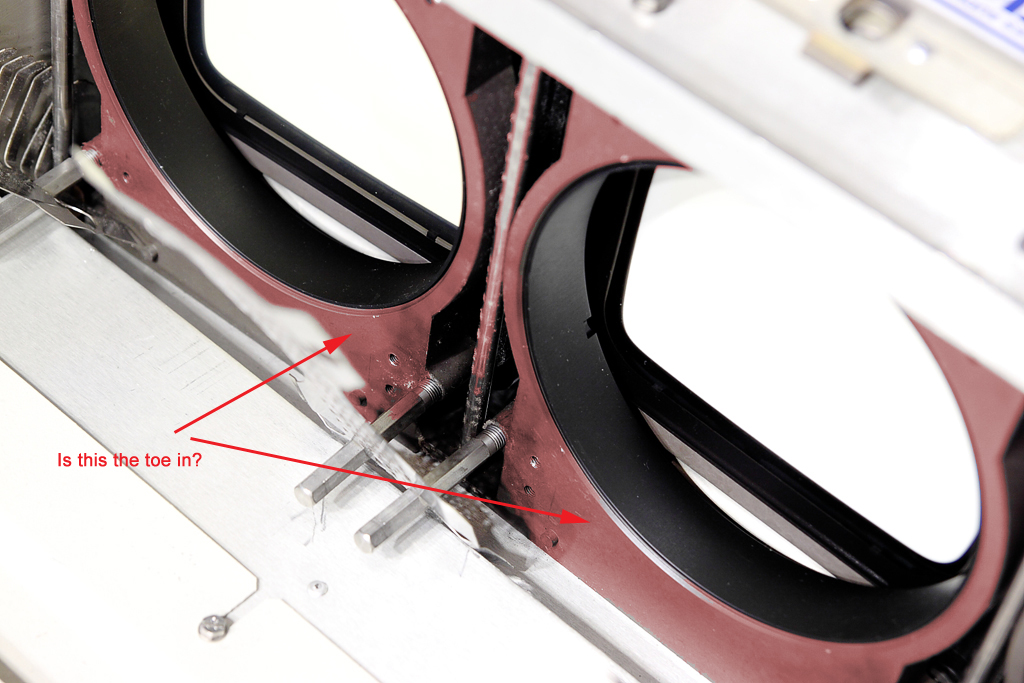
Ok, folks. I need help regarding mechanical convergence. I read the manual and it mentions about washers. I removed the lenses but I didn't see any washers. Please see attached pictures of what I saw. I noticed there were long vertical screws that can be rotated. I'm also thinking that the part where the lenses are mounted to can be moved by loosening the screws on top. However, nothing about these longs screws were mentioned in the pdf manual. How should I proceed with my mechanical convergence?
Oh, I'm optimizing it for 3.2m screen width and up.
Thanks!
| Description: |
|
| Filesize: |
395.8 KB |
| Viewed: |
11432 Time(s) |
|
| Description: |
|
| Filesize: |
405.97 KB |
| Viewed: |
11432 Time(s) |
|
| Description: |
|
| Filesize: |
376.58 KB |
| Viewed: |
11432 Time(s) |

|
|
|
| Back to top |
|
|
Tom.W
Joined: 09 Mar 2006
Posts: 6635
|
|
| Back to top |
|
|
v1rtu0s1ty
Joined: 29 Oct 2007
Posts: 110
|
| Posted: Sun Aug 14, 2011 9:52 pm Post subject: |
|
|
Ok. What I was trying to do is adjust the lenses since I put the barco 13ft from screen. On my Sony 1272, I put spring on outer lenses which allowed me to twist the screw as it tightens and lens moves slowly from left to right/vice versa.
So with our Barco and reading the link you sent, we don't have to remove the lens to do the mechanical aim? Looks like it's the tube that needs to be moved.
|
|
| Back to top |
|
|
zGman
Joined: 22 May 2006
Posts: 599
|
| Posted: Sun Aug 14, 2011 10:01 pm Post subject: |
|
|
The toe-in is adjusted after the bolts are loose on the top panel.
there must be a set-up guide here somewhere, or - try the guided
setup in the menu...
G
|
|
| Back to top |
|
|
v1rtu0s1ty
Joined: 29 Oct 2007
Posts: 110
|
| Posted: Sun Aug 14, 2011 10:03 pm Post subject: |
|
|
| zGman wrote: | The toe-in is adjusted after the bolts are loose on the top panel.
there must be a set-up guide here somewhere, or - try the guided
setup in the menu...
G |
I'm sorry but which part is the toe-in? I'm assuming it's the gray plastic square?
|
|
| Back to top |
|
|
v1rtu0s1ty
Joined: 29 Oct 2007
Posts: 110
|
| Posted: Sun Aug 14, 2011 10:45 pm Post subject: |
|
|
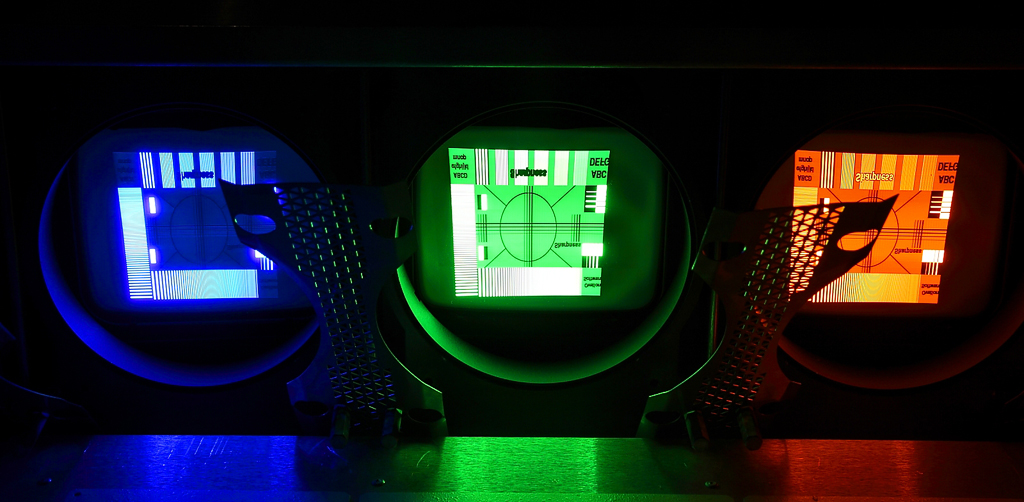
I displayed a pattern so I can see what parts of the raster is being used. It looks like the previous owner set it up properly.
I think I should mention this: when I was converging red to green electronically, I reached the max and it red crosshair was still far from green crosshair. This is the reason I want to mechanically adjust the lens similar to what I did with my Sony 1272. Also, the steps that I was doing for my 1272 could be making me confuse.
Sony steps
1. reset counters all to factory
2. display cross hair in the middle(assuming projector is centered to the screen)
3. adjust the screws on blue lens so blue crosshair is very close to green crosshair
4. adjust the screws on red lens so red crosshair is very close to green crosshair
5. adjust red electronically so it converges green
6. adjust blue electronically so it converges green
7. etc, save
I was thinking that Barco might be different. In my 1272, I didn't move the tubes.
| Description: |
|
| Filesize: |
419.63 KB |
| Viewed: |
11384 Time(s) |
|
| Description: |
|
| Filesize: |
382.86 KB |
| Viewed: |
11390 Time(s) |
|
|
|
| Back to top |
|
|
v1rtu0s1ty
Joined: 29 Oct 2007
Posts: 110
|
| Posted: Mon Aug 15, 2011 1:45 am Post subject: |
|
|
Finally, I figured it out. It's the red and blue tubes that we need to swing. I returned the lenses so I can start converging. However, I would like to reset everything back to factory default before I manually aim it. Where is it in the menu?
| Description: |
|
| Filesize: |
368.29 KB |
| Viewed: |
11366 Time(s) |
|
|
|
| Back to top |
|
|
Elaine Benes
Joined: 25 Apr 2006
Posts: 1416
|
| Posted: Mon Aug 15, 2011 2:07 am Post subject: |
|
|
|
You need to re-install the top piece above the tubes to actually fix the red and blue tubes to the proper "toe in" position...
|
|
| Back to top |
|
|
v1rtu0s1ty
Joined: 29 Oct 2007
Posts: 110
|
| Posted: Mon Aug 15, 2011 2:13 am Post subject: |
|
|
| Elaine Benes wrote: | | You need to re-install the top piece above the tubes to actually fix the red and blue tubes to the proper "toe in" position... |
Will do. Thanks!
|
|
| Back to top |
|
|
v1rtu0s1ty
Joined: 29 Oct 2007
Posts: 110
|
| Posted: Mon Aug 15, 2011 6:46 am Post subject: |
|
|
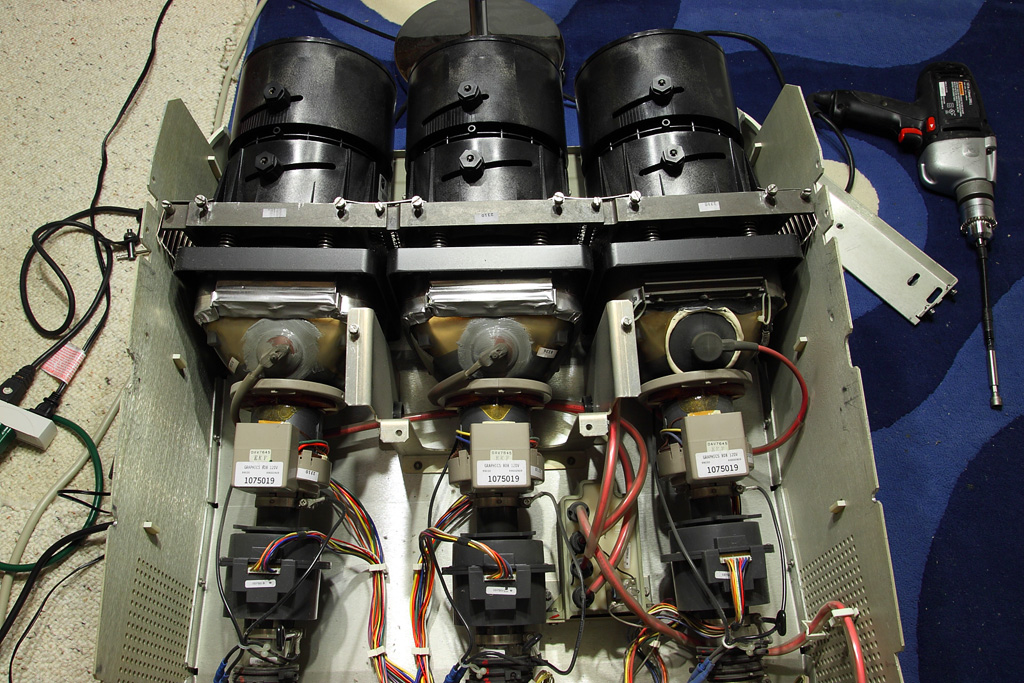
Thanks everyone for all the help!!! It's watchable now. The only thing I need to do is remove the existing crt projector, then install the Barco.
| Description: |
|
| Filesize: |
291.84 KB |
| Viewed: |
11345 Time(s) |

|
| Description: |
|
| Filesize: |
354.88 KB |
| Viewed: |
11345 Time(s) |

|
| Description: |
|
| Filesize: |
351.35 KB |
| Viewed: |
11345 Time(s) |
|
| Description: |
|
| Filesize: |
284.63 KB |
| Viewed: |
11345 Time(s) |

|
|
|
| Back to top |
|
|
ChrisWiggles
Opinionated SOB
Joined: 12 Mar 2006
Posts: 2529
Location: Seattle
|
| Posted: Mon Aug 15, 2011 7:32 pm Post subject: |
|
|
| v1rtu0s1ty wrote: | | Finally, I figured it out. It's the red and blue tubes that we need to swing. I returned the lenses so I can start converging. However, I would like to reset everything back to factory default before I manually aim it. Where is it in the menu? |
The Barco convergence you can just center everything out because it gives you the adjustment ranges. I don't even remember if there is the equivalent of a factory reset on an 808? It's been a while.
But you need to physically swing the tubes as I think you've figured out.
Then you use the long screws poking out the front for lens flapping during optical focus (NOT centering the guns for the particular throw distance).
All of this is covered pretty well in the G808 install manual:
http://www.curtpalme.com/Barco808_Downloads.shtm
Look particularly starting on page 59 and on from there. You should read the whole thing though.
|
|
| Back to top |
|
|
Tom.W
Joined: 09 Mar 2006
Posts: 6635
|
| Posted: Mon Aug 15, 2011 8:33 pm Post subject: |
|
|
|
I would delete all memory blocks before starting from scratch...
|
|
| Back to top |
|
|
v1rtu0s1ty
Joined: 29 Oct 2007
Posts: 110
|
| Posted: Mon Aug 15, 2011 10:09 pm Post subject: |
|
|
| Tom.W wrote: | | I would delete all memory blocks before starting from scratch... |
Ok, I will search the pdf on how to delete the memory blocks. Thanks.
|
|
| Back to top |
|
|
v1rtu0s1ty
Joined: 29 Oct 2007
Posts: 110
|
| Posted: Tue Aug 16, 2011 3:05 am Post subject: |
|
|
I redid the focusing and convergence using binoculars. Movie is Toy Story 3 played on Bluray at 1080p. So far, I'm very pleased with the results. Maybe it's time for me to work on my home theater


|
|
| Back to top |
|
|
AnalogRocks
Forum Moderator
Joined: 08 Mar 2006
Posts: 26706
Location: Toronto, Ontario, Canada
TV/Projector: Sony 1252Q, AMPRO 4000G
|
| Posted: Tue Aug 16, 2011 9:39 am Post subject: |
|
|
What are you projecting onto?
_________________
Tech support for nothing
CRT.
HD done right!
|
|
| Back to top |
|
|
v1rtu0s1ty
Joined: 29 Oct 2007
Posts: 110
|
| Posted: Tue Aug 16, 2011 2:03 pm Post subject: |
|
|
| AnalogRocks wrote: | | What are you projecting onto? |
Material is blackout cloth that I bought from Jo-annes fabric. They only sell 54" in width. You can see the thin black seam line in the middle because I stitched them to be able to get a height of 67-70". It's currently at 126"x70". However, since the projector is on the floor, it's also being projected on the lower part.
Here is a 2007 image but size is different now but still the same location. Sorry, basement is very messy. Sony 1272 seen on pic, ceiling. It's still mounted. 

|
|
| Back to top |
|
|
v1rtu0s1ty
Joined: 29 Oct 2007
Posts: 110
|
| Posted: Tue Aug 16, 2011 6:36 pm Post subject: |
|
|
Can someone please post a close up picture of how you made the mount on your Barco projector? When I acquired my Sony 1272, it had the mounting kit included. However my barco only includes 2 piece of metal that are screwed to the chassis. I'm also thinking that the screw isn't strong enough.
Any help would be greatly appreciated. Thanks.
|
|
| Back to top |
|
|
|
|


