| Author |
Message |
wildchild22
Joined: 16 Aug 2008
Posts: 185
|
| Posted: Mon Nov 15, 2010 5:39 pm Post subject: nec xg 1352 newbie setup[ help ( I am stuck) |
|
|
I have a nec xg 1352 and curt done the board so the tube wont crack. I have the projector mounted and the covers taken off. so I can access the wingnuts for the lenses. I have done a setup a few times and it comes out pretty good. I am ready now to do a complete setup from scratch.
The tubes have little to no wear on a full 4:3 raster setup.
I am using a 16:9 screen and not 4:3 so the big question for re-doing a nec xg would be. Should I put all the controls in the zero position such as tilt,bow,pin cushion etc and save that to a memory block?
Then should I use the internal test pattern and adjust raster to max width (4:3 the internal nec test patterns are)?
or should I use a 16:9 test pattern from my dvdo vp50 and max the raster?
before hand
Should the image size controls in the menu be set to zero?
Amplitude should be set to?
Not real sure if I should use the amplitude or piction controls to adjust raster size.
I can move the projector back and forth 5 ft and left to right approx 3 feet from center either way thanks to unistrut.
I have read all Curts guide on the nec setup but am not sure on how to start the procedure.
|
|
| Back to top |
|
 |
Elaine Benes
Joined: 25 Apr 2006
Posts: 1416
|
| Posted: Tue Nov 16, 2010 3:04 am Post subject: |
|
|
To reset your settings, go to the top most menu, then push Control and Normal together, then choose Cancel. This will reset everything in that menu to null.
Use a test pattern from the source you're setting up, NEC internal patterns are not as accurate for setup as the actual source.
Personally, I would recommend NOT moving the projector way closer to the screen if a really sharp image is your preference. The amount of tubeface you use will be slightly less, but it will be easier to set up your projector and the sides of your image will be better converged and focused if you stay fairly close to the recommended throw distance. I understand this goes against what most people recommend here, but having owned a few NEC's, and done a lot of experimentation with them, I *personally* have never been able to get as perfect an image with a maximized raster, as I could get with the projector very near the factory throw distance. NEC's don't have lens flapping, so if you don't put the projector EXACTLY where you're supposed to, you end up compromising the optical focus. Also, I believe NEC's have trouble converging and focusing the outer edges of the image, which is at least partly why the throw distances are generally more conservative than most projectors. When you use very close to the factory recommended throw distance, I find, setup goes MUCH smoother...
Yes you can save a memory with everything nulled, but don't be surprised if its a really ugly looking input memory...
|
|
| Back to top |
|
|
jarseneau

Joined: 06 Nov 2007
Posts: 323
Location: WI
|
| Posted: Tue Nov 16, 2010 5:56 am Post subject: |
|
|
The whole process is iterative by nature but there are some guidelines.- Optimise mechanical setup by ensuring pj/screen squareness and centering green CRT to screen center. While running your highest resolution, ensure horizontal width coverage with the raster set as wide as practical. At this point you can set PHASE TO CENTER the test pattern. From this point use external test patterns.
- Next, adjust Alignment (green only) to setup geometry to both fill the screen, center and create a square proportioned picture. This would be a suitable time to adjust scheimpflug according to a chart that may exist on the inside lens cover cowelling.
- adjust focus and astig on green
- Adjust red to green convergence starting with size an in the same order as you go down the remote. Repeat for blue.
_________________
Jerry
|
|
| Back to top |
|
|
wildchild22
Joined: 16 Aug 2008
Posts: 185
|
| Posted: Tue Nov 16, 2010 6:01 pm Post subject: |
|
|
thanks for the help so far. I tried maximizing the raster and maxing the width control to 100% and moving the projector as far forward as possible to fill my 92X51.75 " 16:9 screen. But after setting the image up as best as possible for a newbie I found the image blurry looking. So I moved the projector back approx 3 feet and lowered the H width amplitude and the focus is defiantly better with the projector back further.
So I think I will do a complete setup with the projector in it current location. I am approx 10 feet back and that is close to what the manual suggests.
I'll post some shots after I get the setup re done.
Last question should I setup using 1080i@ 60hz or 1080i @ 72hz from my vp50?
From my limited testing it seems to not make any difference as I copied the memory block from my 1080i @60hz to my 72hz memory block and didnt have to touch any of my settings.
|
|
| Back to top |
|
|
MrGogo
Joined: 07 Sep 2006
Posts: 21
Location: MTL, QC
|
| Posted: Tue Nov 16, 2010 6:47 pm Post subject: |
|
|
Hi wildchild22,
You really should try and maximize the amount of phosphor used. Especially if the tubes have little to no wear. The manual that comes with XGs suggest a longer throw distance and does NOT maximize phosphor area usage. That why most people suggest that you make your raster as big as possible and then move the projector relative to the screen to make it fit. You will get a better image and your tubes will last longer.
If you are having trouble focusing the set then you need to reset all the menu items to 0. Mechanically you should be able to focus very crisp when the tube raster area is maximized. As for focus, you should set all the menus to 0 and then using the main electric focus trim pot adjust the focus until its crisp. You will probably need to go back and forth between the mechanical and electrical focus adjustments to get it just right.
Good luck
|
|
| Back to top |
|
|
Curt Palme
CRT Tech
Joined: 08 Mar 2006
Posts: 24396
Location: Langley, BC
TV/Projector: All of them!
|
| Posted: Tue Nov 16, 2010 6:49 pm Post subject: |
|
|
| wildchild22 wrote: | But after setting the image up as best as possible for a newbie I found the image blurry looking. So I moved the projector back approx 3 feet and lowered the H width amplitude and the focus is defiantly better with the projector back further.
. |
3' of movement of the projector is a LOT for the same screen size! If you're too close to the tube edges, the corner focus may be compromised, but that's about it. A very general rule of thumb is 1.4 X the width of the screen for throw distance.
your test pattern should look sorta like this on the tube face:
http://www.curtpalme.com/TubeRasterSetup3.shtm
You might go a bit smaller in width (and obviously height, the above pix shows an approx 4:3 setup), but too small, and you'll compromise resolution and overall tube life.
http://www.curtpalme.com/TubeCondition_PoorInstall.shtm
Another general rule of thumb is go about 7% closer to the screen than what the NEC manual suggests. That always gives good results.
|
|
| Back to top |
|
|
jarseneau
Joined: 06 Nov 2007
Posts: 323
Location: WI
|
| Posted: Tue Nov 16, 2010 7:35 pm Post subject: |
|
|
If you have an LC (IIRC all 52's are LC's) then you might be having trouble focus-ing at the closer distance due to the interactive nature of the LC lens adjustment. In other words, the edge adjustment can make the center adjustment hard to focus. See the instructions at this link.
I think it says to start with both focus adjustments at the CW stop, then move wingnut A to get center focus; tighten. Then move barrel B for best edge focus. Then go back and check center and adjust wingnut A as needed, then re-check edge.
_________________
Jerry
|
|
| Back to top |
|
|
wildchild22
Joined: 16 Aug 2008
Posts: 185
|
| Posted: Tue Nov 16, 2010 8:18 pm Post subject: |
|
|
|
Okay I will try setting it up maxed on raster. However the problem for me is the images in the guide is of a non LC . The tube face on mine looks curved on the edges. As the image widens out it curves on the tube face. I am not putting it to far as it seems not mater how much h width I use I cannot get it wide enough to go over the tube face as in the pics. I have approx 1/2 inch to the danger zone when maxed out on width.
|
|
| Back to top |
|
|
Curt Palme
CRT Tech
Joined: 08 Mar 2006
Posts: 24396
Location: Langley, BC
TV/Projector: All of them!
|
| Posted: Tue Nov 16, 2010 8:48 pm Post subject: |
|
|
So just look 'through' the C element, as the tube face behind it is the same as a non LC set. Only the C element is curved, the tube face is flat.
If you can't overshoot the tube face, that's a good thing. The image will be slightly smaller than the test pattern anyways, so if you've got 1/2" or so to the edge of the phosphor, I'd max out the width as much as possible to get the most use of the phosphor and the most resolution.
|
|
| Back to top |
|
|
Elaine Benes
Joined: 25 Apr 2006
Posts: 1416
|
| Posted: Wed Nov 17, 2010 8:15 am Post subject: |
|
|
| wildchild22 wrote: | | Okay I will try setting it up maxed on raster. However the problem for me is the images in the guide is of a non LC . The tube face on mine looks curved on the edges. As the image widens out it curves on the tube face. I am not putting it to far as it seems not mater how much h width I use I cannot get it wide enough to go over the tube face as in the pics. I have approx 1/2 inch to the danger zone when maxed out on width. |
Huh ?
I thought the problem you were having was that the focus was poorer using the "max raster" method than it was using closer to the factory throw ?
Go with what works.
I realize I'm the contrarian here, but my personal experience with NEC's has been that I can achieve a MUCH better QUALITY of setup, especially in the areas of focus and convergence, if I stick much closer to the factory dictated throw distances.
My theory is that there MUST have been a reason for the NEC engineers to devise those throw distances, and I believe they did that EXACTLY SO you would use pretty much just the middle of the tube because EVERYTHING gets harder to do the farther from the center of the tube you get. Convergence, astig, and electronic focus, even geometry get more difficult to control on the extreme edges. And that's not even mentioning, yet again, the fact that NEC's lack infinitely variable lens flapping. They do have lens flapping, but its fixed, and tied to throw distance via the notched rings....
Prove to yourself what works FOR YOU, don't let someone tell you you're wrong because you choose a different method, you may not have the same priorities as another user.
|
|
| Back to top |
|
|
wildchild22
Joined: 16 Aug 2008
Posts: 185
|
| Posted: Wed Nov 17, 2010 3:23 pm Post subject: |
|
|
I cannot use the 100% horizontal width as the screen can only can focus the center and the sides are blurry. I tried the h and v dials to correct edge focus as per manual. That was my 3 hr ordeal last night.
Tonight I will slide the projector back where I can Focus it then redo a setup. It seems Elaine Benes is correct that it is hard to max width and get all the screen to focus.
Thanks for all the help so far.
It maybe the lenses I have they are some sort of protoype lenses for VR with a nda sticker on them.
They seem to allow a very short throw much much closer than the nec manual but then the screen will not focus well. So it seems my only option is to use approx 70-85% h width and focus the screen.
| Elaine Benes wrote: | | wildchild22 wrote: | | Okay I will try setting it up maxed on raster. However the problem for me is the images in the guide is of a non LC . The tube face on mine looks curved on the edges. As the image widens out it curves on the tube face. I am not putting it to far as it seems not mater how much h width I use I cannot get it wide enough to go over the tube face as in the pics. I have approx 1/2 inch to the danger zone when maxed out on width. |
Huh ?
I thought the problem you were having was that the focus was poorer using the "max raster" method than it was using closer to the factory throw ?
Go with what works.
I realize I'm the contrarian here, but my personal experience with NEC's has been that I can achieve a MUCH better QUALITY of setup, especially in the areas of focus and convergence, if I stick much closer to the factory dictated throw distances.
My theory is that there MUST have been a reason for the NEC engineers to devise those throw distances, and I believe they did that EXACTLY SO you would use pretty much just the middle of the tube because EVERYTHING gets harder to do the farther from the center of the tube you get. Convergence, astig, and electronic focus, even geometry get more difficult to control on the extreme edges. And that's not even mentioning, yet again, the fact that NEC's lack infinitely variable lens flapping. They do have lens flapping, but its fixed, and tied to throw distance via the notched rings....
Prove to yourself what works FOR YOU, don't let someone tell you you're wrong because you choose a different method, you may not have the same priorities as another user. |
|
|
| Back to top |
|
|
Curt Palme
CRT Tech
Joined: 08 Mar 2006
Posts: 24396
Location: Langley, BC
TV/Projector: All of them!
|
| Posted: Wed Nov 17, 2010 3:55 pm Post subject: |
|
|
|
Pull hte projector forward again and look into the lenses. Are the test patterns clear on the tube faces? If so, you have an optical focusing issue. It would be a shame for you to get tube wear at 500 hours because the setup wasn't done right at the beginning.
|
|
| Back to top |
|
|
wildchild22
Joined: 16 Aug 2008
Posts: 185
|
| Posted: Wed Nov 17, 2010 4:31 pm Post subject: |
|
|
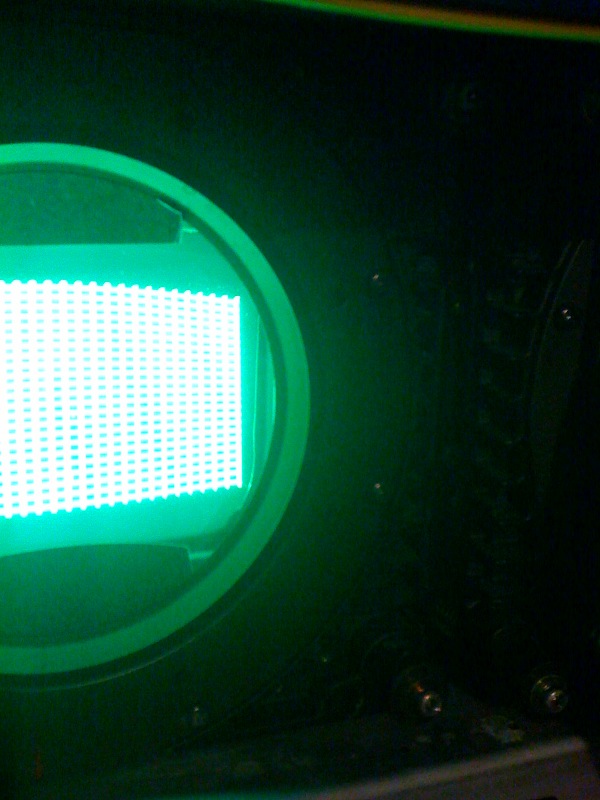
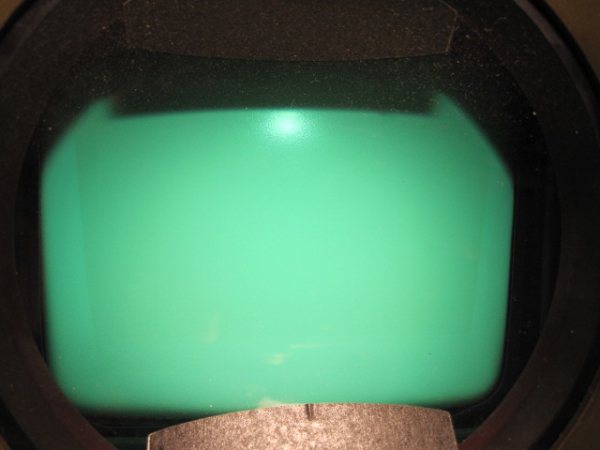
Here are some pics from my iphone of the raster using the internal nec test pattern. It is not correct size as I just put h width to max and bumped the vertical size to approx. They are the same pic just one you cant see the right side of the raster.
How do this look?
The previous Owner had black cardboard stuck on the front of the c element so I never took it off.
This is after setting all internal settings to zero and I had to drop the brightness and contrast down do my iphone would focus on it.
| Description: |
|
| Filesize: |
84.28 KB |
| Viewed: |
8236 Time(s) |

|
| Description: |
|
| Filesize: |
108.58 KB |
| Viewed: |
8236 Time(s) |
|
|
|
| Back to top |
|
|
wildchild22
Joined: 16 Aug 2008
Posts: 185
|
| Posted: Wed Nov 17, 2010 4:43 pm Post subject: |
|
|
Here is a pic of the green tube the previous owner took. The wear you see on the tube cannot be seen by your eye even with a flash light.
| Description: |
|
| Filesize: |
25.49 KB |
| Viewed: |
8232 Time(s) |
|
|
|
| Back to top |
|
|
dropzone7

Joined: 12 Jun 2007
Posts: 1069
Location: Charlotte, NC
|
| Posted: Wed Nov 17, 2010 5:01 pm Post subject: |
|
|
| wildchild22 wrote: | thanks for the help so far. I tried maximizing the raster and maxing the width control to 100% and moving the projector as far forward as possible to fill my 92X51.75 " 16:9 screen. But after setting the image up as best as possible for a newbie I found the image blurry looking. So I moved the projector back approx 3 feet and lowered the H width amplitude and the focus is defiantly better with the projector back further.
So I think I will do a complete setup with the projector in it current location. I am approx 10 feet back and that is close to what the manual suggests.
I'll post some shots after I get the setup re done.
Last question should I setup using 1080i@ 60hz or 1080i @ 72hz from my vp50?
From my limited testing it seems to not make any difference as I copied the memory block from my 1080i @60hz to my 72hz memory block and didnt have to touch any of my settings. |
I just have an XG852 but having used 1080i/60 and 1080i/72 I can tell you that you might like the look of 720p/72 better. You will need to make some changes in the VP50 to get it to fit on the screen correctly but it's a much smoother image in my opinion. I still have my 1080i entries as well but switching back and forth I can see scan lines using 1080i that are not there using 720p. All my sources are set to 1080p/24 into the VP50 and then output 720p/72.
_________________
"Coffee is for Closers."
|
|
| Back to top |
|
|
Curt Palme
CRT Tech
Joined: 08 Mar 2006
Posts: 24396
Location: Langley, BC
TV/Projector: All of them!
|
| Posted: Wed Nov 17, 2010 8:34 pm Post subject: |
|
|
|
There's no focus problem within the set that I can see. That black cardboard is stock NEC, not sure why it's there other than to perhaps absorb reflections.
|
|
| Back to top |
|
|
wildchild22
Joined: 16 Aug 2008
Posts: 185
|
| Posted: Wed Nov 17, 2010 9:07 pm Post subject: |
|
|
Can someone explain how to adjust phase properly. I am very close to having a watchable image but my geometry isnt perfect. I can see scan lines @ 1080i@60hz though. So I am making improvement.
With bell hdtv I can see the channel logo when you change channels across the top isn't staright it is bowed.
I read how to adjust phase in the manual but it doesnt make sense.
|
|
| Back to top |
|
|
wildchild22
Joined: 16 Aug 2008
Posts: 185
|
| Posted: Thu Nov 18, 2010 12:14 am Post subject: |
|
|
|
My projector has acat. How do I use this feature? Not in my manual.
|
|
| Back to top |
|
|
dropzone7
Joined: 12 Jun 2007
Posts: 1069
Location: Charlotte, NC
|
| Posted: Thu Nov 18, 2010 12:47 am Post subject: |
|
|
| wildchild22 wrote: | | My projector has acat. How do I use this feature? Not in my manual. |
ACAT is easy to use but I wouldn't bother with it until you are sure you have the mechanical and electronic setup nailed down pretty well. To use ACAT you just need to be in programming mode, convergence, ACAT and then turn off the blue tube. You should now just see red and green. Green is your reference so don't move this around. Use the arrow keys to move the cross around side to side and up and down, lining up red on top of green as best you can by eye. You need to be holding down the CNTRL key while hitting the arrow keys in order to move the individual crosses around. Just pushing a left, right, up or down arrow key will toggle you to the next area on the screen. Once you have converged red on top of green press the ENTER key and ACAT will do it's thing. Now turn green off and blue back on. I find it's easier to align blue on top of red than green. Same steps as before, once all points are touched up hit the ENTER key and ACAT works. Turn all tubes back on and hit ENTER one more time to let ACAT run once again. Then save and exit. Just going by memory here but that's pretty much it.
_________________
"Coffee is for Closers."
|
|
| Back to top |
|
|
|
|


