| Author |
Message |
Kiev Savoie
Joined: 25 Oct 2007
Posts: 432
|
| Posted: Sat Jan 30, 2010 10:10 pm Post subject: What are these lines? |
|
|
I've had this problem since day one with my G70. It wasn't much of a big deal to me until recently when I got my raster perfectly centered on the tube face and no longer want to tip toe around it by adjusting my throw or my raster position off center to compensate.
On each tube there is a straight bold line and a much fainter arched thin line at the top of the raster. It appears whether a source is connected or not. On screen only the bold line is visible as a faint grey line at the top of the image. If I move the active image area into this line it cuts the image off and any scan lines that pass it end up on the bottom of the screen. In contrast to my well centered raster, the active image wants to show up well above center. I have to adjust RGB shift all the way down to get it close to the center of the screen. The only way i know of to get RGB shift close to mid range would be to throw my raster off center or adjust my projection angle and i would rather not do either.
Here are a few pictures. Does anyone know what this is?
| Description: |
|
| Filesize: |
159.45 KB |
| Viewed: |
5172 Time(s) |
|
| Description: |
|
| Filesize: |
162.37 KB |
| Viewed: |
5127 Time(s) |
|
| Description: |
|
| Filesize: |
156.83 KB |
| Viewed: |
5103 Time(s) |
|
| Description: |
| green tube with the lens off |
|

Download |
| Filename: |
DSC00026.JPG |
| Filesize: |
374.59 KB |
| Downloaded: |
364 Time(s) |
|
|
| Back to top |
|
 |
ecrabb
Forum Moderator

Joined: 13 Mar 2006
Posts: 15909
Location: Utah
TV/Projector: JVC RS40, Epson 5010
|
|
| Back to top |
|
|
Kiev Savoie
Joined: 25 Oct 2007
Posts: 432
|
| Posted: Sun Jan 31, 2010 12:22 am Post subject: |
|
|
Thanks ecrabb. That was indeed very informative. What did you end up doing with your setup once everything was all said and done? It sounded like you were at the same place then that i am now. My hunch is that this whole raster maximizing philosophy that i've heard so much about is not serving me very well. Just like you i am dealing with the ringing issue and the AKB line and i might be having trouble with raster wrap as well but i'm not 100% sure on that last one as it is a new term to me.
I plan on getting a calibration setup soon anyway so I think I can probably get away with having ABG off.
I have a 78" 1.50:1 screen that gives me a 75" diagonal in 16:9 I just set the throw 3" further back to 85" and i have the raster maxed but it still only overshoots the sides of the screen by half an inch or so. What do you think?
Anyway, I'm going to set AGB off and report back.
|
|
| Back to top |
|
|
Kiev Savoie
Joined: 25 Oct 2007
Posts: 432
|
| Posted: Sun Jan 31, 2010 1:01 am Post subject: |
|
|
Ok, SO turning ABG off got rid of the lines and made the picture markedly dimmer, but this did nothing for the RGB Shift adjustment issue. The image will still clip if it is adjusted up to where the AKB line was and it is still no where near centered without adjusting RGB Shift all the way down. I also realized that since I have my projection angle on a zero axis (parallel with the floor), increasing the throw distance won't make any difference on the position of the center of the image. It will stay constant. I just don't understand why the image wants to be so high up!
Here is the video chain: PS3 on component - RTC2200 - G70 through RGBHV running 1080i. I backed off all the turnpots on the RTC2200 but there was no effect.
Any Ideas?
|
|
| Back to top |
|
|
AFryia

Joined: 09 Mar 2006
Posts: 965
Location: S.E. Michigan VPH-G70Q
|
| Posted: Sun Jan 31, 2010 1:46 am Post subject: |
|
|
I run with AGB On and rarely notice it watching video. Video is more stable IMO.
First question what resolutions are you trying to run? In my experience 1280x720p 60/72hz I can pretty much use standard video timings (HTPC/PowerStrip) and get things centered with raster maximized. 1080i I think my timings are standard also.
At higher resolutions (bandwidth) I also have centering issues. The counter measure is to increase the porch sizes in PowerStrip.
_________________
My Volt Blog
|
|
| Back to top |
|
|
Kiev Savoie
Joined: 25 Oct 2007
Posts: 432
|
| Posted: Sun Jan 31, 2010 2:09 am Post subject: |
|
|
I'm not running an HTPC. I've heard porch sizes help with ringing a well. I assume all of my timings would be considered standard since i'm using a PS3 as my source. I run 1080i (60Hz?) almost exclusively.
Maybe moving the raster down and off center is the best soultion for this problem. If I increase the throw distance another two inches or so and then lower the raster down a little I might have enough wiggle room to bring the image down a few more clicks or up a little with out hitting the AKB line. That way if a different source shifts it off center i would have room for adjustment. I would still be at the very low end of the RGB Shift Adjustment, making it an imperfect solution, but at least I wouldn't need a scaler or an HTPC. It does sound like a PC or a Scaler can make life a lot easier though...
|
|
| Back to top |
|
|
CIR Engineering

Joined: 25 Aug 2008
Posts: 4269
Location: Chicago USA & Berlin Germany
|
| Posted: Sun Jan 31, 2010 3:27 pm Post subject: |
|
|
Don't center the image inside the raster. Center the image on the tube face, but have the image at the lower right porting of the raster (when looking on the screen). This way you will avoid raster ringing and probably the other problems you are having.
Use the "center" function to move the raster. Then use the "shift" function to move the image inside the raster.
Use "shift" to push the image to the bottom right of the raster, but be careful. You will find a point when you move the image too far to the right side (and the bottom side) and the image will start to compress. When the image starts to compress move the "shift" back to the left by two or three clicks at the bottom and top. The easiest way to see compression is with a circle hatch pattern with circles in the corners, but a hatch pattern works well also.
So start by shifting the image to the lower right of the raster with shift. And then just center the image on the tube face (screen) with the center function. Don't worry if the raster goes off the tube face on the left side (of the screen) as long as the image stays on the phosphor.
After that, set your blanking right up the the edge of the image on all four sides.
craigr
_________________
JETI 1501-HiRes 2nm Spectroradiometer
JETI 1211 Spectroradiometer
Photo Research PR-650 Spectroradiometer
Klein K10-A Colorimeter
Murideo Fresco SIX-G HDMI 2.x Multimedia Generator
Murideo Fresco SIX-A HDMI 2.x Analyzer
Light Illusion ColourSpace XPT Color Calibration Software
Light Illusion LightSpace XPT Pro Version 10.x Color Calibration Software
OMARDRIS JVC Software Patch to use K10-A and Jeti with JVC OEM AutoCal Software!
Sencore CR7000 CRT Tube Analyzer / Rejuvenater
Authorized Dealer for Lumagen & just about everything worth buying 
www.CIR-Engineering.com - craigr@cir-engineering.com
Phone: 865-405-6892
Last edited by CIR Engineering on Mon Feb 01, 2010 2:44 pm; edited 1 time in total
|
|
| Back to top |
|
|
CIR Engineering
Joined: 25 Aug 2008
Posts: 4269
Location: Chicago USA & Berlin Germany
|
| Posted: Sun Jan 31, 2010 3:34 pm Post subject: |
|
|
| Kiev Savoie wrote: |
I plan on getting a calibration setup soon anyway so I think I can probably get away with having ABG off. |
If you would like calibration service please shoot me an email at craigr@cir-engineering.com or just give me a ring (865)-405-6892. I have plans for the eastern USA, Florida, and Texas over the next five weeks and I make it everywhere else in the USA regularly. I can be had in most EU nations about once a year as well.
craigr
_________________
JETI 1501-HiRes 2nm Spectroradiometer
JETI 1211 Spectroradiometer
Photo Research PR-650 Spectroradiometer
Klein K10-A Colorimeter
Murideo Fresco SIX-G HDMI 2.x Multimedia Generator
Murideo Fresco SIX-A HDMI 2.x Analyzer
Light Illusion ColourSpace XPT Color Calibration Software
Light Illusion LightSpace XPT Pro Version 10.x Color Calibration Software
OMARDRIS JVC Software Patch to use K10-A and Jeti with JVC OEM AutoCal Software!
Sencore CR7000 CRT Tube Analyzer / Rejuvenater
Authorized Dealer for Lumagen & just about everything worth buying
www.CIR-Engineering.com - craigr@cir-engineering.com
Phone: 865-405-6892
|
|
| Back to top |
|
|
Curt Palme
CRT Tech
Joined: 08 Mar 2006
Posts: 24396
Location: Langley, BC
TV/Projector: All of them!
|
| Posted: Sun Jan 31, 2010 6:20 pm Post subject: |
|
|
| CIR Engineering wrote: | | Kiev Savoie wrote: |
I plan on getting a calibration setup soon anyway so I think I can probably get away with having ABG off. |
If you would like calibration service please shoot me an email at craigr@cir-engineering.com or just give me a ring (865)-405-6892. I have plans for the eastern USA, Florida, and Texas over the next five weeks and I make it everywhere else in the USA regularly. I can be had in most EU nations about once a year as well.
craigr |
A Beach Boys song comes to mind.
"round round getaround, I get around..." 
|
|
| Back to top |
|
|
Kiev Savoie
Joined: 25 Oct 2007
Posts: 432
|
| Posted: Mon Feb 01, 2010 2:29 am Post subject: |
|
|
Thanks Craig, that makes perfect sense! I guess I just wasn't thinking "outside of the box" literally! I remember you mentioning something in another thread about this but I completely misunderstood your meaning.
Please rest assured that I plan on having you calibrate my setup when the time comes. I just want to get a basic calibration setup to play with and maybe make a niche for myself at the AV store I work at. The only guys doing calibration in this town is Best Buy and I think I might be able to do better than them. Part of my motivation for getting you to calibrate my setup is to have a reference display from a real pro. Once I have the prints finished I can send you a copy to make sure my setup is easy for you to work with. I still have to hang the unit and mirrors and get a scaler and an HDMI card. So it will still be a while before it will be ready.
|
|
| Back to top |
|
|
CIR Engineering
Joined: 25 Aug 2008
Posts: 4269
Location: Chicago USA & Berlin Germany
|
| Posted: Mon Feb 01, 2010 2:42 pm Post subject: |
|
|
| Kiev Savoie wrote: | Thanks Craig, that makes perfect sense! I guess I just wasn't thinking "outside of the box" literally! I remember you mentioning something in another thread about this but I completely misunderstood your meaning.
Please rest assured that I plan on having you calibrate my setup when the time comes. I just want to get a basic calibration setup to play with and maybe make a niche for myself at the AV store I work at. The only guys doing calibration in this town is Best Buy and I think I might be able to do better than them. Part of my motivation for getting you to calibrate my setup is to have a reference display from a real pro. Once I have the prints finished I can send you a copy to make sure my setup is easy for you to work with. I still have to hang the unit and mirrors and get a scaler and an HDMI card. So it will still be a while before it will be ready. |
It would be an interesting performance if someone from BB came to calibrate your G70..... HAHAHA. That poor kid wouldn't know what to do and probably not what to say about it either. I mean he wouldn't even have a screw driver with him, all these guys do on flat panels is set the gray scale, brightness, and contrast, and collect their payment Geometry and focus are not even on the table.
Anyhow, are you the fellow who I spoke with on the phone a couple months back asking all the questions on G70's? If that was you, I was wondering what ever happened to you.
craigr
_________________
JETI 1501-HiRes 2nm Spectroradiometer
JETI 1211 Spectroradiometer
Photo Research PR-650 Spectroradiometer
Klein K10-A Colorimeter
Murideo Fresco SIX-G HDMI 2.x Multimedia Generator
Murideo Fresco SIX-A HDMI 2.x Analyzer
Light Illusion ColourSpace XPT Color Calibration Software
Light Illusion LightSpace XPT Pro Version 10.x Color Calibration Software
OMARDRIS JVC Software Patch to use K10-A and Jeti with JVC OEM AutoCal Software!
Sencore CR7000 CRT Tube Analyzer / Rejuvenater
Authorized Dealer for Lumagen & just about everything worth buying
www.CIR-Engineering.com - craigr@cir-engineering.com
Phone: 865-405-6892
|
|
| Back to top |
|
|
CIR Engineering
Joined: 25 Aug 2008
Posts: 4269
Location: Chicago USA & Berlin Germany
|
| Posted: Mon Feb 01, 2010 2:46 pm Post subject: |
|
|
Hey, I just edited my post above because I had my lefts and rights backwards in some places. I hadn't finished my coffee yet when I posted those instructions.... but I haven't finished my coffee yet this morning either so watch out!
craigr
_________________
JETI 1501-HiRes 2nm Spectroradiometer
JETI 1211 Spectroradiometer
Photo Research PR-650 Spectroradiometer
Klein K10-A Colorimeter
Murideo Fresco SIX-G HDMI 2.x Multimedia Generator
Murideo Fresco SIX-A HDMI 2.x Analyzer
Light Illusion ColourSpace XPT Color Calibration Software
Light Illusion LightSpace XPT Pro Version 10.x Color Calibration Software
OMARDRIS JVC Software Patch to use K10-A and Jeti with JVC OEM AutoCal Software!
Sencore CR7000 CRT Tube Analyzer / Rejuvenater
Authorized Dealer for Lumagen & just about everything worth buying
www.CIR-Engineering.com - craigr@cir-engineering.com
Phone: 865-405-6892
|
|
| Back to top |
|
|
CIR Engineering
Joined: 25 Aug 2008
Posts: 4269
Location: Chicago USA & Berlin Germany
|
| Posted: Mon Feb 01, 2010 2:49 pm Post subject: |
|
|
| Curt Palme wrote: | | CIR Engineering wrote: | | Kiev Savoie wrote: |
I plan on getting a calibration setup soon anyway so I think I can probably get away with having ABG off. |
If you would like calibration service please shoot me an email at craigr@cir-engineering.com or just give me a ring (865)-405-6892. I have plans for the eastern USA, Florida, and Texas over the next five weeks and I make it everywhere else in the USA regularly. I can be had in most EU nations about once a year as well.
craigr |
A Beach Boys song comes to mind.
"round round getaround, I get around..." |
I haven't been up in your neck of the woods in nearly four years though. BC, Washington, and Oregon have been dead zones for me lately. I'd love to swing by one day and say hey Curt.
craigr
_________________
JETI 1501-HiRes 2nm Spectroradiometer
JETI 1211 Spectroradiometer
Photo Research PR-650 Spectroradiometer
Klein K10-A Colorimeter
Murideo Fresco SIX-G HDMI 2.x Multimedia Generator
Murideo Fresco SIX-A HDMI 2.x Analyzer
Light Illusion ColourSpace XPT Color Calibration Software
Light Illusion LightSpace XPT Pro Version 10.x Color Calibration Software
OMARDRIS JVC Software Patch to use K10-A and Jeti with JVC OEM AutoCal Software!
Sencore CR7000 CRT Tube Analyzer / Rejuvenater
Authorized Dealer for Lumagen & just about everything worth buying
www.CIR-Engineering.com - craigr@cir-engineering.com
Phone: 865-405-6892
|
|
| Back to top |
|
|
Kiev Savoie
Joined: 25 Oct 2007
Posts: 432
|
| Posted: Tue Feb 02, 2010 12:19 am Post subject: |
|
|
| CIR Engineering wrote: |
Anyhow, are you the fellow who I spoke with on the phone a couple months back asking all the questions on G70's? If that was you, I was wondering what ever happened to you.
craigr |
Yeah that's me. That conversation left my head reeling! But it got me excited about how to go forward with my rig. It's a slow process, but I've been plugging away at it as time and money make themselves available. I will be utilizing your instructions from this thread Saturday, I'll let you know how it goes. Oh and yes, I think a BB kid would be out the door before he had time to scratch his head if he saw a CRT setup!
Thanks again
|
|
| Back to top |
|
|
Kiev Savoie
Joined: 25 Oct 2007
Posts: 432
|
| Posted: Sat Feb 20, 2010 8:42 pm Post subject: |
|
|
| CIR Engineering wrote: | Don't center the image inside the raster. Center the image on the tube face, but have the image at the lower right porting of the raster (when looking on the screen). This way you will avoid raster ringing and probably the other problems you are having.
Use the "center" function to move the raster. Then use the "shift" function to move the image inside the raster.
Use "shift" to push the image to the bottom right of the raster, but be careful. You will find a point when you move the image too far to the right side (and the bottom side) and the image will start to compress. When the image starts to compress move the "shift" back to the left by two or three clicks at the bottom and top. The easiest way to see compression is with a circle hatch pattern with circles in the corners, but a hatch pattern works well also.
So start by shifting the image to the lower right of the raster with shift. And then just center the image on the tube face (screen) with the center function. Don't worry if the raster goes off the tube face on the left side (of the screen) as long as the image stays on the phosphor.
After that, set your blanking right up the the edge of the image on all four sides.
craigr |
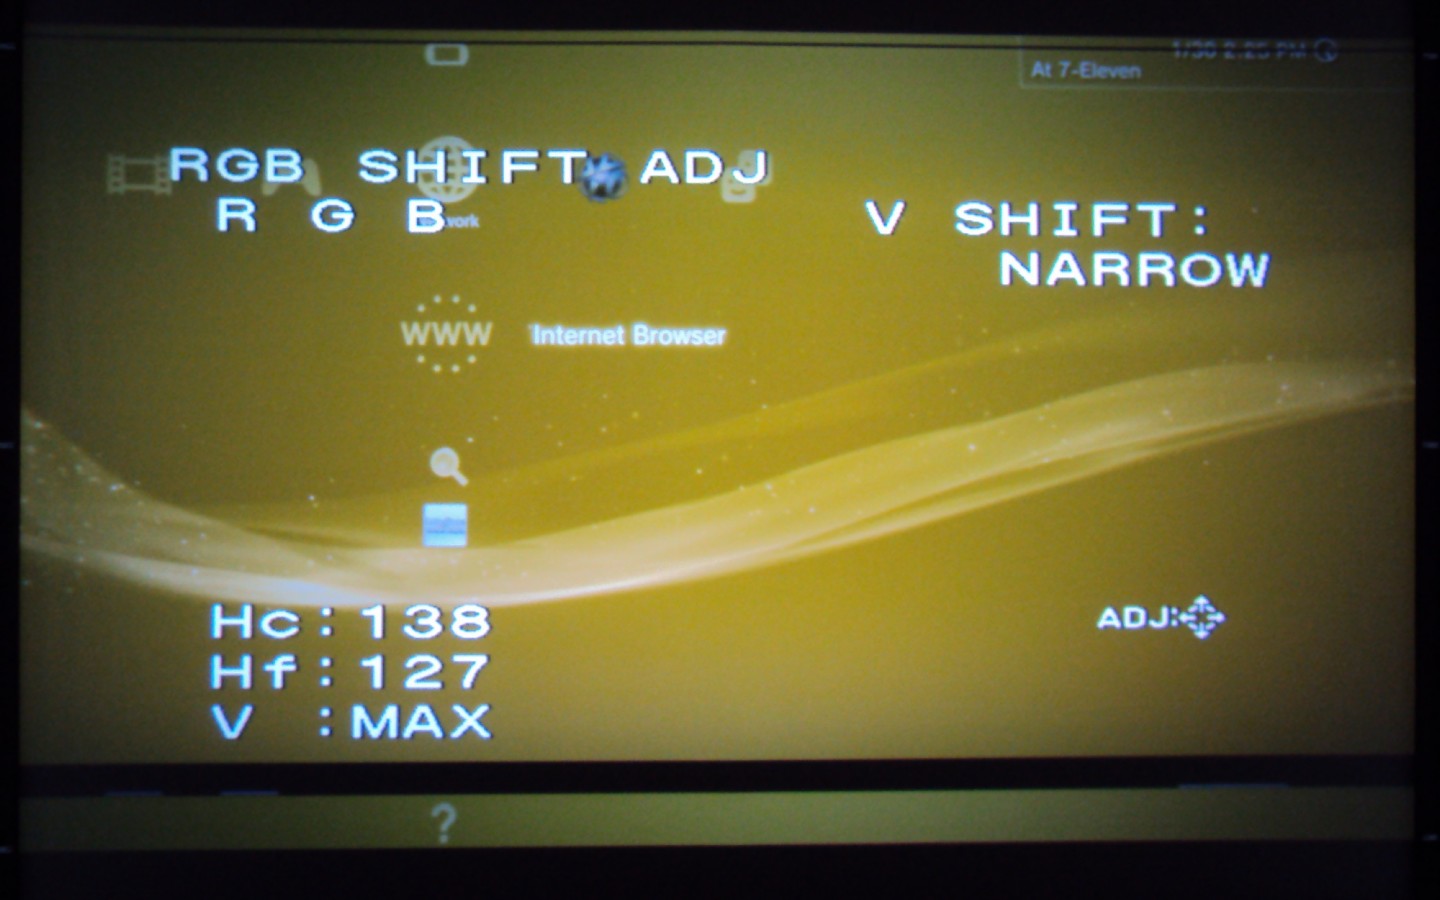
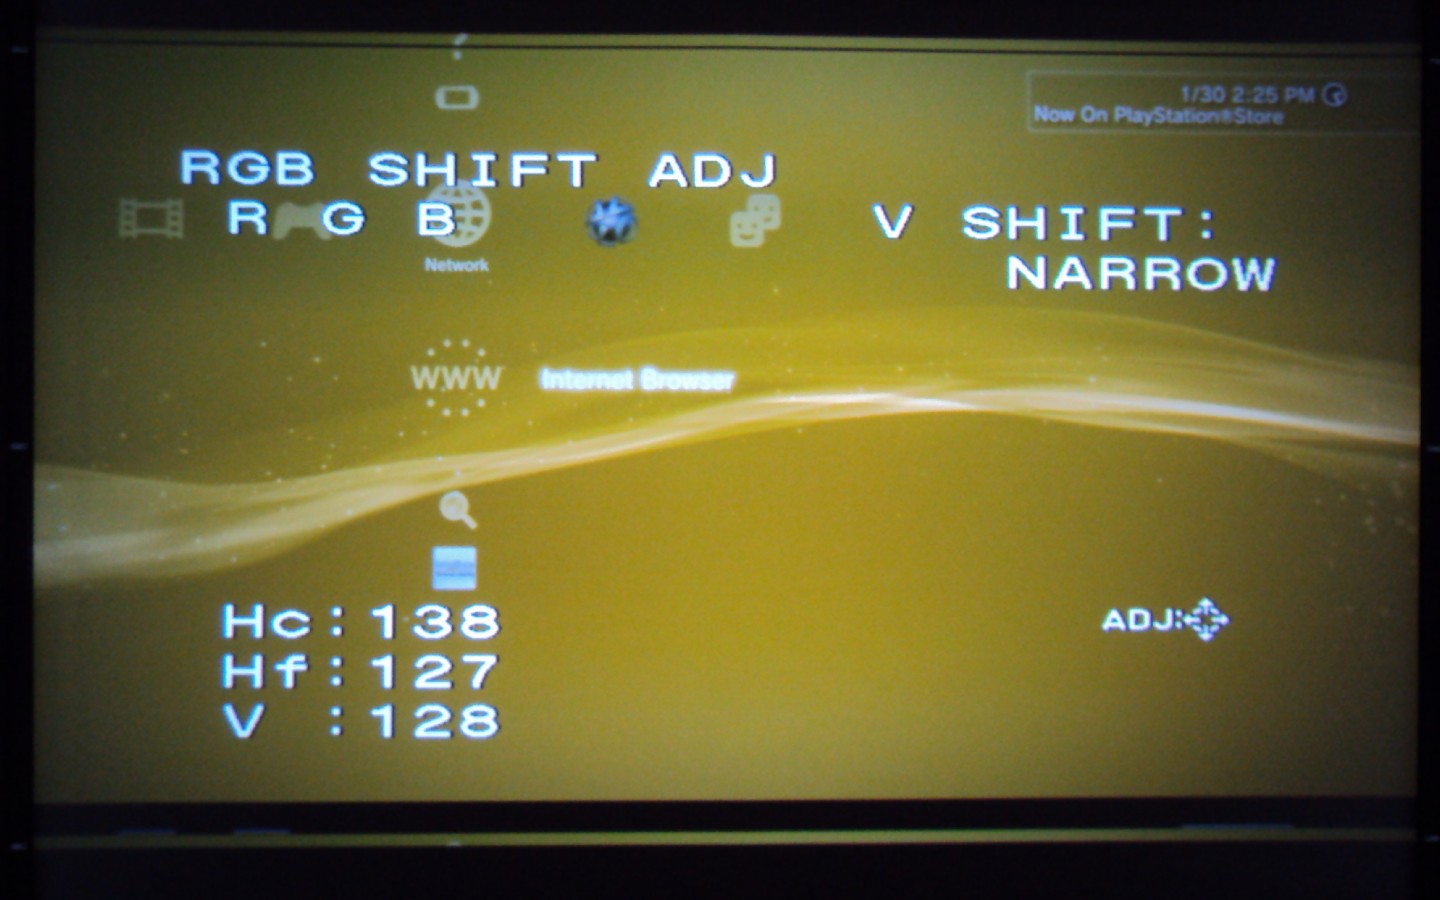
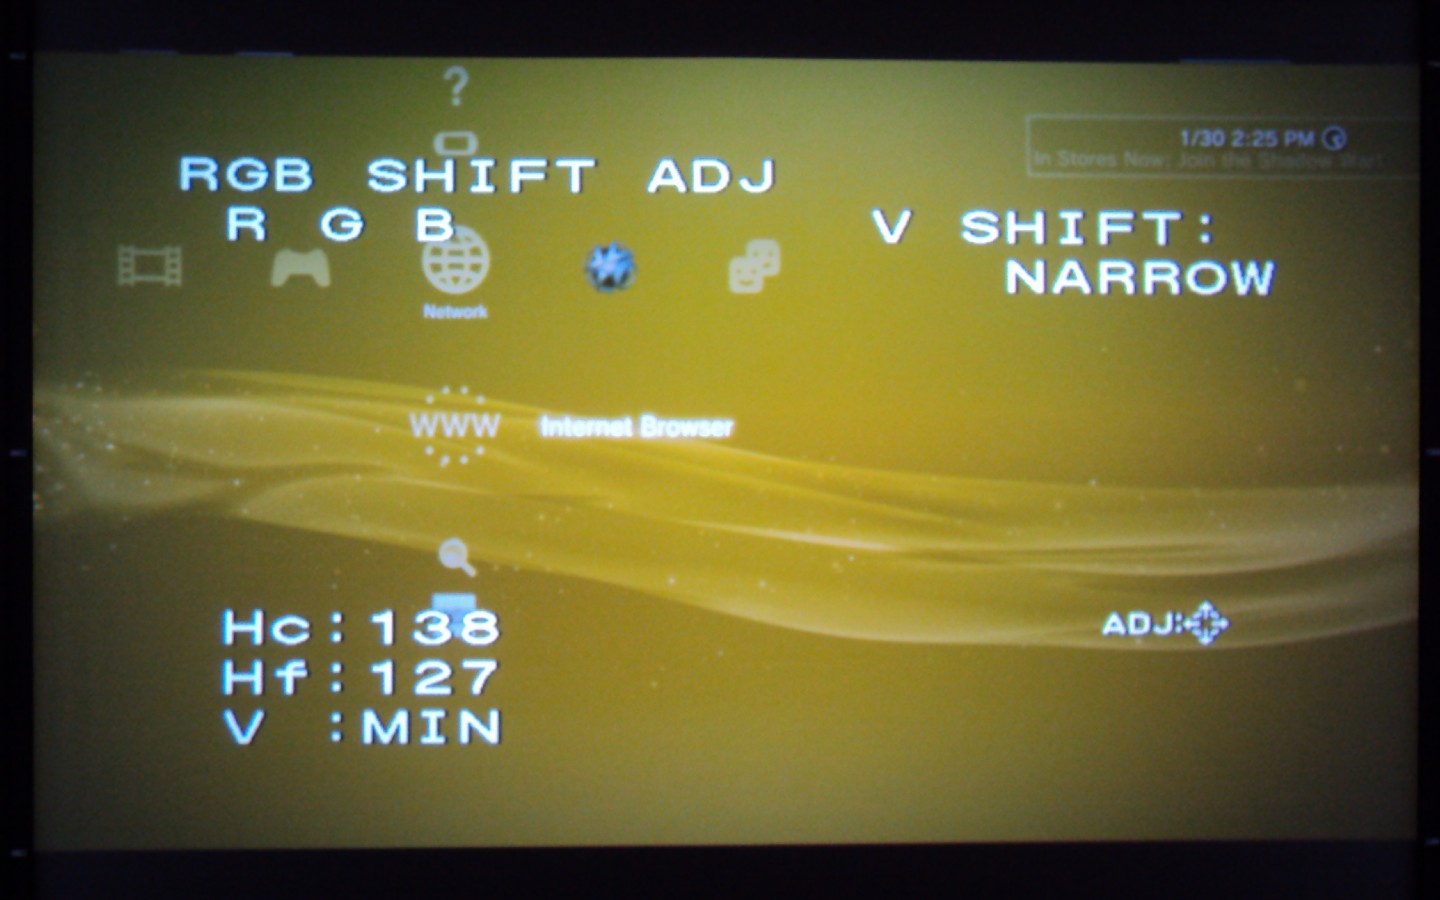
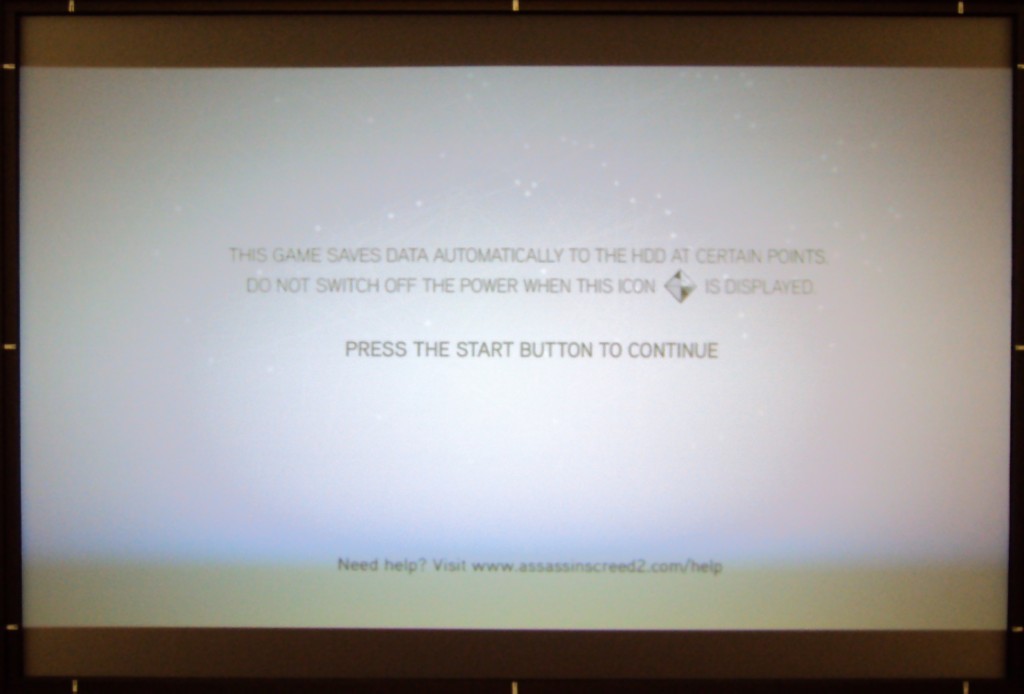
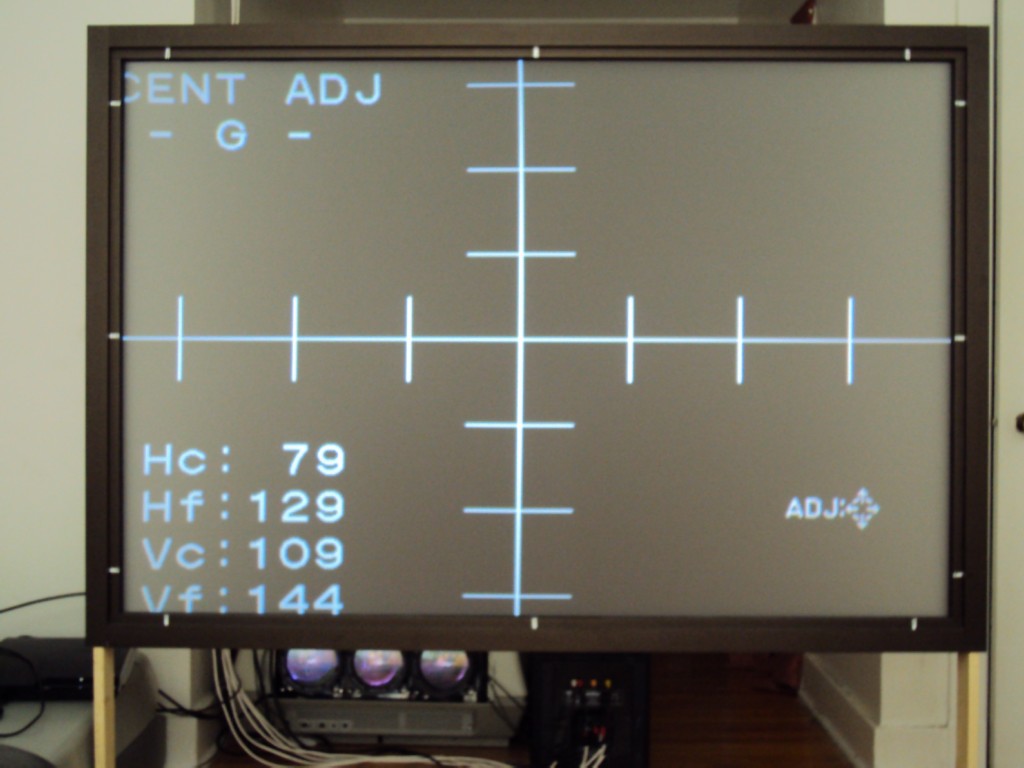
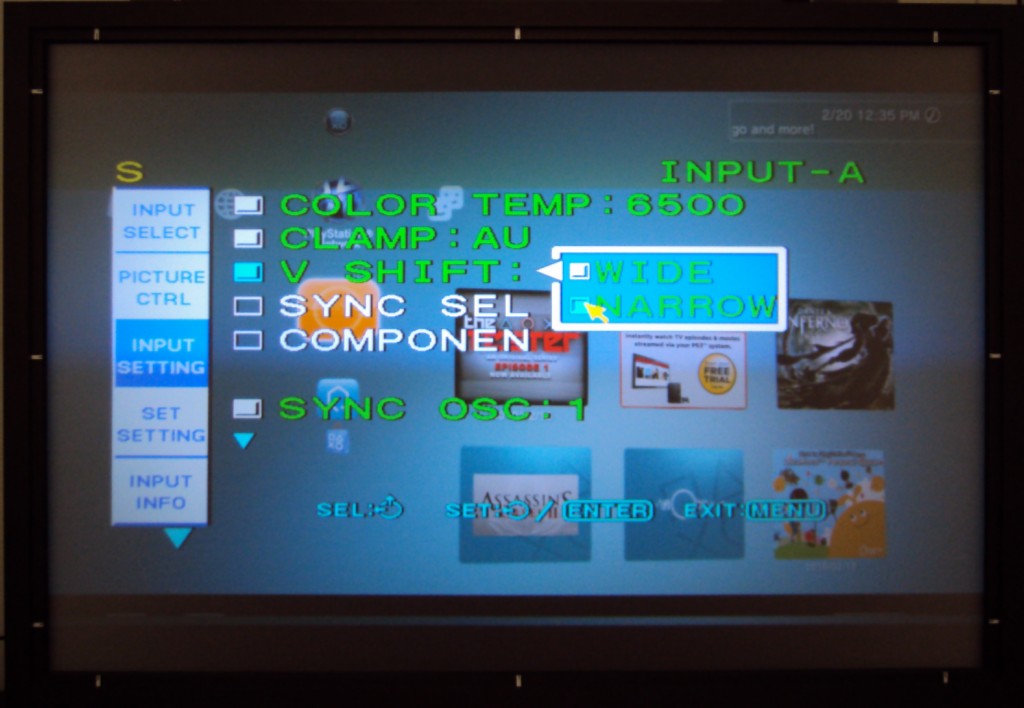
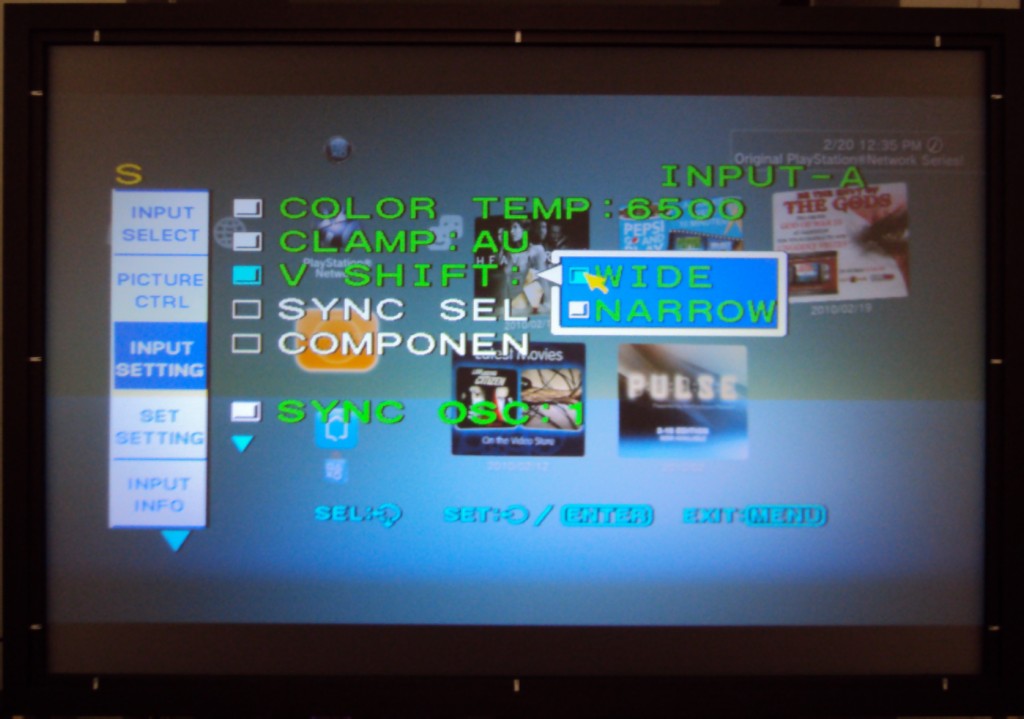
It all worked out pretty much as you said, Craig! I increased the throw to 90.25 inches which turns out to be the distance recommend by the conversions in the install manual AND the bare minimum necessary to provide enough room to shift the raster over far enough to eliminate the ringing. I did not have to worry about the raster going off the tube face, because there just wasn't enough adjustment to allow it. The AKB line always rides the top of the image but, I had my V-shift setting in the service menu set to Narrow for some reason which was why my shift adjustment maxed out when i tried to shift it down to screen center, switching it to Wide put the center near dead on the middle range. After that it was a simple matter of finding the middle of the shift adjustment before either the top or the bottom got clipped off. This was a range of only 30 clicks or so, but, putting it dead center of this range and using Center adjustment to shift the raster down a hair gave me enough shift adjustment to bring the image down or up a good inch or so. That's enough to compensate for different source devices and TV broadcasts shifting the image up or down a little.
My only problem with this setup is that the active image area is a lot smaller due to the increased throw distance. I'm used to seeing the sides of the image way closer to the sides of the tube face than this. I think I would rather just decrease the throw two or three inches and live with the ringing until I get a video processor, rather than wear in a pattern on my tubes that small and leave no wiggle room for your setup later.
Below are a couple of pictures to illustrate. Sorry the image quality isn't great. I took these in daylight.
Ringing Gone! 
| Description: |
|
| Filesize: |
69.91 KB |
| Viewed: |
6465 Time(s) |
|
| Description: |
|
| Filesize: |
98.81 KB |
| Viewed: |
6465 Time(s) |
|
| Description: |
| Just switching to narrow makes the image clip at mid range |
|
| Filesize: |
107.98 KB |
| Viewed: |
6465 Time(s) |
|
| Description: |
|
| Filesize: |
108.8 KB |
| Viewed: |
6465 Time(s) |
|
|
|
| Back to top |
|
|
CIR Engineering
Joined: 25 Aug 2008
Posts: 4269
Location: Chicago USA & Berlin Germany
|
| Posted: Sat Feb 20, 2010 10:00 pm Post subject: |
|
|
Nice work.
However you are still doing something wrong. The throw distance has nothing to do with the raster ringing or image position. Position the projector to maximize your phosphor usage as you had done in the past. Then just use the center adjustment to put the image in center.
The size adjustment increases both the image and raster sizes together. So if you increase the width the image should stay the same distance from all sides of the raster and you should not get any more or less raster ringing no matter where the projector is positioned.
Am I making sense?
craigr
_________________
JETI 1501-HiRes 2nm Spectroradiometer
JETI 1211 Spectroradiometer
Photo Research PR-650 Spectroradiometer
Klein K10-A Colorimeter
Murideo Fresco SIX-G HDMI 2.x Multimedia Generator
Murideo Fresco SIX-A HDMI 2.x Analyzer
Light Illusion ColourSpace XPT Color Calibration Software
Light Illusion LightSpace XPT Pro Version 10.x Color Calibration Software
OMARDRIS JVC Software Patch to use K10-A and Jeti with JVC OEM AutoCal Software!
Sencore CR7000 CRT Tube Analyzer / Rejuvenater
Authorized Dealer for Lumagen & just about everything worth buying
www.CIR-Engineering.com - craigr@cir-engineering.com
Phone: 865-405-6892
|
|
| Back to top |
|
|
CIR Engineering
Joined: 25 Aug 2008
Posts: 4269
Location: Chicago USA & Berlin Germany
|
| Posted: Sat Feb 20, 2010 10:02 pm Post subject: |
|
|
Maximizing the phosphor usage on 8" machines like the G70 is absolutely critical so you must do this right. A g70 can come close to fully resolving 1080p 60Hz if you set up your image to use the entire tube face. Ever millimeter of wasted tube face will result in loss of resolution and you don't want that
craigr
_________________
JETI 1501-HiRes 2nm Spectroradiometer
JETI 1211 Spectroradiometer
Photo Research PR-650 Spectroradiometer
Klein K10-A Colorimeter
Murideo Fresco SIX-G HDMI 2.x Multimedia Generator
Murideo Fresco SIX-A HDMI 2.x Analyzer
Light Illusion ColourSpace XPT Color Calibration Software
Light Illusion LightSpace XPT Pro Version 10.x Color Calibration Software
OMARDRIS JVC Software Patch to use K10-A and Jeti with JVC OEM AutoCal Software!
Sencore CR7000 CRT Tube Analyzer / Rejuvenater
Authorized Dealer for Lumagen & just about everything worth buying
www.CIR-Engineering.com - craigr@cir-engineering.com
Phone: 865-405-6892
|
|
| Back to top |
|
|
Kiev Savoie
Joined: 25 Oct 2007
Posts: 432
|
| Posted: Sat Feb 20, 2010 11:25 pm Post subject: |
|
|
Ok, If i understand you correctly I can put the throw back up to the 82" which i used initially. With size and raster maxed out I had a 1080i active image area almost touch the tube face sides (equal to or less than 1/8" clearance) and just barely fill the screen with about a 1/2 inch of adjustment to spare. I had trouble with 720p filling the screen, as you may recall, but that is what the VP can help with, I suppose. Then all i have to do is move my raster off center and adjust the shift setting to recenter the image and perform a few geometry corrections to get a nice ringing free picture? I think i'll start moving my screen back right now.
Thanks!
|
|
| Back to top |
|
|
|
|


