|
As this forum is rarely used anymore, we've locked it. Feel free to browse and read. Questions? Please reach out to us directly. Cheers! |
|
|
 |
|
|
| Author |
Message |
jkruger

Joined: 24 Oct 2007
Posts: 2435
Location: Carlsbad, CA
|
| Posted: Tue Dec 09, 2008 5:58 am Post subject: |
|
|
| Gino wrote: | | jkruger wrote: | | Sounds exactly like my 1100. I was told the lenses are HFQ-900 |
HFQ900's are not all metal as Gary described. |
Gino,
Which lenses do we have then? Mine are all black anodized aluminum housings with the round plastic knobs on the focus screws. No labels at all. The closest distance they could focus at was about 2 meters. I have not tried to determine the farthest distance yet.
|
|
| Back to top |
|
 |
Gino

Joined: 22 Apr 2006
Posts: 1363
Location: Trinity Beach, AUSTRALIA
|
| Posted: Tue Dec 09, 2008 6:05 am Post subject: |
|
|
No idea. But the sets of HFQ900's I have seen including my pair have a plastic barrel for edge focus and the rest of the lens assembly metal.
_________________
( B ) ( G ) ( R ) Blendzilla Down Under ( R ) ( G ) ( B ) - Tubes of Fury
|
|
| Back to top |
|
|
jkruger
Joined: 24 Oct 2007
Posts: 2435
Location: Carlsbad, CA
|
| Posted: Tue Dec 09, 2008 6:12 am Post subject: |
|
|
|
HD10GT17?
|
|
| Back to top |
|
|
Gino
Joined: 22 Apr 2006
Posts: 1363
Location: Trinity Beach, AUSTRALIA
|
| Posted: Tue Dec 09, 2008 7:44 am Post subject: |
|
|
Both barrel's of the GT17's are metal, so could be?
_________________
( B ) ( G ) ( R ) Blendzilla Down Under ( R ) ( G ) ( B ) - Tubes of Fury
|
|
| Back to top |
|
|
Gary M.
Guest
|
| Posted: Tue Dec 09, 2008 2:40 pm Post subject: |
|
|
yes Gino both barrels are metal, I am thinking GT17 as well, not too shabby
upon receipt of the PJ yesterday I noticed it had alot of black filth inside, after working with it yesterday alot last night I got pretty sick with pouring nose, asthma attack etc., after taking it apart today completely I know what it is, MOLD!! the inside is covered, especially the HV areas and leads, the tubes and mechanics, I didn't need a excuse to gut the thing anyway but what the heck  time for a total clean and spruce up including cleaning all the contacts etc. time for a total clean and spruce up including cleaning all the contacts etc.
look at that rag after a couple of rubs inside the case, it gets like that every minute or so of cleaning 


-Gary
|
|
| Back to top |
|
|
jkruger
Joined: 24 Oct 2007
Posts: 2435
Location: Carlsbad, CA
|
| Posted: Tue Dec 09, 2008 2:43 pm Post subject: |
|
|
|
Holy crap! Now's the time to pull that bottom cover off !
|
|
| Back to top |
|
|
Gary M.
Guest
|
| Posted: Tue Dec 09, 2008 2:49 pm Post subject: |
|
|
| jkruger wrote: | | Holy crap! Now's the time to pull that bottom cover off ! |
would you believe the screws are underneath the bottom motherboard? 
I am probably still going to cut it off, I just don't see anyway to get to it unless I tear the entire thing apart literally
-Gary
|
|
| Back to top |
|
|
Nashou66

Joined: 12 Jan 2007
Posts: 16171
Location: West Seneca NY
|
|
| Back to top |
|
|
Gary M.
Guest
|
| Posted: Tue Dec 09, 2008 11:46 pm Post subject: |
|
|
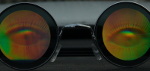
check out the glycol from those tubes, nasty pissy brown, the pic is nothing to what it really looks like:

change that glycol from those tubes guys, I have always done this and always have good pix to show for it
-Gary
|
|
| Back to top |
|
|
wallace123456
Joined: 14 Aug 2006
Posts: 2236
Location: Northwest VA area
|
| Posted: Wed Dec 10, 2008 12:01 am Post subject: |
|
|
| Gary M. wrote: | look at that rag after a couple of rubs inside the case, it gets like that every minute or so of cleaning
-Gary |
Damn Gary I have less dirt on rags when I rebuild an engine!!! 
j/k
Looks like your project should be documented as "Overhauling a CRT"! 
wallace
_________________
Life Is Good, But BBQ Is Better! BBQ Competition Team
|
|
| Back to top |
|
|
jkruger
Joined: 24 Oct 2007
Posts: 2435
Location: Carlsbad, CA
|
| Posted: Wed Dec 10, 2008 1:16 am Post subject: |
|
|
|
Is that the glycol from the tubes you have posted for sale?
|
|
| Back to top |
|
|
AnalogRocks
Forum Moderator
Joined: 08 Mar 2006
Posts: 26706
Location: Toronto, Ontario, Canada
TV/Projector: Sony 1252Q, AMPRO 4000G
|
| Posted: Wed Dec 10, 2008 1:17 am Post subject: |
|
|
| Gary M. wrote: | check out the glycol from those tubes, nasty pissy brown, the pic is nothing to what it really looks like:
change that glycol from those tubes guys, I have always done this and always have good pix to show for it
-Gary |
Awww c'mon admit it you peed in the cup 
_________________
Tech support for nothing
CRT.
HD done right!
|
|
| Back to top |
|
|
perisoft
Joined: 29 Aug 2007
Posts: 2920
Location: Ithaca, NY
|
| Posted: Wed Dec 10, 2008 4:43 am Post subject: |
|
|
| AnalogRocks wrote: |
Awww c'mon admit it you peed in the cup |
Yep... you know you spend too much time with CRTs when you piss glycol...
_________________

|
|
| Back to top |
|
|
AnalogRocks
Forum Moderator
Joined: 08 Mar 2006
Posts: 26706
Location: Toronto, Ontario, Canada
TV/Projector: Sony 1252Q, AMPRO 4000G
|
| Posted: Wed Dec 10, 2008 6:37 am Post subject: |
|
|
| perisoft wrote: | | AnalogRocks wrote: |
Awww c'mon admit it you peed in the cup |
Yep... you know you spend too much time with CRTs when you piss glycol... |
Talk about your blood running cold....
_________________
Tech support for nothing
CRT.
HD done right!
|
|
| Back to top |
|
|
zGman
Joined: 22 May 2006
Posts: 599
|
| Posted: Wed Dec 10, 2008 7:02 am Post subject: 1101 lenses |
|
|
Hi,
The lenses are barco HD120 - they are pretty nice, with better corner focus than the GT17's,
in my experience. I would guess thay are optimised for 7-8' flat screens, based on some testing.
You should have no problem getting good results, unless your screen is very small.
All HFQ900's have the GRP outer barrels, and are not standard for this model, or the Cine9/DTV1200.
If you plan to remove the bottom case section, look inside near the structural rails, and locate
the six 10mm hex head bolts, and there are a couple more little screws under the remote tray,
and possibly may need to remove the cover around the AC input connector. And heck, maybe the
little hinged remote assembly needs to come off - two more screws inside and a connector.
The whole chassis will lift out of the case - you do not need to remove the screws under the m'board,
the ones that you can't access anyhow. I did this recently with my 1101 chassis - easy, no problems.
G
|
|
| Back to top |
|
|
Gary M.
Guest
|
| Posted: Wed Dec 10, 2008 9:39 am Post subject: |
|
|
| jkruger wrote: | | Is that the glycol from the tubes you have posted for sale? |
yes, I removed that nasty stuff, cleaned all the housings and will be replacing it with fresh on that blue before shipping, green none because I am keeping the filtered c-element and can't refill
I am nuts for selling the blue tube, I'm way too picky, but I am going to perfect this beast before putting it up and be done with it for a few years
-Gary
|
|
| Back to top |
|
|
jkruger
Joined: 24 Oct 2007
Posts: 2435
Location: Carlsbad, CA
|
| Posted: Fri Dec 12, 2008 2:34 pm Post subject: Re: 1101 lenses |
|
|
| zGman wrote: | Hi,
If you plan to remove the bottom case section, look inside near the structural rails, and locate
the six 10mm hex head bolts, and there are a couple more little screws under the remote tray,
and possibly may need to remove the cover around the AC input connector. And heck, maybe the
little hinged remote assembly needs to come off - two more screws inside and a connector.
The whole chassis will lift out of the case - you do not need to remove the screws under the m'board,
the ones that you can't access anyhow. I did this recently with my 1101 chassis - easy, no problems.
G |
Gary, have you tried to do this yet?
|
|
| Back to top |
|
|
Gary M.
Guest
|
| Posted: Fri Dec 12, 2008 9:56 pm Post subject: Re: 1101 lenses |
|
|
| jkruger wrote: | | zGman wrote: | Hi,
If you plan to remove the bottom case section, look inside near the structural rails, and locate
the six 10mm hex head bolts, and there are a couple more little screws under the remote tray,
and possibly may need to remove the cover around the AC input connector. And heck, maybe the
little hinged remote assembly needs to come off - two more screws inside and a connector.
The whole chassis will lift out of the case - you do not need to remove the screws under the m'board,
the ones that you can't access anyhow. I did this recently with my 1101 chassis - easy, no problems.
G |
Gary, have you tried to do this yet? |
won't work jkruger, at least on mine it wouldn't, you would have to tear the entire chassis apart to get to the small philips screws that you mentioned before, there are quite a few as well
-Gary
|
|
| Back to top |
|
|
Gary M.
Guest
|
| Posted: Mon Dec 22, 2008 7:40 am Post subject: |
|
|
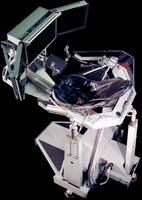
finally got everything back together and ready to go, installed the beast last night
I thought for a bit how to do a perfect mount that I wouldn't have to spend $$ on, this is the best mount I have ever done, solid as a rock, more so than factory ceiling mounts 
first are 2 350lb eyelets with 3/4" nuts top and bottom, the key is the threaded rod at the back, connected to the mount and then to the shelf the PJ is mounted to, adjusted for perfect level and side to side level, then locked into place with threadloc
you will have to forgive the mess back inside this hidden area behind the pj, including the spray foam where I removed the hushbox sealed enclosure from around the XG 1352
ready to go with Box1021, HDFury2 and high-end 16" breakout cable
here are the pics:


-Gary
|
|
| Back to top |
|
|
huggy

Joined: 02 Aug 2008
Posts: 927
Location: Melbourne,Australia
|
| Posted: Mon Dec 22, 2008 7:49 am Post subject: |
|
|
|
Looking good Gary
|
|
| Back to top |
|
|
|
|
|
|
|
You cannot post new topics in this forum
You cannot reply to topics in this forum
You cannot edit your posts in this forum
You cannot delete your posts in this forum
You cannot vote in polls in this forum
You cannot attach files in this forum
You can download files in this forum
|
Forum powered by phpBB © phpBB Group
|
|


