| Author |
Message |
Elfear
Joined: 22 Aug 2008
Posts: 9
|
| Posted: Fri Aug 22, 2008 3:46 pm Post subject: Gluing WilsonArt Directly to Wall? |
|
|
I've read through some posts on gluing WilsonArt laminate to various materials but I haven't seen much on gluing it directly to the wall. My plan is to screw some 2x4s to the wall on the bottom edge of where I want the laminate to sit. I would then roller some glue on the wall and set the laminate up on the 2x4s and get it in place before I pushed it up on the glue. I would then use some kind of J-roller to get all the air bubbles out and get it flat. Any thoughts on using the method I outlined?
I also thought about painting the walls surrounding the laminate in a flat black to act as a border. Would paint make a good border or would something like velvet work better?
|
|
| Back to top |
|
 |
dropzone7

Joined: 12 Jun 2007
Posts: 1069
Location: Charlotte, NC
|
| Posted: Fri Aug 22, 2008 3:55 pm Post subject: |
|
|
I haven't tried that method because in my room it was not possible (window on the screen wall). I really think it would be difficult to get the material flat with no bubbles. Not to mention, unless your wall is perfectly flat and free of imperfections then those things might affect how the laminate adheres to the wall. Also there is the problem of what all that glue is going to do to your wall if you ever need to take the screen down. You would have one shot at it really and you wont know until you try it of course. If you don't plan to use the entire piece of material for your screen surface then I think I would try gluing the laminate to something else first like that pegboard stuff or a thin hardwood material. Then that gives you a flatter, more rigid backing to work with. Then you could just put a few drywall screws in the corners of the laminate to hold the whole thing to the wall. Regarding the border I would go with the velvet, perhaps wrap some pine 1x2's or 2x2's in black velvet to create a type of frame border around your screen. Even the most flat of paint finish is going to reflect some light but that velvet or velveteen really soaks up the stray light well.
_________________
"Coffee is for Closers."
|
|
| Back to top |
|
|
ecrabb
Forum Moderator

Joined: 13 Mar 2006
Posts: 15909
Location: Utah
TV/Projector: JVC RS40, Epson 5010
|
| Posted: Fri Aug 22, 2008 4:13 pm Post subject: |
|
|
Besides not knowing whether it would be perfectly flat (most walls would be flat enough, though), I would say the primary reason nobody glues the laminate directly to the wall, is that it would literally destroy the wall if you ever wanted to take it back down. If you didn't need to completely replace the wall surface, you'd at the very least need to skim-coat, sand and finish the entire area - a HUGE mess and expense. It's so much easier to just use a light sheet of MDF and a 1x French cleat. Gives the screen a nice shadow effect in the process. You also have the ability to tweak or reposition the screen, too.
If you do decide to throw caution to the wind and apply the material directly to the wall, I wouldn't use paint only to trim it out, either. Not because it wouldn't work OK, but because it might look a little cheesy having a painted edge butt right up the screen. There's no way you'd get a nice clean finished edge. What I might do is paint it as planned - say, with a 1' black border for light rejection, but then still trim the edge with cheap PVC moulding covered in flock-tape. That way you could paint it and see how it looked, then finish with the trim if you wanted a cleaner more finished look.
SC
|
|
| Back to top |
|
|
dropzone7
Joined: 12 Jun 2007
Posts: 1069
Location: Charlotte, NC
|
| Posted: Fri Aug 22, 2008 4:17 pm Post subject: |
|
|
SC, that's the word I couldn't think of. French Cleat! I did this with my first DIY screen which was BOC on a wood frame. Just hung it on the wall like a picture using the cleat and it looked like it was floating there. Everyone thought that looked cool and I never used any masking for that screen so it really did just float on the wall. Now I know better and I have the entire screen wall covered in black fabric.
_________________
"Coffee is for Closers."
|
|
| Back to top |
|
|
Elfear
Joined: 22 Aug 2008
Posts: 9
|
| Posted: Fri Aug 22, 2008 4:23 pm Post subject: |
|
|
|
Thanks for the input guys. The permanence of the screen is the big deterrent at this point. If I ever wanted to change it out I'd be stuck refinishing the wall like dropzone7 mentioned. I'm hoping to make a 110" screen (54" x 96"). Do they make MDF boards that are bigger than 4'x8'? If 4'x8' is the biggest, how would I join the two pieces so that they form a flat surface? Unfortunately, I don't have many tools like routers, sanders, etc. so I'm trying to find the simplest solution possible.
|
|
| Back to top |
|
|
jkruger

Joined: 24 Oct 2007
Posts: 2435
Location: Carlsbad, CA
|
| Posted: Fri Aug 22, 2008 4:43 pm Post subject: |
|
|
|
The cabinet shop next door to me quoted $170.00 for a 54 x 96 wilsonart laminated to 1/2" mdf...
|
|
| Back to top |
|
|
JustGreg

Joined: 07 Mar 2006
Posts: 3098
Location: Kenosha, WI
|
| Posted: Fri Aug 22, 2008 4:46 pm Post subject: |
|
|
I wonder if applying a good washable fabric wallpaper to the area first would work out if the Wilsonart needed to be removed later. It only has to cover the wall where the Wilsonart will be. If you pulled it off later you'd just end up with (hopefully) the wallpaper stuck to the Wilsonart and the drywall would be OK?  A roll of the dice for sure. A roll of the dice for sure.
I join the concesus however. I'd glue it to MDF (gawd that sh*t's heavy) and install it with the standoffs/French cleat. When you have both the MDF and Wilsonart glued, line up one long edge and clamp it on both ends while somebody keeps the rest of the sheet from touching the MDF. Then while rolling the Wilsonart back on itself slowly roll it forward while using a very firm J roller and rolling fully edge to edge. (eg, moving like a madman).
I've never done it but if it's anything like laminating cabinets...once the two parts touch, there's isn't any going back.
_________________
Greg
"Is it ignorance or apathy? Hey, I don't know and I don't care!" --Jimmy Buffett
|
|
| Back to top |
|
|
jkruger
Joined: 24 Oct 2007
Posts: 2435
Location: Carlsbad, CA
|
| Posted: Fri Aug 22, 2008 5:18 pm Post subject: |
|
|
| JustGreg wrote: | | I've never done it but if it's anything like laminating cabinets...once the two parts touch, there's isn't any going back. |
That's why I had the Cabinetmaker quote it. He knows what he's doing, and if he blows it, he makes it right.
|
|
| Back to top |
|
|
ecrabb
Forum Moderator
Joined: 13 Mar 2006
Posts: 15909
Location: Utah
TV/Projector: JVC RS40, Epson 5010
|
| Posted: Fri Aug 22, 2008 6:01 pm Post subject: |
|
|
It's really not that hard to do laminate guys. You get a bunch of wire clothes hangers or 1/2" quarter round to use as furring strips and lay them out all over your glued substrate to hold the glued laminate above the substrate. Even with the glue applied, you can slide the laminate around until it's exactly where you want, then you start in the middle and start pulling out strips, and work your way out. Then you start in the middle and work your way out again with the J-roller. No stress, you don't have to work fast... Just take your time and go slowly. It's a piece of cake.
$170 is a pretty good price. I paid almost $100 for my laminate, and had probably another $60 in MDF and contact adhesive. I know they get better deals, but they still can't be getting much for labor... Or, was the $170 just for labor?
When I did mine, I bought two pieces of 3/4" MDF, cut a 27" piece off of each and joined them together with a 2x4. You could just as easily use 1/2" MDF and 1x material, and it would be WAY lighter than mine. I only did mine the way I did because I wanted the stand-off - I have lighting behind mine.
See these threads:
https://www.curtpalme.com/forum_archived/viewtopic.php@t=7843.html
https://www.curtpalme.com/forum_archived/viewtopic.php@t=7491.html
https://www.curtpalme.com/forum_archived/viewtopic.php@t=9501.html
My basic screen substrate and framing:

SC
|
|
| Back to top |
|
|
JustGreg
Joined: 07 Mar 2006
Posts: 3098
Location: Kenosha, WI
|
| Posted: Fri Aug 22, 2008 6:29 pm Post subject: |
|
|
Nice SC. Very nice. 
Printed and saved to my 'To-Do' (wish) list.
_________________
Greg
"Is it ignorance or apathy? Hey, I don't know and I don't care!" --Jimmy Buffett
|
|
| Back to top |
|
|
Elfear
Joined: 22 Aug 2008
Posts: 9
|
| Posted: Fri Aug 22, 2008 7:27 pm Post subject: |
|
|
Thanks for the diagram ecrabb. That looks relatively simple and maybe I can talk the wife into a circular saw to make the cuts I would need.
If I understand you right the 2x4s are on the back side and will slide onto the French cleat? If that is the case, would I just cut the MDF bigger than the size screen I want and attach a velvet or something similar to the outside edges not covered by the laminate?
|
|
| Back to top |
|
|
dropzone7
Joined: 12 Jun 2007
Posts: 1069
Location: Charlotte, NC
|
| Posted: Fri Aug 22, 2008 7:45 pm Post subject: |
|
|
Not to confuse you with an alternative but I always like to see pictures to get ideas. This is what I did because I was afraid of glue and also had a window on my screen wall to contend with. I could take down the screen if need be by simply removing six screws. The pictures don't really illustrate how this works but the wood pieces attached to the laminate on both sides wrap around the side of the three wood pieces attached to the wall. It makes for a tight fit and would really stay there without extra screws though I decided to be safe. I used a 5x10 sheet of laminate because I wanted a 60x108 screen and this allowed me to mask both sides of the screen and in the process cover up the screws I used to attach the laminate to the wall.


_________________
"Coffee is for Closers."
|
|
| Back to top |
|
|
ecrabb
Forum Moderator
Joined: 13 Mar 2006
Posts: 15909
Location: Utah
TV/Projector: JVC RS40, Epson 5010
|
| Posted: Fri Aug 22, 2008 8:59 pm Post subject: |
|
|
| Elfear wrote: | | Thanks for the diagram ecrabb. That looks relatively simple and maybe I can talk the wife into a circular saw to make the cuts I would need. |
You can also rent a saw from a tool rental shop (or Home Depot) for a day for probably $10. Might make sense if you won't have any other need for a $100 saw laying around for years to come. You'll also need an aluminum saw guide and a couple of little clamps. The saw guide is extruded aluminum, in two halves that snap together, and is about 98" or so when assembled. Using it, you can get a super-nice perfectly straight cut the entire length of a 4x8 sheet. Without it... not so much.
| Elfear wrote: | | If I understand you right the 2x4s are on the back side and will slide onto the French cleat? If that is the case, would I just cut the MDF bigger than the size screen I want and attach a velvet or something similar to the outside edges not covered by the laminate? |
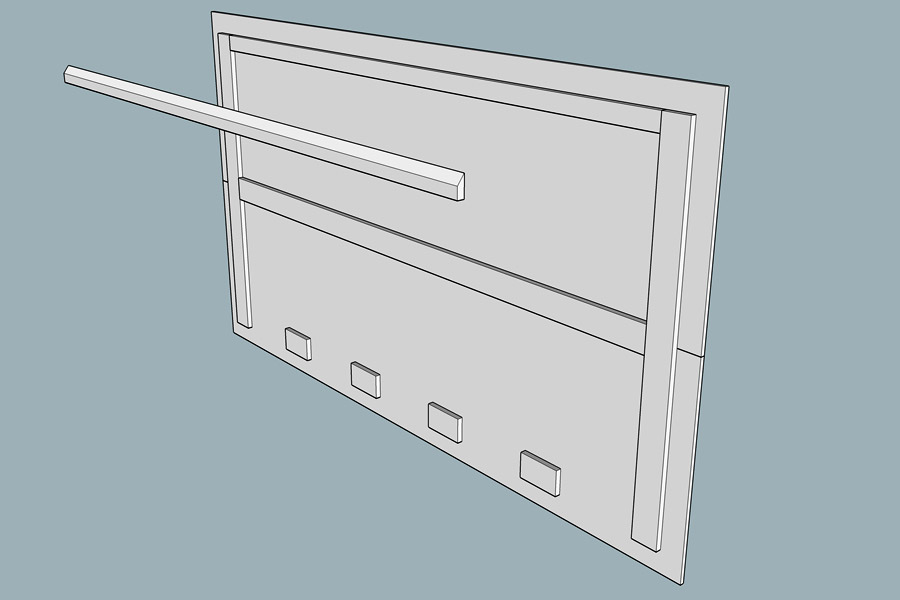
My screen is a little bigger/heavier than what you'd have to build. Yours could just be the two halves of MDF, plus a 1x4 to attach the seam, another 1x4 at the top for a cleat, and another 1x4 at the bottom (or even just a few chunks) to hold the screen out at the bottom.
Also, the laminate came oversize, and generally, you use a laminate trimmer - basically a router with a special bit - to trim the excess laminate off. It leaves a nice clean edge you could paint and cover with trim, or just leave some extra trim hanging over to hide the edge.
The way I did it is by no means the only way - just one way.
Attached is a screen like mine, but with 1x4 and no material waste (assuming the extra MDF could be used for shelving, etc.).
This consists only of (2) 4x8 sheets 1/2" MDF and (3) 8' 1x4's (Plus screws, liquid nails, contact cement, laminate, etc.)
SC
| Description: |
| Screen with French cleat and 1x4... |
|
| Filesize: |
42.13 KB |
| Viewed: |
18368 Time(s) |
|
|
|
| Back to top |
|
|
Elfear
Joined: 22 Aug 2008
Posts: 9
|
| Posted: Fri Aug 22, 2008 11:34 pm Post subject: |
|
|
| ecrabb wrote: |
You can also rent a saw from a tool rental shop (or Home Depot) for a day for probably $10. Might make sense if you won't have any other need for a $100 saw laying around for years to come. You'll also need an aluminum saw guide and a couple of little clamps. The saw guide is extruded aluminum, in two halves that snap together, and is about 98" or so when assembled. Using it, you can get a super-nice perfectly straight cut the entire length of a 4x8 sheet. Without it... not so much.
My screen is a little bigger/heavier than what you'd have to build. Yours could just be the two halves of MDF, plus a 1x4 to attach the seam, another 1x4 at the top for a cleat, and another 1x4 at the bottom (or even just a few chunks) to hold the screen out at the bottom.
Also, the laminate came oversize, and generally, you use a laminate trimmer - basically a router with a special bit - to trim the excess laminate off. It leaves a nice clean edge you could paint and cover with trim, or just leave some extra trim hanging over to hide the edge.
The way I did it is by no means the only way - just one way.
Attached is a screen like mine, but with 1x4 and no material waste (assuming the extra MDF could be used for shelving, etc.).
This consists only of (2) 4x8 sheets 1/2" MDF and (3) 8' 1x4's (Plus screws, liquid nails, contact cement, laminate, etc.)
SC |
So on the diagram you posted, is the top 1x4 board running the length of the MDF piece the 2nd half of the French cleat?
|
|
| Back to top |
|
|
dropzone7
Joined: 12 Jun 2007
Posts: 1069
Location: Charlotte, NC
|
| Posted: Sat Aug 23, 2008 12:06 am Post subject: |
|
|
Those are cool looking drawings there SC. Is that Google Sketchup or what?
_________________
"Coffee is for Closers."
|
|
| Back to top |
|
|
ecrabb
Forum Moderator
Joined: 13 Mar 2006
Posts: 15909
Location: Utah
TV/Projector: JVC RS40, Epson 5010
|
| Posted: Sat Aug 23, 2008 12:54 am Post subject: |
|
|
Yes and yes.
I LOVE SketchUp. I can't build anything any more without building it in SketchUp first. I'm totally addicted.
SC
|
|
| Back to top |
|
|
Elfear
Joined: 22 Aug 2008
Posts: 9
|
| Posted: Sat Aug 23, 2008 9:22 pm Post subject: |
|
|
|
Thanks for the help guys. I've decided to give ecrabb's method a try since it looks the simplest and least expensive. I'll report back when I get it done.
|
|
| Back to top |
|
|
MYoung
Joined: 24 Feb 2007
Posts: 369
Location: Madison, WI
|
| Posted: Wed Sep 24, 2008 3:04 pm Post subject: |
|
|
|
For my Wilsonart laminate screen I used a router to cut slots the width of the laminate depth into 1x4s for the top and bottom parts of the frame and into 1x2s for the sides of the frame. I then fitted the laminate into the slots, attached the 1x4s and 1x2s to two 1x6s that reside on the left and right vertical edges of the screen. Sure, this does add some weight, but I'm mounting to a stand built with 2x4s. If you use premium wood for the 1x4 and 1x2 frame you get some pretty clean edges. I also like the fact that the screen can be dismantled and reassembled too. It gives the screen some resale or the ability to re-tool it (which I'm in the process of doing using the same piece of laminate I used on my previous version.
|
|
| Back to top |
|
|
Elfear
Joined: 22 Aug 2008
Posts: 9
|
| Posted: Sat Sep 27, 2008 9:27 pm Post subject: |
|
|
I finally got my screen done. I found a 5'x9' piece of MDF so that I wouldn't have to slap two pieces together. It seems to sit very flat and I am very satisfied. Thanks again ecrabb.
I feel like a little bit of a donkey admitting this but I never checked the dimensions before I set about making the screen. I just assumed the width and height measurements from Projector Central's calculator were accurate. Well, they aren't and stupid me forgot to check and see if they were a true 16:9 ratio. I need to cut about an inch off the width of the screen. Can I do that with a circular saw with a fine-tooth blade?
|
|
| Back to top |
|
|
|
|


