| Author |
Message |
Arno P

Joined: 01 Jan 2007
Posts: 282
Location: The Netherlands
|
| Posted: Sat Oct 04, 2008 1:23 pm Post subject: |
|
|
| Nashou66 wrote: | Is that a fish tank Pump?!?!!!!! 
Athanasios |
Nah, not that simple.....it's a pump they use in hospitals and labs.... 
_________________
"Obviously you're not a golfer"
|
|
| Back to top |
|
 |
Arno P
Joined: 01 Jan 2007
Posts: 282
Location: The Netherlands
|
| Posted: Sat Oct 04, 2008 5:10 pm Post subject: |
|
|
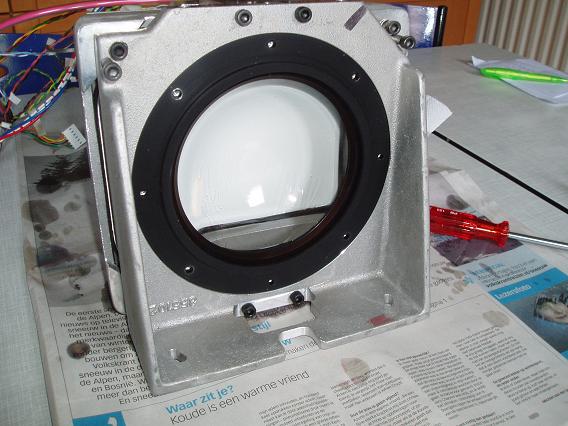
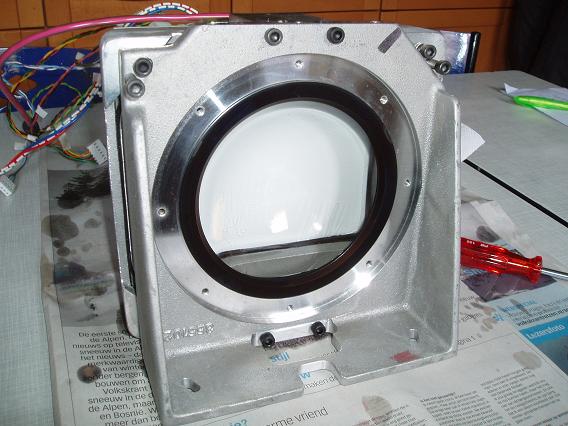
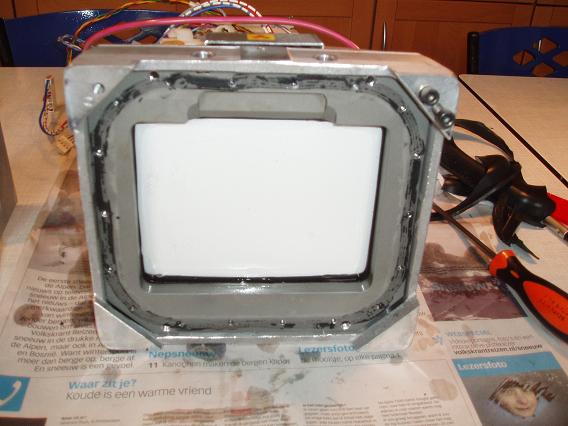
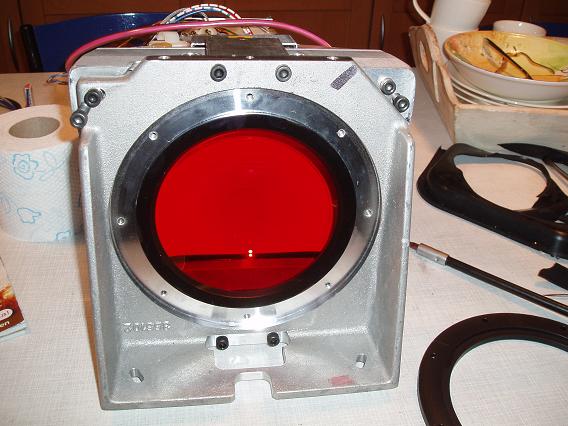
It was a busy day...
(And it's a miracle anyone could ever remove a C-element without destroying the bellow)
| Description: |
|
| Filesize: |
54.93 KB |
| Viewed: |
9529 Time(s) |
|
| Description: |
|
| Filesize: |
54.83 KB |
| Viewed: |
9529 Time(s) |
|
| Description: |
|
| Filesize: |
56.05 KB |
| Viewed: |
9529 Time(s) |
|
| Description: |
|
| Filesize: |
58.86 KB |
| Viewed: |
9529 Time(s) |
|
_________________
"Obviously you're not a golfer"
|
|
| Back to top |
|
|
Arno P
Joined: 01 Jan 2007
Posts: 282
Location: The Netherlands
|
| Posted: Sat Oct 04, 2008 5:12 pm Post subject: |
|
|
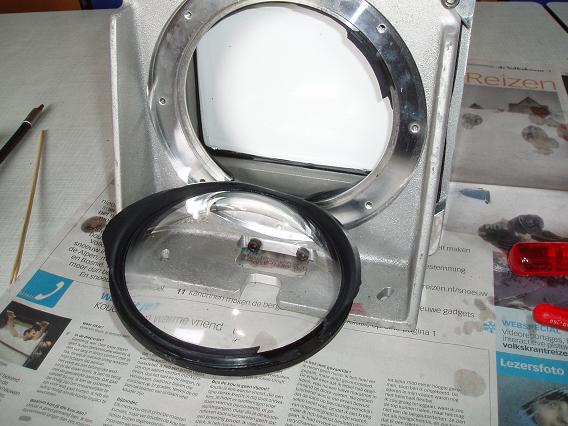
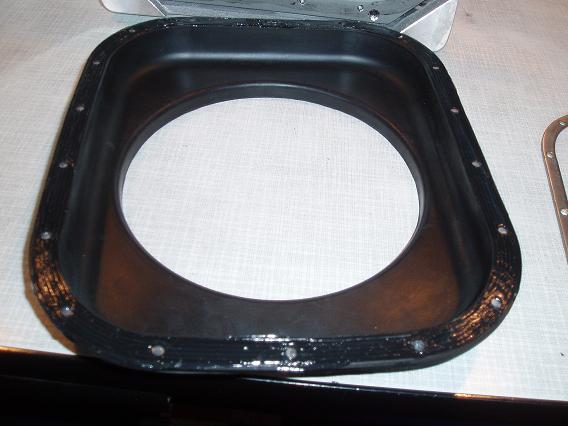
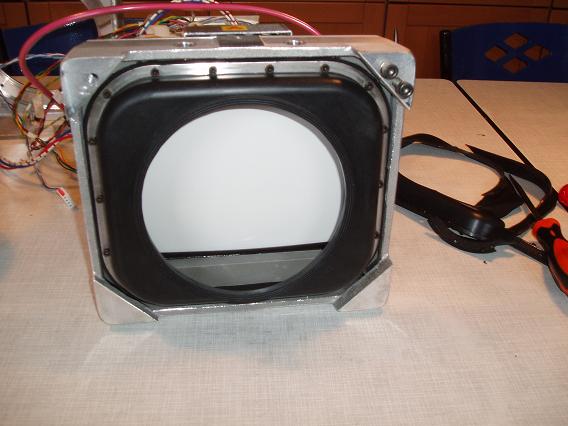
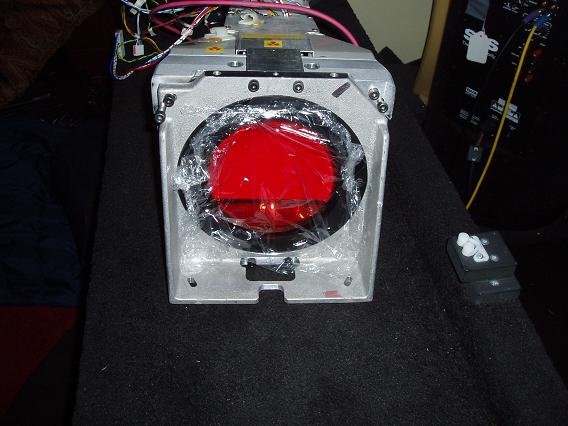
Cleaning....was quite some work
| Description: |
|
| Filesize: |
47.36 KB |
| Viewed: |
9527 Time(s) |
|
| Description: |
|
| Filesize: |
46.84 KB |
| Viewed: |
9527 Time(s) |

|
| Description: |
|
| Filesize: |
40.25 KB |
| Viewed: |
9527 Time(s) |
|
| Description: |
|
| Filesize: |
43.91 KB |
| Viewed: |
9527 Time(s) |
|
_________________
"Obviously you're not a golfer"
|
|
| Back to top |
|
|
Arno P
Joined: 01 Jan 2007
Posts: 282
Location: The Netherlands
|
| Posted: Sat Oct 04, 2008 5:14 pm Post subject: |
|
|
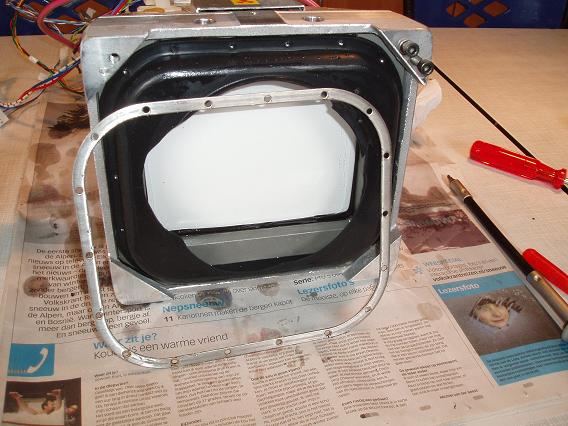
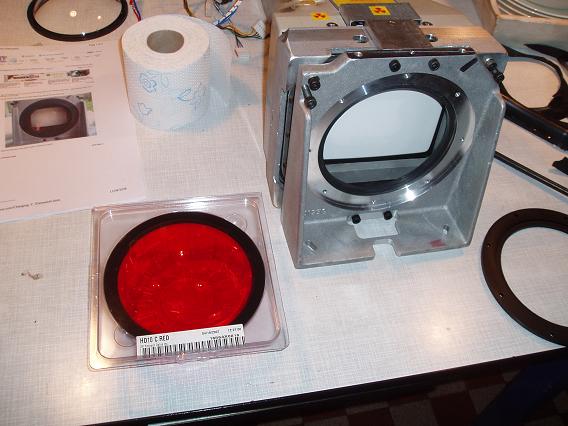
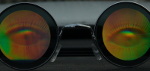
The red C....and after finishing som foil to avoid dust while drying
| Description: |
|
| Filesize: |
49.56 KB |
| Viewed: |
9525 Time(s) |
|
| Description: |
|
| Filesize: |
53.78 KB |
| Viewed: |
9525 Time(s) |
|
| Description: |
|
| Filesize: |
48.64 KB |
| Viewed: |
9525 Time(s) |
|
_________________
"Obviously you're not a golfer"
|
|
| Back to top |
|
|
Arno P
Joined: 01 Jan 2007
Posts: 282
Location: The Netherlands
|
| Posted: Sat Oct 04, 2008 5:15 pm Post subject: |
|
|
Was wondering if it is sufficient to flush the Green and Blue and refresh the glycol.....or...would it be better to take them apart?
(And flushing....with water or something else?)
_________________
"Obviously you're not a golfer"
|
|
| Back to top |
|
|
Nashou66

Joined: 12 Jan 2007
Posts: 16171
Location: West Seneca NY
|
| Posted: Sat Oct 04, 2008 6:41 pm Post subject: |
|
|
Arno thats why I told you to take off the back of the LC housing, With it removed you can easily get the metal gasket off and then push the entire bellow with the C Element attached out the front. Then once the C-element and bellow are out you will be able to use a razor blade to separate the Bellow from the C-element, I need to take pics of what I mean. The Lc housing I got form SpeedyAndres has white silicone all over the Bellows inbetween the housings , looks lim,e it was a quick fix for a leak aroud the metal gaskets instead of just tightening them all. Not sure if he did it or it was like that already. But I havent done this yet but am sure its the best way to go for removing the bellow. because once you have room to get to the gasket screws and also now have more room to pry it off the back of the housing you can then push it through the front hole Celement and Bellow.
Athanasios
_________________
Don't blame your underwear for your crooked ass~ unknown Greek philosopher
"Republicans believe every day is the Fourth of July, but the Democrats believe every day is April 15." --- President Reagan
One Smart Dog!!!
Marquee High Performance Bellows now shipping!!
Marquee Modifications and Performance Enhancement
Marquee C-element and Bellow removal
|
|
| Back to top |
|
|
Arno P
Joined: 01 Jan 2007
Posts: 282
Location: The Netherlands
|
| Posted: Sat Oct 04, 2008 6:44 pm Post subject: |
|
|
| Nashou66 wrote: | Arno thats why I told you to take off the back of the LC housing, With it removed you can easily get the metal gasket off and then push the entire bellow with the C Element attached out the front. Then once the C-element and bellow are out you will be able to use a razor blade to separate the Bellow from the C-element, I need to take pics of what I mean. The Lc housing I got form SpeedyAndres has white silicone all over the Bellows inbetween the housings , looks lim,e it was a quick fix for a leak aroud the metal gaskets instead of just tightening them all. Not sure if he did it or it was like that already. But I havent done this yet but am sure its the best way to go for removing the bellow. because once you have room to get to the gasket screws and also now have more room to pry it off the back of the housing you can then push it through the front hole Celement and Bellow.
Athanasios |
I see, I see....
But anyhow......got a new bellow in there (sometimes I really do feel lucky )
_________________
"Obviously you're not a golfer"
|
|
| Back to top |
|
|
Arno P
Joined: 01 Jan 2007
Posts: 282
Location: The Netherlands
|
| Posted: Sat Oct 04, 2008 10:08 pm Post subject: |
|
|
| Nashou66 wrote: | to take off the back of the LC housing, With it removed you can easily get the metal gasket off
Athanasios |
But...can it be done with a straight hex-bit or do I need an angled one (any pics?)
_________________
"Obviously you're not a golfer"
|
|
| Back to top |
|
|
Nashou66
Joined: 12 Jan 2007
Posts: 16171
Location: West Seneca NY
|
| Posted: Sat Oct 04, 2008 11:08 pm Post subject: Easy methode for C-element removal |
|
|
Hi Guys, I found a new way that increases the odds of getting the C-element out with less or no damage to the Bellow.
I first said you take off the back LC housing brace but I was wrong, you need to slide it back to give you more
working room to get of the Bellow from the back of the housing. First you need to remover the
pins that are used for Schliemfluge adjustments(Also keep the C-element ring in place till we get
the Bellow off the back)
Screw in to the pin an allen or other screw that fits the threads And Pry it out,
Prying out screw and pin

Pin Removed

Next remove any screws that hold front housing to back and dont loose the Springs.

So after you remove the screws and the top and bottom pivot plates you can move the
housing back to gibe more room to the bellow screws and for a razor or flat screw driver to help
pry it off after the metal gasket is off.
Lc outer Housing slid back to give more room

More room on top too !!!

Now more room for allen key !!! Woo Hooo!


Remove all allen screws, then pry off metal gasket.
Gasket removal

[img]Now slide gasket out of way to front of housing[/img]

Now carefully remove Bellow from back of face plate with blade to start then finger
or you can use the blade all the way around if its on there good!!
Separating Bellow from face plate


Front of LC housing removed from face plate

Now take off gasket

Next remove C-Element retaining ring.

Now fold over the bellow onto the C-element and push the whole thing trough the
Housing hole, do it carefully, but it should be ok and not rip.
Folding Bellow


C-element still attached to bellow

Now you can much more easily get a blade to the bellow and
C-Element to separate them.
Carefully sliding blade between Bellow and C-element

C-Element removed and no bellow damage !!!!!!

i hope this procedure is easier than trying to take the C-element out while the metal housing
is still in place. I think it is.
Athanasios
_________________
Don't blame your underwear for your crooked ass~ unknown Greek philosopher
"Republicans believe every day is the Fourth of July, but the Democrats believe every day is April 15." --- President Reagan
One Smart Dog!!!
Marquee High Performance Bellows now shipping!!
Marquee Modifications and Performance Enhancement
Marquee C-element and Bellow removal
|
|
| Back to top |
|
|
AnalogRocks
Forum Moderator
Joined: 08 Mar 2006
Posts: 26706
Location: Toronto, Ontario, Canada
TV/Projector: Sony 1252Q, AMPRO 4000G
|
| Posted: Sun Oct 05, 2008 3:42 am Post subject: |
|
|
Good job of reverse engineering.
_________________
Tech support for nothing
CRT.
HD done right!
|
|
| Back to top |
|
|
Arno P
Joined: 01 Jan 2007
Posts: 282
Location: The Netherlands
|
| Posted: Sun Oct 05, 2008 6:18 am Post subject: |
|
|
Very clear, thanks!
Have to get these 90deg allen keys..
By the way, why did you remove the green C from that bellow (replacing it with the new Red?  hope not)? hope not)?
_________________
"Obviously you're not a golfer"
|
|
| Back to top |
|
|
Nashou66
Joined: 12 Jan 2007
Posts: 16171
Location: West Seneca NY
|
| Posted: Sun Oct 05, 2008 11:50 am Post subject: |
|
|
| Arno P wrote: | Very clear, thanks!
Have to get these 90deg allen keys..
By the way, why did you remove the green C from that bellow (replacing it with the new Red? hope not)? |
Thanks Arno, I got a set of LC housings from Speedyandre from his toasted Vision One, I am putting in those Hybrid
9 inch tube's with Sony pinouts. I did the neck board Mod but have not been able to test it fully with out an LC housing.
Once i let the Silicone around the tube cure i am going to screw in the bellow add as much glycol through the C-element hole then button it up and fill the rest through the bleed holes. And then test the modded neck board and Hybrid tube .
I hope they work or i'll have to remove it all over again!! I Wish I knew exactly what they used to fill around the tube
after you first adhere it to the tube face plate with RTV, I just used regular grey silicon.
Athanasios
_________________
Don't blame your underwear for your crooked ass~ unknown Greek philosopher
"Republicans believe every day is the Fourth of July, but the Democrats believe every day is April 15." --- President Reagan
One Smart Dog!!!
Marquee High Performance Bellows now shipping!!
Marquee Modifications and Performance Enhancement
Marquee C-element and Bellow removal
|
|
| Back to top |
|
|
Arno P
Joined: 01 Jan 2007
Posts: 282
Location: The Netherlands
|
| Posted: Sun Oct 05, 2008 12:05 pm Post subject: |
|
|
| Nashou66 wrote: | | Arno P wrote: | Very clear, thanks!
Have to get these 90deg allen keys..
By the way, why did you remove the green C from that bellow (replacing it with the new Red? hope not)? |
Thanks Arno, I got a set of LC housings from Speedyandre from his toasted Vision One, I am putting in those Hybrid
9 inch tube's with Sony pinouts. I did the neck board Mod but have not been able to test it fully with out an LC housing.
Once i let the Silicone around the tube cure i am going to screw in the bellow add as much glycol through the C-element hole then button it up and fill the rest through the bleed holes. And then test the modded neck board and Hybrid tube .
I hope they work or i'll have to remove it all over again!! I Wish I knew exactly what they used to fill around the tube
after you first adhere it to the tube face plate with RTV, I just used regular grey silicon.
Athanasios |
Just did the blue tube....without destroying the bellow
For the silicon....it looks that they used black silicone...I used transparant (fingers crossed)
_________________
"Obviously you're not a golfer"
|
|
| Back to top |
|
|
Nashou66
Joined: 12 Jan 2007
Posts: 16171
Location: West Seneca NY
|
| Posted: Sun Oct 05, 2008 12:15 pm Post subject: |
|
|
I also painted the face plate with Black Krylon ultra flat paint, I tested an area with a puddle of the Glycol on it for over 24 hours and it didnt soften so I hope it holds up, the face plates i got had the coating gone in a few a large area exposing the shiny aluminum. so I figured flat black might also help in reflections.
Once its all put together and I test it out for about 24 hours of running I'll report back, probably in a week or two.
Arno, Did you use this new procedure?
Athanasios
_________________
Don't blame your underwear for your crooked ass~ unknown Greek philosopher
"Republicans believe every day is the Fourth of July, but the Democrats believe every day is April 15." --- President Reagan
One Smart Dog!!!
Marquee High Performance Bellows now shipping!!
Marquee Modifications and Performance Enhancement
Marquee C-element and Bellow removal
|
|
| Back to top |
|
|
Arno P
Joined: 01 Jan 2007
Posts: 282
Location: The Netherlands
|
| Posted: Sun Oct 05, 2008 1:17 pm Post subject: |
|
|
| Nashou66 wrote: | I also painted the face plate with Black Krylon ultra flat paint, I tested an area with a puddle of the Glycol on it for over 24 hours and it didnt soften so I hope it holds up, the face plates i got had the coating gone in a few a large area exposing the shiny aluminum. so I figured flat black might also help in reflections.
Once its all put together and I test it out for about 24 hours of running I'll report back, probably in a week or two.
Arno, Did you use this new procedure?
Athanasios |
I thought of painting it black...but too chicken to do so....don't want to open the tubes anymore after this one
Indeed I used your procedure....and if it's up to me...it's released as an official document 
_________________
"Obviously you're not a golfer"
|
|
| Back to top |
|
|
Arno P
Joined: 01 Jan 2007
Posts: 282
Location: The Netherlands
|
| Posted: Sat Oct 11, 2008 2:49 pm Post subject: |
|
|
Be sure to clean the fill-hole screws...otherwise some rust might appear in the glycol....or you'll be trying to suck it back out again like I did with the first tube 
_________________
"Obviously you're not a golfer"
|
|
| Back to top |
|
|
Arno P
Joined: 01 Jan 2007
Posts: 282
Location: The Netherlands
|
| Posted: Sat Oct 11, 2008 2:50 pm Post subject: |
|
|
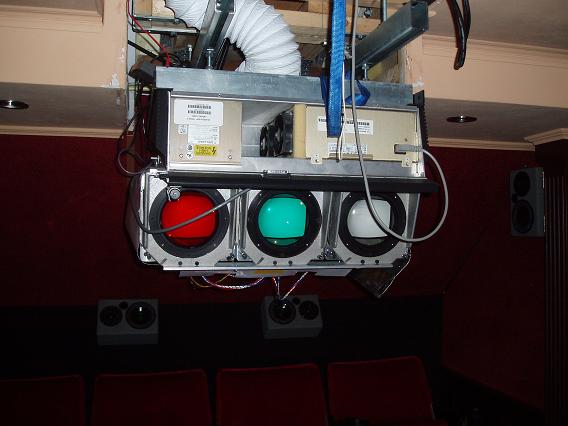
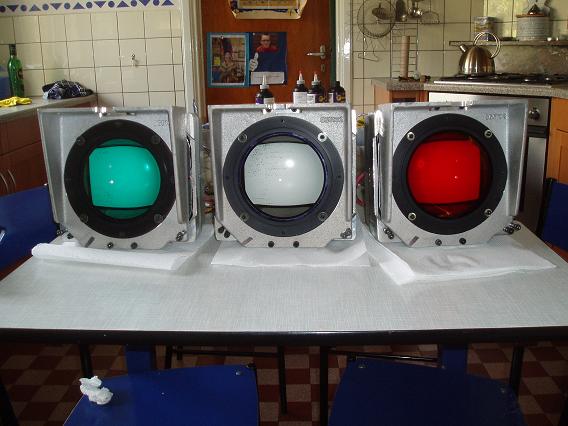
BUT.....everything was worth the effort :
| Description: |
|
| Filesize: |
42.06 KB |
| Viewed: |
9389 Time(s) |
|
| Description: |
|
| Filesize: |
49.44 KB |
| Viewed: |
9389 Time(s) |
|
_________________
"Obviously you're not a golfer"
|
|
| Back to top |
|
|
draganm

Joined: 08 Mar 2006
Posts: 8990
Location: Colorado
|
| Posted: Sat Oct 11, 2008 5:13 pm Post subject: |
|
|
|
nice set-up Arno, I hope to hang mine sometime this winter
|
|
| Back to top |
|
|
PaulB
Joined: 26 Oct 2007
Posts: 359
Location: Bonnie (but rainy) Scotland
|
| Posted: Sun Oct 12, 2008 11:42 am Post subject: |
|
|
Some fantastic new ideas here guys, really superb stuff
_________________
Paul
|
|
| Back to top |
|
|
|
|


