|
As this forum is rarely used anymore, we've locked it. Feel free to browse and read. Questions? Please reach out to us directly. Cheers! |

|
 |
|
|
| Author |
Message |
scroll1
Joined: 11 Apr 2007
Posts: 8
|
| Posted: Tue Aug 12, 2008 10:18 pm Post subject: Sony 1271QM setup |
|
|
Hello,
I have been watching the brilliant "Step by Step" DVD from Graham Johnson, and I have been inspired to finally setup my 1271 correctly after owning it for several years.
I have a 2.35:1 screen (2873mm wide) and a ceiling mounted 1271QM and feeding it with a Lumagen processor.
Because of the unique aspect ratio of the screen, I am going to try and setup a fixed height for all aspect ratios and use black masking to shrink the width of the screen.
I'll try to only ask one or two questions per post (but there are many questions arising at each step).
I have gone to great lengths to line up the projector exactly parallel to the screen, measuring and re-measuring corners of the screen to corners of the PJ, however when I line up the raster on the dead centre of the tube face, it projects the "size" cross hair onto the screen off-centre by about 10cm. I would have assumed that with a perfectly positioned PJ and a raster centered on the tube would give me a centered cross-hair on the screen....
In centering and maximising the raster on each tube face, I find that I need to adjust keystoning as well to get a nice square image. Am I correct to assume that I can make as many electronic adjustments as necessary in order to get a nice full raster on the tube.?
Also I am unsure about get the size right for the raster, do I need to set it up as an exact square (with equal sides) or a perfectly measured 4:3 size?
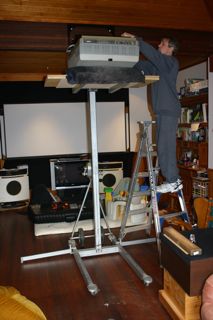
thanks for any help, I unfortunately have many more questions...I have included some pics of the 1271 going up to the unique ceiling mount...
Wayne
| Description: |
|
| Filesize: |
17.32 KB |
| Viewed: |
6733 Time(s) |
|
|
|
| Back to top |
|
 |
imprez25
Joined: 01 May 2007
Posts: 70
|
| Posted: Wed Aug 13, 2008 8:37 pm Post subject: Re: Sony 1271QM setup |
|
|
| scroll1 wrote: | Hello,
I have been watching the brilliant "Step by Step" DVD from Graham Johnson, and I have been inspired to finally setup my 1271 correctly after owning it for several years.
I have a 2.35:1 screen (2873mm wide) and a ceiling mounted 1271QM and feeding it with a Lumagen processor.
Because of the unique aspect ratio of the screen, I am going to try and setup a fixed height for all aspect ratios and use black masking to shrink the width of the screen.
I'll try to only ask one or two questions per post (but there are many questions arising at each step).
I have gone to great lengths to line up the projector exactly parallel to the screen, measuring and re-measuring corners of the screen to corners of the PJ, however when I line up the raster on the dead centre of the tube face, it projects the "size" cross hair onto the screen off-centre by about 10cm. I would have assumed that with a perfectly positioned PJ and a raster centered on the tube would give me a centered cross-hair on the screen.... |
I know the internal test paterns are not centered in the rasters. In order to get them perfect in relation to your source you should use an external test patern played at the highest res you plan on running.
| Quote: |
In centering and maximising the raster on each tube face, I find that I need to adjust keystoning as well to get a nice square image. Am I correct to assume that I can make as many electronic adjustments as necessary in order to get a nice full raster on the tube.? |
On the 12xx projectors there are few mechanical adjustments from the factory. So you are limited to mainly electronic adjustments. There are, however, mods that will allow you to perform a more precise mechanical setup, thus limiting electronic adjustments. Search for mooneysass.
Based on your mounting method there will be keystone adjsutments to compensate for the tilt of the projector. A perfectly squared projector centered on the horizantal and vertical planes of the screen would require zero keystone, but that usually is a difficlut place to such a large projector. 
| Quote: | | Also I am unsure about get the size right for the raster, do I need to set it up as an exact square (with equal sides) or a perfectly measured 4:3 size? |
The raster should be set based on your screen dimentions (4:3, 16:9, or 2.35:1, Though 2.35:1 might be hard to squeez down on the 12xx projectors).
| Quote: | thanks for any help, I unfortunately have many more questions...I have included some pics of the 1271 going up to the unique ceiling mount...
Wayne |
|
|
| Back to top |
|
|
scroll1
Joined: 11 Apr 2007
Posts: 8
|
| Posted: Wed Aug 13, 2008 10:53 pm Post subject: |
|
|
thank you imprez25 for the reply,
I will not rely on the internal patterns now, although, on the green tube face (when I look into the lens) it appears to be centered. The green tube is all I'm working with at the moment, because I assumed it would be set at the factory at right angles to the frame and would require no toe-in or re-alignment...is this a wrong assumption?
I understand that I will require to do some keystone adjustments on the screen, I was referring to setting up the raster on the phosphor, I needed to add some keystone adjustments, mainly horizontal to get a nice square raster on the tube face...is that normal?
Thank you for answering the raster size in relation to the screen, I will now need to set my raster to a 2.35:1 ratio on the tube face. I had thought that perhaps the video signal could be resized from the Lumagen processor irrespective of what size raster I had set up...
I can't recall that Graham answered the 16:9 final setup on the DVD setup guide, and I can't seem to find any information other than the general "maximise the raster on the phosphor" statement. I guess I would have been better off with a 16:9 screen, but this one was given to me for free...it was going to be scrapped...
I have read about the mods for my projector and I have added extra shims on the red and blue tubes to give me fairly accurate mechanical toe-in.
cheers,
Wayne
|
|
| Back to top |
|
|
imprez25
Joined: 01 May 2007
Posts: 70
|
| Posted: Thu Aug 14, 2008 12:26 am Post subject: |
|
|
|
centering on green is correct. Focus on getting it perfect and the move the red and blue to it. Any more pics of your mounting system?
|
|
| Back to top |
|
|
jkruger

Joined: 24 Oct 2007
Posts: 2435
Location: Carlsbad, CA
|
| Posted: Thu Aug 14, 2008 12:38 am Post subject: |
|
|
Pull the lenses and do this with the brightness turned down enough so you don't hurt your eyes:
Reset the electronics to the factory zero settings and then square up the raster on green as wide as you can without going off the tube face with the internal pattern. Then use an external setup pattern at your max resolution to set the final width to within 1/8" - 1/4" of the sides of the tube face. Set the raster height as big as it will get and still be close to 4:3. Then do the same with red and blue. Only after you do this will you be sure you are using all of the available area for the best picture. If you have visible wear or text burn on the tube you may need to change the raster size or location to get a good image. If you have done the spring mod to the tube spacers you will find that you can mechanically converge the red and blue to match the green with very little electronic adjustment and that means less work for the projector to do and longer life for all the components!
That should keep you busy for a while.... 
|
|
| Back to top |
|
|
scroll1
Joined: 11 Apr 2007
Posts: 8
|
| Posted: Thu Aug 14, 2008 5:52 am Post subject: |
|
|
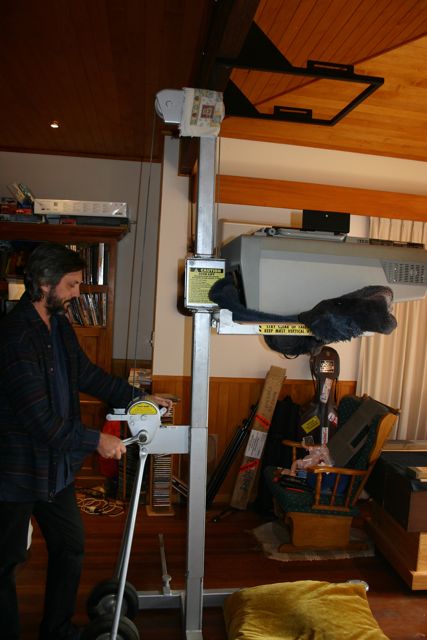
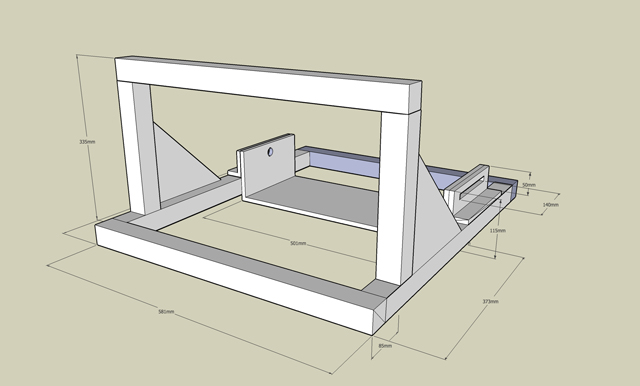
Thanks for the replies. I have added some more shots of the projector going up and the mount design that I had to come up with for our ceiling type....
I still can't quite understand why my mechanical measurement of the PJ to the screen which I have re-checked many times now, places the PJ parallel and dead centre to the screen. But when I turn on the green tube (with centered rasters) the image is a good 10cm off to the left.
Do I just reposition the screen, knowing that the tape measurements are going to be off?
| Description: |
|
| Filesize: |
44.4 KB |
| Viewed: |
6679 Time(s) |
|
| Description: |
|
| Filesize: |
78.65 KB |
| Viewed: |
6679 Time(s) |
|
|
|
| Back to top |
|
|
jkruger
Joined: 24 Oct 2007
Posts: 2435
Location: Carlsbad, CA
|
| Posted: Thu Aug 14, 2008 1:25 pm Post subject: |
|
|
|
IIRC, the internal patterns on the 12xx are not exactly centered in the raster. Ignore the internal pattern alignment and make sure the external test pattern is centered.
|
|
| Back to top |
|
|
scroll1
Joined: 11 Apr 2007
Posts: 8
|
| Posted: Fri Aug 15, 2008 9:18 am Post subject: |
|
|
ok,
the centered rasters and centered video input, show the same results...the projector may be parallel to the screen, but it is not centre!! ...even though the measurements from corners to screen reveal that it should be squared up. Time to move the screen, at least I have enough wall space.

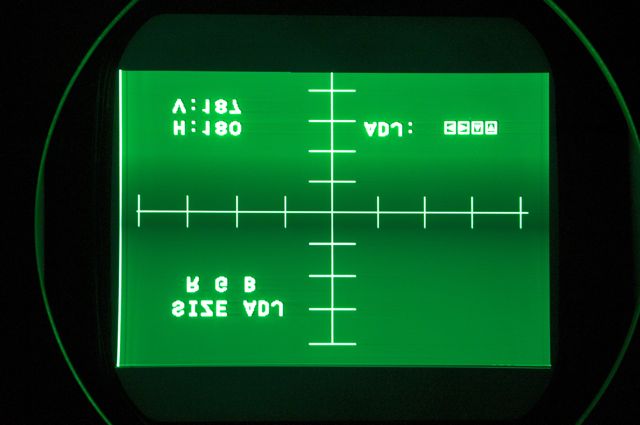
At least I'm getting a full raster size without reaching max settings:
| Description: |
|
| Filesize: |
26.45 KB |
| Viewed: |
6633 Time(s) |
|
|
|
| Back to top |
|
|
imprez25
Joined: 01 May 2007
Posts: 70
|
| Posted: Fri Aug 15, 2008 12:58 pm Post subject: |
|
|
|
you need to use an external video source to center the image on the screen. I beleive you have to hold down the test button for 5 seconds or so to get the image to switch from the internal paterns to the external source. If the projector is centered to the screen don't move it. YOu will be chasing your focus for ever and you will never be able to get it right.
|
|
| Back to top |
|
|
ecrabb
Forum Moderator

Joined: 13 Mar 2006
Posts: 15909
Location: Utah
TV/Projector: JVC RS40, Epson 5010
|
| Posted: Fri Aug 15, 2008 8:02 pm Post subject: |
|
|
If the test pattern is truly centered on the tube face, the source (whether internal or external) is irrelevant. There's no reason at physical install stage, you need to use any external source.
Wayne... If you've only measured to the corners and haven't done any right-angle (orthogonal) projection, the projector could absolutely be out of square AND not centered, but the measurements to the corners could still be equal. You MUST find the orthogonal projection from the screen - just measuring corners won't find that. Otherwise, you'll have both horizontal keystone as well as horizontal focus issues.
Do you or a friend have a laser level you could use? By far the most accurate method to ensure the projector is nice and square to the screen is this:
Find the center of the screen and translate that to the ceiling at the wall/ceiling intersection point (use a spirit level or the laser level). Then, using a tape measure and the 3/4/5 method (or a little basic trig) and a mechanical pencil (you can use painter's tape if you don't want to make marks on the ceiling), find a point on the ceiling - say 8' from the screen. On the screen you have screen center marked at top and bottom (and center, too - you'll need to do geometry, anyway). Then, set up a laser level on a tripod close to the projector, but well in front of it, a meter or 1.5 off the floor. In "plumb" mode (vertical orientation), you can then strike a laser line right up screen-center, across the ceiling, and across the projector chassis. That will then be the perfectly orthogonal projection. If the projector is mounted square and centered, the laser line will strike right through the center of the green lens (or tube face), right across the center of the chassis, and will land right between two metal tabs on the remote IR sensor at the back of the chassis. Any error in mounting of more than a few mm will be immediately obvious, as will <1 degree of rotation.
I have my projector square and centered down to within a few millimeters using that method. At that point, any pattern, regardless of external or internal, will be on the center of the screen if it's on the center of the tube face - period. The number (whether 115, 127, or 140) becomes irrelevant.
SC
|
|
| Back to top |
|
|
VideoGrabber
Joined: 09 Apr 2006
Posts: 933
Location: Michigan
|
| Posted: Sun Oct 19, 2008 8:13 am Post subject: |
|
|
Wayne wrote:
> the centered rasters and centered video input, show the same results...the projector may be parallel to the screen, but it is not centre!! <
Looking at your picture, you may also want to note that while you have the raster squared up center on your tube face, that the internal "centering" pattern quite obviously is NOT in the center of the tube face. I see 4 major divisions left and right of the center-line. But there's significantly more extra space on the right side than the left (10 more pixels, in my gfx program, where the total pattern portion width is 382 wide). Of course the projected image will be off-center on-screen. Although I doubt the full 10cm deviation you're seeing will be explained.
If you mark the physical centerline on your CRT face (say with a thread), then ANY pattern, internal or external, can be aligned to that point. Only after doing that should you come to any conclusions about how far off center your on-screen image is.
_________________
- Tim
|
|
| Back to top |
|
|
|
|
|
|
|
You cannot post new topics in this forum
You cannot reply to topics in this forum
You cannot edit your posts in this forum
You cannot delete your posts in this forum
You cannot vote in polls in this forum
You cannot attach files in this forum
You can download files in this forum
|
Forum powered by phpBB © phpBB Group
|
|


