| Author |
Message |
Thor

Joined: 09 May 2007
Posts: 75
Location: Denmark
|
| Posted: Thu May 01, 2008 9:50 pm Post subject: About to go nuts! (9500LC U) |
|
|
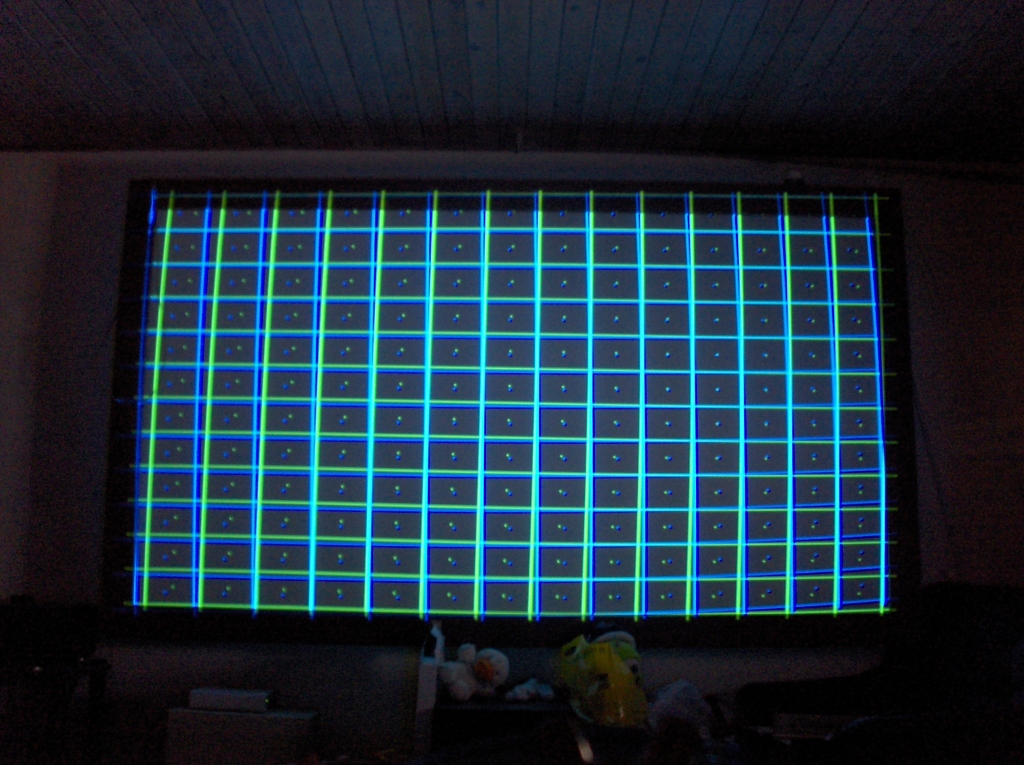
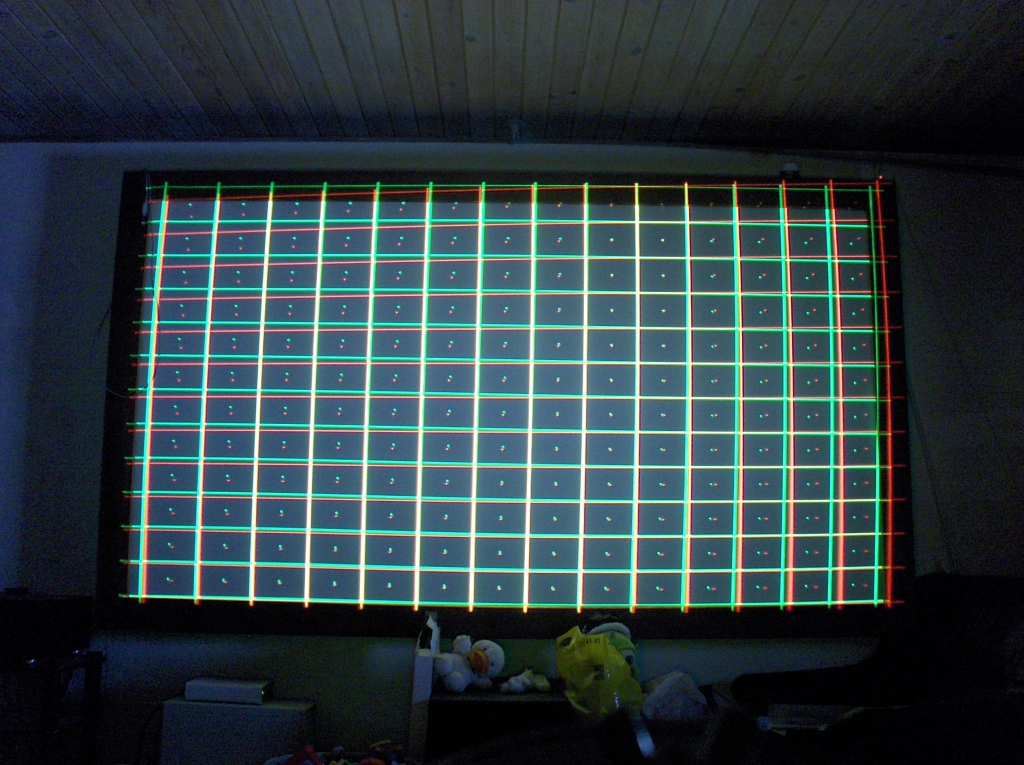
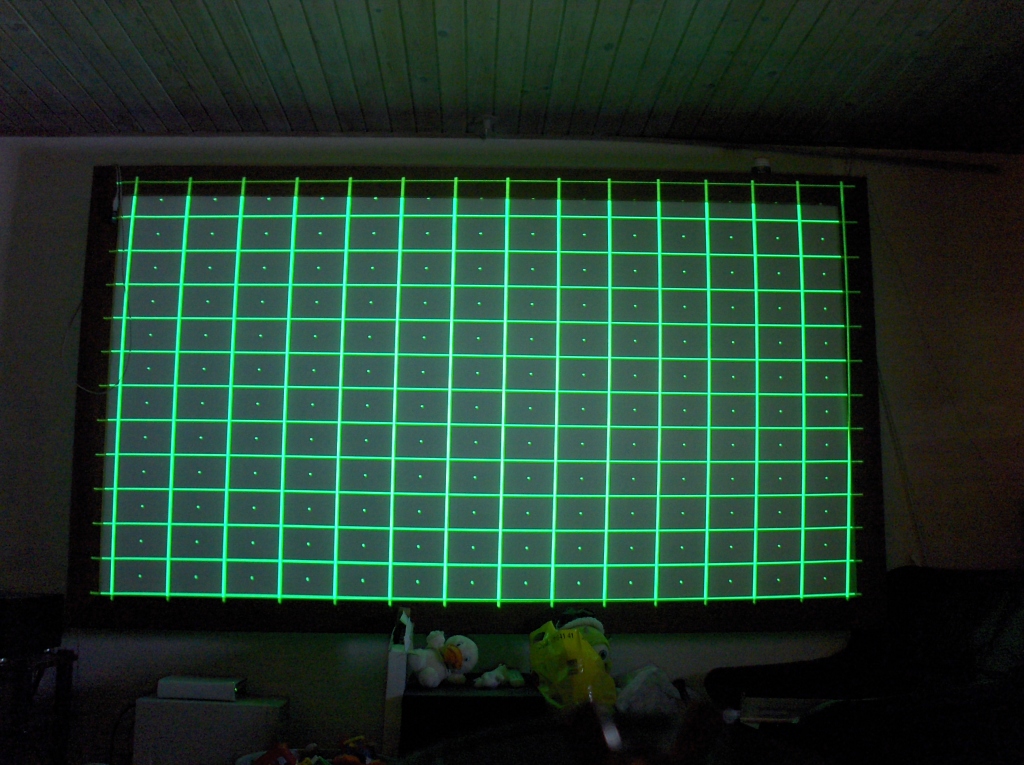
Hi Guys,
I'm playing around with my new 9500LC Ultra, and wanted to see the image quality on this beast, although it's not going up on my HT room ceiling before in a couple of months.
So I have placed in on a table and done mechanical setup on it, and done a coarse green geometry on it, so that's fine. But the red and blue crosshatch look like crap on green, and even though I can set it right by the convergence, I feel I have to push it too far to do it.
Especially the red looks funny, I have never had these problems on my Barcos. Do I have to get my hands on the scan yokes or any thing else dangerous?
When I turn down the contrast and look directly into the lenses, they all line up beautifully, and looks very much the same, but not on the screen?
Any ideas?
| Description: |
|
| Filesize: |
416.18 KB |
| Viewed: |
11782 Time(s) |
|
| Description: |
|
| Filesize: |
465.23 KB |
| Viewed: |
11782 Time(s) |
|
| Description: |
|
| Filesize: |
394.43 KB |
| Viewed: |
11782 Time(s) |
|
|
|
| Back to top |
|
 |
Person99
Joined: 09 Mar 2006
Posts: 4899
Location: Flower Mound, TX
|
| Posted: Thu May 01, 2008 10:05 pm Post subject: |
|
|
Red and blue deflection coils need to be tweaked.
_________________
Dave
A train station is where the train stops. A bus station is where the bus stops. On my desk, I have a work station....
|
|
| Back to top |
|
|
ecrabb
Forum Moderator

Joined: 13 Mar 2006
Posts: 15909
Location: Utah
TV/Projector: JVC RS40, Epson 5010
|
| Posted: Thu May 01, 2008 10:07 pm Post subject: |
|
|
Welcome to the world of LC and stepless Schempflug! It's a lot more complicated than an AC machine. I assume the Barcos you came from were AC.
Assuming your mechanical alignment is right on, that's about what a beginning mechanical setup should look like. The blue and green will always have a bunch of distortion and lack of horizontal focus the green won't have. Looks like you need to level the deflection yokes and then work on scheimpflug. Red looks way out, and I can't tell on blue. Once you have both of those done, then you can start working on geometry. You also need to make sure you've centered both rasters on the tube face.
Did you use string on the screen to find vertical and horizontal? Find the centers of your screen frame and tape a piece of string right on the screen between the centers. That will give you a nice level horizontal reference to align the rasters and also show you exactly where screen center is. If you're not comfortable getting inside and adjusting deflection yokes, I'd highly recommend you pick up Graham's setup DVD - it goes through everything from mechanical alignment, to optical focus and scheimpflug (flapping), to yoke adjustment and electromagnetic focus. It's worth every penny.
I'm not an ehome guy, and you probably already know this, but make sure you remove all zone adjustments before you start trying to do geometry.
It's a very iterative process to set the more complicated machines up. You have to go in circles a few times to optimize each adjustment.
SC
|
|
| Back to top |
|
|
Nashou66

Joined: 12 Jan 2007
Posts: 16171
Location: West Seneca NY
|
| Posted: Thu May 01, 2008 10:49 pm Post subject: |
|
|
First you should do a re initialization of the set. now look into the lenses before you do any convergence , if the grids are not fairly straight on all tubes then you will need to align them by adjusting the focus coil and or the scan yoke. Once the grid is level to the horizon use the internal mechanical set up guide for a rough set up. then tweek your heart out cause marquees love it!
Athanasios
_________________
Don't blame your underwear for your crooked ass~ unknown Greek philosopher
"Republicans believe every day is the Fourth of July, but the Democrats believe every day is April 15." --- President Reagan
One Smart Dog!!!
Marquee High Performance Bellows now shipping!!
Marquee Modifications and Performance Enhancement
Marquee C-element and Bellow removal
|
|
| Back to top |
|
|
stefuel

Joined: 07 Mar 2006
Posts: 3353
Location: Green Harbor MA USA
|
| Posted: Thu May 01, 2008 11:08 pm Post subject: |
|
|
Someone just tell him how to get into the convergence menu and follow the on screen instructions 
_________________
Chip
A Barco is only a AmPro with training wheels
Card carrying member of the AVS chain gang.
|
|
| Back to top |
|
|
Curt Palme
CRT Tech
Joined: 08 Mar 2006
Posts: 24396
Location: Langley, BC
TV/Projector: All of them!
|
| Posted: Fri May 02, 2008 1:09 am Post subject: |
|
|
No, what you need to do assuming that you did start from scratch is use the interpolated geometry and convergence menus. Start with the green, and the interpolated geometry menu is in the 'service' menu in the convergence menu at the bottom. Password is 0901.
Go through it twice so you get the gist of what you're doing with it, get the geometry close to perfect, then do the same in the convergence menu for the R and B tubes.
|
|
| Back to top |
|
|
stefuel
Joined: 07 Mar 2006
Posts: 3353
Location: Green Harbor MA USA
|
| Posted: Fri May 02, 2008 1:22 am Post subject: |
|
|
Thank you Curt. I think that's what I was trying to say. I just couldn't remember tha E-home terminology. I mean wadda you expect. I'm just a dumb-ass AmPro guy. 
_________________
Chip
A Barco is only a AmPro with training wheels
Card carrying member of the AVS chain gang.
|
|
| Back to top |
|
|
Gino

Joined: 22 Apr 2006
Posts: 1363
Location: Trinity Beach, AUSTRALIA
|
| Posted: Fri May 02, 2008 4:09 am Post subject: |
|
|
Before you do what Curt says, be sure to level your scan yokes and to also adjust your horizontal size width slugs on the HDM first, especially on red (your vertical sizes look just about right but adjustment for this is done in the service menu). This way when you do interpolated then guided convergence, the circuits will not be driven so hard.
_________________
( B ) ( G ) ( R ) Blendzilla Down Under ( R ) ( G ) ( B ) - Tubes of Fury
|
|
| Back to top |
|
|
Thor
Joined: 09 May 2007
Posts: 75
Location: Denmark
|
| Posted: Fri May 02, 2008 6:32 am Post subject: |
|
|
Thanks,
Yes I come from AC Barcos, so this is new to me.
I do in fact have Grahams DVD, and that's what freaked me out, he didn't have to do much tweaking to align the rasters over each other on the 1292  He just did lens toe, and just played with the deflections yoke, to show us how it worked?? He just did lens toe, and just played with the deflections yoke, to show us how it worked??
The first thing I did to the projector was to reset it and delete all memory in it, so it should be from scratch.
What I don't like is the trapezoid image I get from red, where the blue is more square on the screen.
I spend a lot of time making sure that the raster is centered on each screen, and that the vertical hight is the same. And as said, the size and lines match each other, looking through the lenses.
Are the deflection yokes only attach with glue, and no screws, so I have to glue it back on when done? (this part scares me a little  ) )
The green horizontal line is straight on the screen, I made that sure on "mechanical guide setup", by measuring the distance from screen bottom to the center line. And the whole projector is square to the screen.
I tried working the scheimpflug on red lens, but it didn't do anything to the geometry of red, just the focus.
The interpolated convergence, is that a kind of geometry setting also? Is it okay to have to tweak interpolated, some more that you would on normal convergence?
I don't know if this is normal, but when I reset the PJ, the red and blue electronic focus went bad. The green stayed focused fine on "50", but R and B did I have to turn down to about "21" and "30", to focus again?
Sorry for all the questions, but I just need to understand what I'm working with here. Or would somebody swap this for something I know, say a Cine9?
|
|
| Back to top |
|
|
fireanimal
Joined: 17 Jul 2007
Posts: 231
Location: Stayner, ON
|
| Posted: Fri May 02, 2008 11:15 am Post subject: |
|
|
Here is a good guide to follow for an entire setup.
| Description: |
|

Download |
| Filename: |
Marquee Setup.pdf |
| Filesize: |
27.82 KB |
| Downloaded: |
438 Time(s) |
|
|
| Back to top |
|
|
stefuel
Joined: 07 Mar 2006
Posts: 3353
Location: Green Harbor MA USA
|
| Posted: Fri May 02, 2008 11:40 am Post subject: |
|
|
I wouldn't get too fussy with it until it's hanging in it's final configuration. For now, he said he just wanted to see how it looks. A bunch of time spent doing stig, flare and yoke adjustments will have to be done all over again when he hangs it and starts from scratch again.
_________________
Chip
A Barco is only a AmPro with training wheels
Card carrying member of the AVS chain gang.
|
|
| Back to top |
|
|
fireanimal
Joined: 17 Jul 2007
Posts: 231
Location: Stayner, ON
|
| Posted: Fri May 02, 2008 11:45 am Post subject: |
|
|
Practice makes perfect, the more he does it now, that better it will be when it is hanging from the ceiling
_________________
My Movie Collection
|
|
| Back to top |
|
|
Nashou66
Joined: 12 Jan 2007
Posts: 16171
Location: West Seneca NY
|
|
| Back to top |
|
|
draganm

Joined: 08 Mar 2006
Posts: 8990
Location: Colorado
|
| Posted: Fri May 02, 2008 4:07 pm Post subject: |
|
|
| Gino wrote: | | Before you do what Curt says, be sure to level your scan yokes and to also adjust your horizontal size width slugs on the HDM first, especially on red (your vertical sizes look just about right but adjustment for this is done in the service menu). This way when you do interpolated then guided convergence, the circuits will not be driven so hard. |
bingo, I was just about to suggest the same thing when i read Gino's post. You need a plastic 2.5mm hex tool to adjust these. You might need a little yoke adjustment but more or less Everything else looks normal for a Marquee. They were designed to use the convergence circuit for a lot more raster correction than other models.
|
|
| Back to top |
|
|
Thor
Joined: 09 May 2007
Posts: 75
Location: Denmark
|
| Posted: Fri May 09, 2008 6:21 am Post subject: |
|
|
|
I pulled the sides of the PJ and took a look at the bellows. They all have a little moisture on them, like condense, is this normal?
|
|
| Back to top |
|
|
PaulB
Joined: 26 Oct 2007
Posts: 359
Location: Bonnie (but rainy) Scotland
|
| Posted: Fri May 09, 2008 6:38 am Post subject: |
|
|
| Thor wrote: | | I pulled the sides of the PJ and took a look at the bellows. They all have a little moisture on them, like condense, is this normal? |
Yes, pretty much normal. Wipe them clean with a cloth and some Isopropyl Alcohol. Check for any leaks though.
Also, make sure that the bellows are soft to touch. If they feel hard then there may be too much glycol in them in which case follow the instructions here https://www.curtpalme.com/forum_archived/viewtopic.php@t=6522.html
Paul
|
|
| Back to top |
|
|
Thor
Joined: 09 May 2007
Posts: 75
Location: Denmark
|
| Posted: Fri May 09, 2008 7:27 am Post subject: |
|
|
Thanks Paul,
Okay, then I can relax again. I spend a half an hour yesterday to look for leaks, when I saw this moisture, but no sign of any leaks anywhere.
I was planning to vent it anyhow, when I get it ceiling mounted later.
|
|
| Back to top |
|
|
Thor
Joined: 09 May 2007
Posts: 75
Location: Denmark
|
| Posted: Tue Nov 11, 2008 7:53 am Post subject: |
|
|
Hi,
Well, it's finally hanging on the HT room ceiling now, and I got my screen up hanging yesterday too, so it was time to see how it worked.
I have since the first posts here pulled the PJ apart and cleaned all, changed glycol on all three, got a red C-element and changed out the regular HD-10's with GT-17.
But! I now have a problem with green geometry. The right side of the image is fine and I can adjust it with the normal keystone, pin and so on. But the left side is screwed up, no matter how much I use the normal control I can get it to be right. I can get it better by using excessive amount of skew, but it still looks wrong?
The PJ is 100% aligned with the screen, and all mechanical setup is done. I have tilted the back of the the PJ about 4 millimeters up to get the image a little down, but that shouldn't affect the image this way?
I did not have this problem with the first "floor" setup.
I'm on work now, so I will post some pictures when I get home, then it's easier for you to get the idea.
|
|
| Back to top |
|
|
Chuchuf
Joined: 11 Mar 2006
Posts: 548
|
| Posted: Tue Nov 11, 2008 12:52 pm Post subject: |
|
|
Once you have the right side adjusted using the geometry controls, go into convergence, service, 0901, Green Random, and use that to adjust out the lest side.
Terry
|
|
| Back to top |
|
|
Thor
Joined: 09 May 2007
Posts: 75
Location: Denmark
|
| Posted: Tue Nov 11, 2008 1:00 pm Post subject: |
|
|
| Chuchuf wrote: | Once you have the right side adjusted using the geometry controls, go into convergence, service, 0901, Green Random, and use that to adjust out the lest side.
Terry |
Hi Terry,
Is this a normal procedure for a Marquee?
|
|
| Back to top |
|
|
|
|


