CurtPalme.com Home Theater sales, calibration, service, and discussion forum. Hundreds of free manuals & setup tips.


Sign up and receive the latest newsletters by email!     Join the Forum discussions!    
    Site Map  
Home Products
For Sale
Referral
List
Photo
Gallery
Links Contact
Us
CRT Primer
Troubleshooting Tips
Mounting Methods
Definitive CRT
Projector Setup Guide
Tube/Raster Setup
Advanced Procedures
Projector
Specifications
Projector Rankings
Video Processors
Ampro 1500/2000
Ampro 2300/2600
Ampro 3600/4600
Barco (Older Analog)
Barco 70x/Cine7  
Barco 500/800/801
Barco 808/Cine8
Barco 120x/Cine9
Dwin 500/700
Electrohome ECP 
Electrohome Marquee 
Mitsubishi
NEC PG
NEC XG
Panasonic 108x
Runco
Seleco
Sony 10xx
Sony 125x/127x
Sony 1292
Sony D50
Sony G70
Sony G90
Zenith 841/851
Zenith 895/900
Zenith 1200


Tube Condition (Wear)

      >> Basic Information  
      >> What Uneven Tube Wear Looks Like On-Screen  
      >> Example of a Poorly Installed Set 
      >> Tube Wear Rating Chart  


Example of a Poorly Installed Set


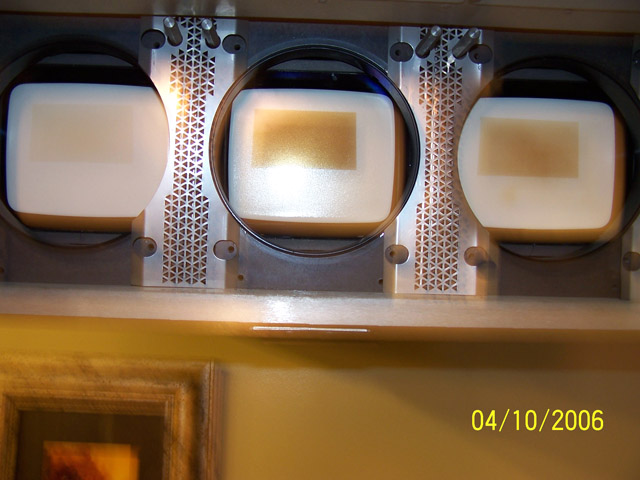
Without trying to make fun of one of my customers, here’s what can happen when you install a CRT projector about 20% too far back from the recommended screen distance. You get insanely premature tube wear as shown below. The raster was not centered, the image is far too high on the tube face which can cause convergence instability over time, and the wear shown should happen towards the end of the tube life, not two years after the set was installed.

Remember to read the throw distance charts in the manuals, most of them are darn accurate!

While following the manual for throw distance is always a good bet (and recommended for new users), to maximize tube life even further do the following steps:

  • Put the projector on the cart or simply leave it on the floor so that you can move it.
  • Display something that fills the screen entirely (like a grid test pattern).
  • Using only the green (middle) tube, look into the tube and increase the image width on the tube face until it is around 1/8" to 1/4" from the edge of the white phosphor. Under no circumstances should you allow the image to go off of the white phosphor surface!
  • Move the projector back and forth until the image fits your screen.
  • THAT is the correct throw distance for optimal phosphor usage.

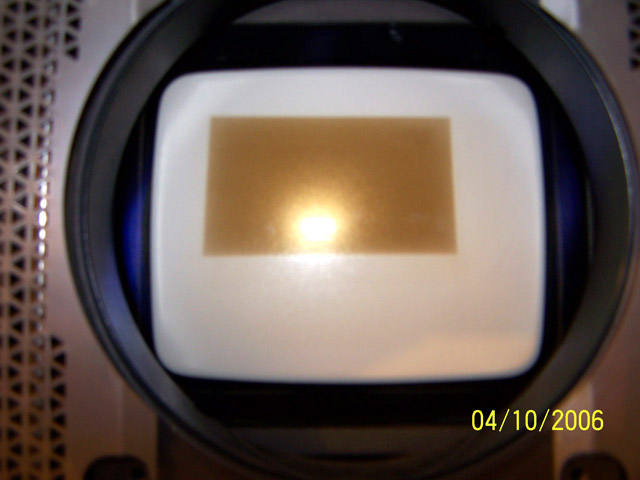
It'll usually be 5-8% closer than what the manual tell you because the manual throw instructions are conservative since they make you install blindly without even looking in the tubes at all.

Here's an example of correctly optimized phosphor usage (see below).  Notice how the grid is very close (but not over) the edge of the phosphor.

Note: It is recommended to use an external grid/test pattern from your actual source device for this (and not the internal one shown in the picture above) as the image width may vary between the two.  When first setting up your projector for various devices and resolutions, always take a peek into the tubes to make sure your image is not going off the edge of the white phosphor.

Did you find this information useful? Please consider making a donation to help defray the cost of managing and hosting future articles, tips, and documents.     
Or purchase from Amazon.com and a small percentage automatically goes to support this site at no extra cost to you! Visit their Blu-ray and 4K UHD stores for sales. Want to show off your home theater? See our Blu-ray Release List & Must-Have Titles. Shop at Amazon.com and support our site!


Next Page (Tube Wear Rating Chart)


© Copyright CurtPalme.com. All Rights Reserved.